Showing posts with label how-to. Show all posts
Tuesday, May 26, 2015
Tea For One
Well, in all my moanings and wallowing lately I totally forgot to tell ya'll about my latest adventures in tea making!! So, I finally got the nerve up to actually pick the tea and attempt to process it. I have 3 bushes that survived out of six. I originally bought 3 white blooming camellias and 3 red or pink blooming. The pinks died. They apparently did not like it here. The whites are doing pretty good though.
Now, when it's time to pick, which is generally in the spring, you pick the last 2 leaves and the bud on the tip of the new growth at the end of the limb. It's very easy to determine new growth because the stems and leaves are a very bright green. This is the "first flush". Supposedly there is a "second flush" sometime in the summer but I'm not sure about all that.
My shrubs are still kinda small so yeah, I didn't have a huge haul of leaves but that's okay. I just wanted to have enough to process for a cup or two to see if I could even do it. So, the first step is to wilt the fresh picked leaves in the sun. I'm not sure how long this normally takes but I let mine sit for maybe a couple of hours. Then you take the leaves between your hands and roll them so that you are crushing the leaves and releasing the juices. Then you put the rolled leaves, still in a single layer, in a cool, dark area for a number of hours for the leaves to oxidize. In this process they turn a bronzish color. I think I left mine over night.

Then you take the leaves and spread them in a single layer on a baking sheet and put them in a warm oven (about 250F) for about 15 minutes. This is supposed to turn the leaves a dark black. As you can see, some of mine did and some of them still stayed the bronzy color. I turned the oven up and let them stay in for longer (about 30 minutes) but they never got any darker. I think my mistake was that I did not roll the leaves hard enough or maybe wilt them long enough either. At any rate, they did look very much like loose, gourmet tea that you buy so I was happy that it seemed close.
Finally, I brewed one cup using about 1 1/2 teaspoons of the leaves. I was hoping for a dark breakfast type tea but that didn't happen. However, I did get a nice, bright and pretty tasty green tea! So, it wasn't all bad, I just need to do a bit more experimenting and research on how to get that dark, black tea flavor. I really think crushing the leaves more is the key. And maybe drying at a slightly higher temp.
It's pretty cool though, because you can get three types of tea from the same leaves just depending on how they are processed; either white, green or black! And, in doing some more research, I also discovered that there are actually small tea plantations in Fairhope, Mobile and Andalusia, Alabama! There's a big one in Charleston I think, or somewhere up there. lol!
So, I think it was successful to a certain extent and I definitely learned a good bit from it. And proved to myself and a number of other folks that you can grow tea in the United States! If you can grow camellias where you live, you can grow tea!
Thursday, April 23, 2015
Diamonds Are A Girl's Best Friend
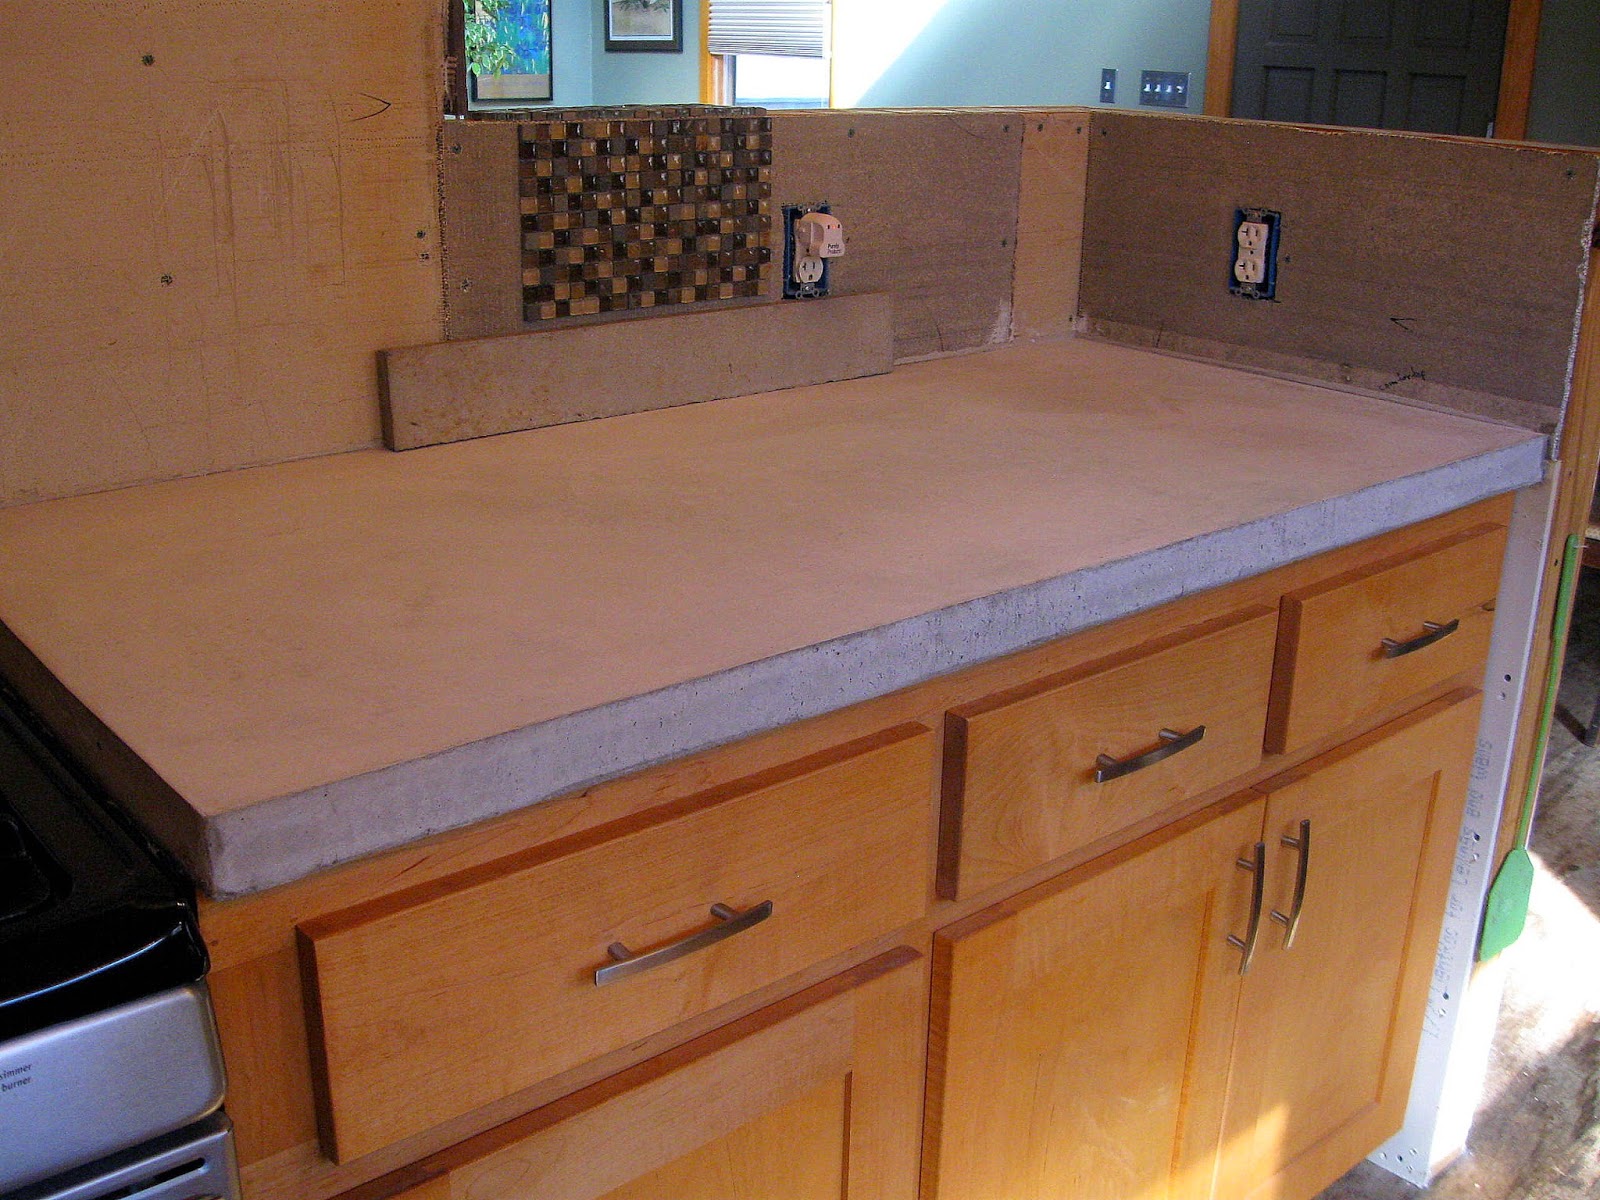
Well, they are IF they come attached to saw blades or grinding pads.....the rest are fairly worthless. You all may remember me pouring the first bar top for the kitchen way back in this post, and I finally got around to doing a bit more work on it. For one thing, I really needed to get that thing out of my studio where it was taking up quite a bit of room. I truly hate trying to work around clutter or junk and since I am really trying to ramp up production here for impending shows, that thing had to leave! Secondly, it finally stopped raining for a few days so that I could actually work outside. Of course, it doesn't matter if the slab gets rained on, but I didn't want to get rained on.
As matter of fact, it has to be soaked down real good before I could grind on it anyway. The diamonds in the pads last longer, as the water cools things slightly, and it doesn't stir up the dust when it's wet. And you actually have to keep wetting it as you work. A messy job for sure but these rubber aprons came in very handy!
At first, it seemed like I was only managing to scrub the grout out of the slab, because it remained slightly rough, but after getting up to about 200 grit and staying on that for a while the concrete began to polish up quite nicely. I will not be able to polish the cast in place counter tops quite this well, I don't think, so I didn't want a mirror finish on these bar tops and have them not match. So I just kept it at 200 grit. Actually, I did go up to 400 grit but the red pads started staining my grey concrete. NOT good. I believe I will have to email the maker of these pads and express my displeasure at that. So, I went back down to 200 and polished until the stains came out, which didn't take too long.
I finished the sides off a little and called it good. I was very pleased with the way this one came out. Hopefully I made it the correct dimensions. Ha! Just kidding....sorta. It's still outside now, drying out a bit and then we will bring it inside and set it in place. It will not be permanently anchored yet. I just want to get it inside where it can fully dry in a less humid and rainy environment and it not be in my way somewhere. After a couple of weeks I'll anchor it in place (basically glued) and finish sealing it.
If you click on this photo you can get a good look up close at the finish. Keep in mind it is wet so that accounts for the high gloss. The finish I'll put on it will be more a semi-gloss or satin. As I said, I am very pleased with the look of this mix and how the aggregate looks when polished. Very cool. It reminds me of some of the recycled glass counter tops I've seen. This is considerably cheaper though! Now I just need to find a good food-safe, water proof sealer.
Sunday, March 29, 2015
The First Days Of Spring
No kind of deep, existential post today.... just a little look around of what's going on in the past week. We had a bit of a cold snap for the past 2 nights but things should warm back up tomorrow. And hopefully, STAY warm! I was pleased to see that the cold did not harm the blooms on this forsythia. I've noticed that a lot of people don't like forsythias because they say, they're just big, green shrubs after the blooms fade. But I like them. I think the blast of sunny yellow lasts long enough and is worth just green the rest of the summer.
Whenever I have some free time I've been trying to get the yard and garden cleaned up and ready for the growing season. We've got a lot of brush to burn, and have burned a good bit already, from when the tree trimmers came through for the power lines. I'm fine with that though because the alternative is that they spray those horrible chemicals and I'm not having that on my land.
I like forsythias so much that I fairly regularly take cuttings off my big one and root them, like the one above. These and blueberries are really easy to do. With several acres in what could be considered yard, I can't afford to buy shrubbery and flowers for everything so it helps greatly to just propagate what you have. For many shrubs I just prune off a nice strong branch, shave the bark off maybe 1/2"-1" on the end to root and just stick it in the ground. Now, I do take them to a spot I have reserved in the garden because the garden soil is much better than what's in the yard. Sometimes I might dip the end in rooting compound...or not. Once I know they are established, usually about a year, I simply transplant them out into the yard.
I love to see the little fidleheads of the ferns coming up. To me, this is the first true sign of spring. Around these parts anyway. These don't come up until it is shor 'nuff spring.
I finally got around to doing what I should have done long ago and that is add a third row to my asparagus bed. I only put in 2 rows when we first made this bed because I was afraid of over-crowding but I came to the conclusion that was probably not going to happen. Besides, if they do seem to get crowded in the years to come I can always thin them to share with friends. As we always used to say in construction....better to have too much than not enough. (and that goes for about anything, lol!).
This year I am determined to finally finish the entrance to the garden and the fruit beds that line the perimeter. I got a pretty good start on that this weekend. Hopefully I can keep my momentum up.
I got a couple of new bird feeders, including this one specifically for the goldfinches and I have been amazed at how many are now coming around. In the past, I had seen 2 or 3 at most but now we are getting 8-10 or more. I just love them and the bright yellows. Or even the dull yellows. They are feisty little birds too! They fight over that thistle seed and will get up in each other's face, screaming as loud as they can.
So, that's about it for garden progress. Hopefully I'll have a lot more pretty soon. Anybody already got theirs planted?
Friday, January 30, 2015
Float On
So, I pulled the forms from the counter top and was pretty pleased with the way it came out. As you can see, the concrete has cured to a fairly light color but once I polish it a bit and seal it, it will be a much darker gray.
I set a piece of concrete backsplash up there too and some of the glass tile I will use for the back also, just to kinda see how it will look. Once the concrete is sealed it will be very close to a grayish slate color and match the glass tile well.
I was fairly pleased also, with the finish I got on this pour, although I think I actually got a smoother finish on the hearth slab. It's fine though. I will run over this a bit with 100-200 grit diamond pads and it'll be slicker'n owl shit. I have no idea where that saying comes from or what it means but I used to hear it all the time on construction sites. Ha!
It's also quite hard (to me anyway) to get a good slick finish right up to the edge because you can't follow through with your stroke but that is easily smoothed with the diamond pads and I'll round that top corner off just a tad. The front face of the edge had a few little bug holes in it but I don't really mind that. It makes it look more like concrete, to me, and I want that to be obvious. I just really like the look of unstained, natural concrete.
It's really hard to explain to somebody else how to finish concrete and I looked around for some YouTube videos that might do a good job but didn't really come up with much. Most of them show how to float concrete, which is good, but none I could find show how to trowel it to a hard finish and that's what takes such finesse.
In the photo above I have the tools most commonly used for concrete finishing and they are not interchangeable. The one on the left is the float and the one on the right is the trowel. Since my pour was so small I did not need a screed or straightedge but you need those on a large pour.
The float has a much thicker blade and is longer; some of them are up to 2 feet long or so and this is what you use immediately after placing the concrete. On really small pours like mine you can use the float sorta as the screed to knock the mud down to the correct elevation. Then you pass over the concrete in sweeping motions to smooth it down nice. Now, at first, it's not going to look that smooth and that's okay. Once you float it off good, with one pass, you just then let the mud sit. Water will begin to rise to the top and you will see a pool form. Let this water evaporate! Do not keep working it back into the mud. Once the water evaporates you can see the surface begin to "tighten up" as we say. Make one more pass over the concrete with the float. Water will rise again. Let it evaporate. At this point the mud may have tightened so that you can move to the trowel. When you go over the mud with the trowel you will begin to get a much smoother finish. As you can see, the blade on the trowel is much thinner. And, it's pretty much the same rhythm; trowel it off, let the water rise and evaporate and etc. Now, at this point, hardly any water will be noticeable on top but you can tell it's happening. This is the part that is really hard to describe as it's something that a person has to see and do to really "get", but it's much like burnishing clay or similar. Also, the tighter the concrete gets the harder you have to press down to get a smoother finish.
If you really want to try pouring something like this and have never worked with concrete before I would strongly suggest pouring some little practice slabs first. Maybe pour some steps or a small patio just to get the hang of floating the mud and those things don't require a really hard finish. In fact, you don't want to get them too slick or they will be very slippery in wet weather. Then maybe pour some little stepping stones or maybe a bench seat to practice troweling a smoother finish. Good concrete work is much harder to do than most people realize but it's not rocket science. It just takes a little finesse, as I said. If all else fails, hire a finisher. And you can polish counter tops once the concrete is cured, to hide a multitude of sins. I've done all my own concrete work here at my house but I'll say this: the work I did as a carpenter and welder was pretty hard sometimes, but I always got through it. I don't think they could have paid me enough money to place and finish concrete however.
Okay! I'll be putting this finish on this top before long but we had to order some new diamond pads so it may be a bit before I have another post on this. And, I have to find a suitable sealer to use on these since they are in the kitchen and would come in contact with food. But I'll have a complete post on all that when I'm done. Any questions?
Labels:
concrete,
creative building,
how-to,
kitchen,
warnings
Saturday, November 15, 2014
Sour Girl
Some of you long-time readers may remember that the blogger, who shall remain nameless, over at Rurality has been a friend of mine for some time and you may also know that she is a big instigator. Haha! But in a good way. In fact, she is the one who talked me into starting this blog so long ago and then abandoned us all a couple of years ago...ahem...but anyways...heehee. Well, she also talked me into going to this fermenting workshop a few weeks ago that was held at a little intentional community not far from here. I've made several posts here about some fermenting I had done using the crock method, and I thought it came out well, but this workshop was going to be using a more modern method (I guess you'd say) so I thought it would be interesting and a fun thing to do. And I tend to be a little reclusive so it was a good thing to get out and meet some new people.
So, basically the workshop provided information on the health benefits of raw fermented foods, such as kimchi, saurkraut, kefir etc. and how to make them. And by raw, I mean not pasteurized, because the heat required in the pasteurization process kills all of the beneficial flora (bacteria) that you are creating by fermenting the food in the first place. I am especially interested in eating more fermented foods because I've read that it is very good to help reduce inflammation in the body and that's seems to be what I've been having trouble with lately, for the most part. Plus, if you make your own it is substantially cheaper than buying it already prepared. I had tried some raw kimchi and liked it, but the only place within an acceptable driving distance that carried it was the Whole Foods in Birmingham and, as you can probably guess, it was quite expensive. At least to me. And, if you grow your own veggies for the mix it can be made for just pennies.
The new jar they use is the one big initial cost but after using it I think that it is well worth it, IF you think that fermenting is something you will do regularly. Rurality was kind enough to let me use an extra of hers for my initial batch and so I could try it out before actually buying it! HERE is a link to one type of jar now used for fermenting instead of the crocks. The type shown in the link is not the same brand as what we used but it is the same basically. I could not ever get the link to our jar brand to open so that's why I'm using this other. Anyway, research it yourself if you are interested. You can find a lot of different brands and such but the one thing that the lady teaching the workshop stressed is that the jar and lid should be entirely glass. If you look around you will find some with a glass jar but a plastic lid and she was adamant that those will not airlock like the glass lids and your food can spoil. Now, the little airlock gadget that sticks up out of the lid is plastic but it doesn't touch the food. Some jars even come with a glass weigh or specially shaped bowl to push the foods under the liquid and that is nice. We just crammed whole cabbage leaves on top to where they were pushed down by the lid and that held the fermenting food under the liquid. You simply discard (or compost) the cabbage leaves when the product is ready and that worked fine.
So, basically we shredded up a bunch of cabbage, green onions, ginger, radishes, carrots, garlic, peppers and then mixed that with the appropriate amount of sea salt and whatever spices you wanted. I keep mine simple and only put in dill and parsley. Using a wooden or ceramic stomper you pack the jar tightly and wait about an hour. If the mixture is mostly cabbage it will release a fair amount of water which will form a natural brine but if it doesn't you can mix a little brine yourself and pour over the veggies until they are just covered. Any little bit of research online or at your library will turn up tons of recipes and the exact amount of salt etc. that you need to use, so I'm not going to go into a great deal of depth on that. But believe me, it is very easy to make. Deciding what you want to go in it is the hard part. Then you just wait a minimum of 2 weeks and the taste test it to see if it has aged to your liking. If it has then you transfer it to a clean jar or jars to keep in your refrigerator and eat at your leisure. The cold stops the fermentation process so it will last for about 6 months stored that way. I can go through a pint of kimchi in about a week so mine doesn't last that long.
After using the glass jar method I have to say it is really great and I will buy one now. The crock method is very easy also but you have to check it every day and skim off any mold growing around the top. No big deal but this way is just so simple. The airlock top keeps any of that from forming and you just check it every day or two to make sure there is water in the little plastic hicky. This initial batch of kimchi I made was good but I think next time I will cut back on the ginger and radishes. I've never been a big fan of radishes. And, I think I might make the next batch a little more spicy. We used some pepper but they were the sweet type and I think a little heat would be a good addition. As far as spices go, well, I just like the fermented taste. Garlic is always a good addition and I might try a little mustard seed next time.
I hope this inspires some of you to try it and if you have any questions feel free to ask away!
So, basically the workshop provided information on the health benefits of raw fermented foods, such as kimchi, saurkraut, kefir etc. and how to make them. And by raw, I mean not pasteurized, because the heat required in the pasteurization process kills all of the beneficial flora (bacteria) that you are creating by fermenting the food in the first place. I am especially interested in eating more fermented foods because I've read that it is very good to help reduce inflammation in the body and that's seems to be what I've been having trouble with lately, for the most part. Plus, if you make your own it is substantially cheaper than buying it already prepared. I had tried some raw kimchi and liked it, but the only place within an acceptable driving distance that carried it was the Whole Foods in Birmingham and, as you can probably guess, it was quite expensive. At least to me. And, if you grow your own veggies for the mix it can be made for just pennies.
This is a Pickl-It jar in the 1 1/2 liter size.
The new jar they use is the one big initial cost but after using it I think that it is well worth it, IF you think that fermenting is something you will do regularly. Rurality was kind enough to let me use an extra of hers for my initial batch and so I could try it out before actually buying it! HERE is a link to one type of jar now used for fermenting instead of the crocks. The type shown in the link is not the same brand as what we used but it is the same basically. I could not ever get the link to our jar brand to open so that's why I'm using this other. Anyway, research it yourself if you are interested. You can find a lot of different brands and such but the one thing that the lady teaching the workshop stressed is that the jar and lid should be entirely glass. If you look around you will find some with a glass jar but a plastic lid and she was adamant that those will not airlock like the glass lids and your food can spoil. Now, the little airlock gadget that sticks up out of the lid is plastic but it doesn't touch the food. Some jars even come with a glass weigh or specially shaped bowl to push the foods under the liquid and that is nice. We just crammed whole cabbage leaves on top to where they were pushed down by the lid and that held the fermenting food under the liquid. You simply discard (or compost) the cabbage leaves when the product is ready and that worked fine.
So, basically we shredded up a bunch of cabbage, green onions, ginger, radishes, carrots, garlic, peppers and then mixed that with the appropriate amount of sea salt and whatever spices you wanted. I keep mine simple and only put in dill and parsley. Using a wooden or ceramic stomper you pack the jar tightly and wait about an hour. If the mixture is mostly cabbage it will release a fair amount of water which will form a natural brine but if it doesn't you can mix a little brine yourself and pour over the veggies until they are just covered. Any little bit of research online or at your library will turn up tons of recipes and the exact amount of salt etc. that you need to use, so I'm not going to go into a great deal of depth on that. But believe me, it is very easy to make. Deciding what you want to go in it is the hard part. Then you just wait a minimum of 2 weeks and the taste test it to see if it has aged to your liking. If it has then you transfer it to a clean jar or jars to keep in your refrigerator and eat at your leisure. The cold stops the fermentation process so it will last for about 6 months stored that way. I can go through a pint of kimchi in about a week so mine doesn't last that long.
After using the glass jar method I have to say it is really great and I will buy one now. The crock method is very easy also but you have to check it every day and skim off any mold growing around the top. No big deal but this way is just so simple. The airlock top keeps any of that from forming and you just check it every day or two to make sure there is water in the little plastic hicky. This initial batch of kimchi I made was good but I think next time I will cut back on the ginger and radishes. I've never been a big fan of radishes. And, I think I might make the next batch a little more spicy. We used some pepper but they were the sweet type and I think a little heat would be a good addition. As far as spices go, well, I just like the fermented taste. Garlic is always a good addition and I might try a little mustard seed next time.
I hope this inspires some of you to try it and if you have any questions feel free to ask away!
Monday, July 01, 2013
Stuck
Well, I finally have a house post for ya'll!! I finally got up the gumption to start the fireplace tile and have been steadily working on it for the past week or so, in between pottery, gardening and such. I am actually a little further along than what you see in this photo. About 2 more runs of tile and I have started the mosaic that will be in that blank space over to the left. Yes, all that smashed pottery will be put to good use. There were a number of reasons that I chose to break this up with a mosaic. First, I think they are pretty and I wanted to do something different and creative. Secondly, in placing these tiles out so that they wrapped the corners the way I wanted them to, it was going to make the spacing between them just a fuzz larger than I really wanted. 3/8" was really the max that I could justify with looking right. By laying the ends the way I wanted and working inward, I could leave a strip in which dimensions didn't matter. Oh, and I didn't want to cut tiles if I could get away with it. There is nothing wrong with cutting them but with the area etc. I would have come out with pretty small cuts and just wanted to avoid that. I wanted to stick with whole pieces for the looks.
As it is, the spacing didn't quite come out as I imagined, although it's close. See, natural tiles are...well..natural. Even cut they may not be exactly the same size or totally square. I have found differences of up to 1/8" and I really didn't expect that. Maybe a better quality tile would have been more accurate, I don't know. I will use a dark grey grout on this so that will also minimize how much you notice the irregular spaces. For the most part I have been able to use these cool little spacers to keep it all in line but I have had to fudge some here or there. I made sure to establish at least 2 control lines (1 vertical, 1 horizontal) before I ever started to help keep the tiles laid level and plumb. Actually, I have 4 lines at this point but it never hurts to keep a check on that. These spacers, by the way, just pull out when the adhesive is set up and you reuse them indefinitely. They are also 2-sided; one side is a space just for a slot and the other is a spacer for intersections of 4 corners. The adhesive also sets fairly quick so I only spread enough to set 4 or 5 tiles (6x6) at a time. You have about 10 minutes working time, maybe. That may seem like a lot but when you are adjusting and tweaking it goes pretty fast. Or it does for me anyway!
You can also see from this photo what I meant about the corners. I did not want the edge of the tile that turns back to show. The edge of the face tile shows from the side but that is more attractive, to me, than the other. Basically, when you are standing in front of the fireplace wall, you will not see any of the edges of the tiles. There are many ways to do corners though. You can run some type of edge cap of another material such as wood or steel corner molding, another type of tile etc. etc.
In this photo you can see a bit more of the unevenness of the spacing but it will be covered up by the fireplace unit. See, I don't have any problem showing my stuff that doesn't come out exactly right. Everybody makes mistakes or has things that don't do exactly what they thought they would. I honestly thought the tiles would be more accurate in size so that was a learning lesson for me. At any rate, I have been able to control the spacing better in areas that will show more, now that I understand the material more. Plus, it's a natural stone. It is just going to have variations. Don't want variations?? Use a manufactured tile. I had to cut a few tiles to fit around the gas lines and anchors that hold the unit in place. This was very simple just using a 4" side grinder with a diamond wheel. You can use it dry too for such small cuts. I just had to nip out a notch here and there. For whole cuts I will use a wet saw for tile.
So, there is the beginnings of that. I'll have some more on it soon. Hopefully. If you would like to see a more in depth or closer look at how I did something please let me know. I'm not sure how well I explain things so please ask questions if needed or tell me to clarify.
Labels:
creative building,
house,
how-to,
living room,
screw-ups,
stonework,
tile work,
walls
Wednesday, July 25, 2012
Outside The Box
Since some of you seemed to like the tile thing I thought I'd show ya'll how easy it is to do. Of course, you have to have a kiln to fire them but the process of the tiles is fairly simple and you don't really need any fancy equipment. I had taken these pictures a while back and had kinda forgotten about them but luckily didn't delete any.
So, first you make your original design and getting it all perfect in every way. This tile may look a little out of square but I got it straightened up before going further. Keep in mind that the clay will shrink considerably by the time it makes it through the final firing. Most clays shrink around 10%.
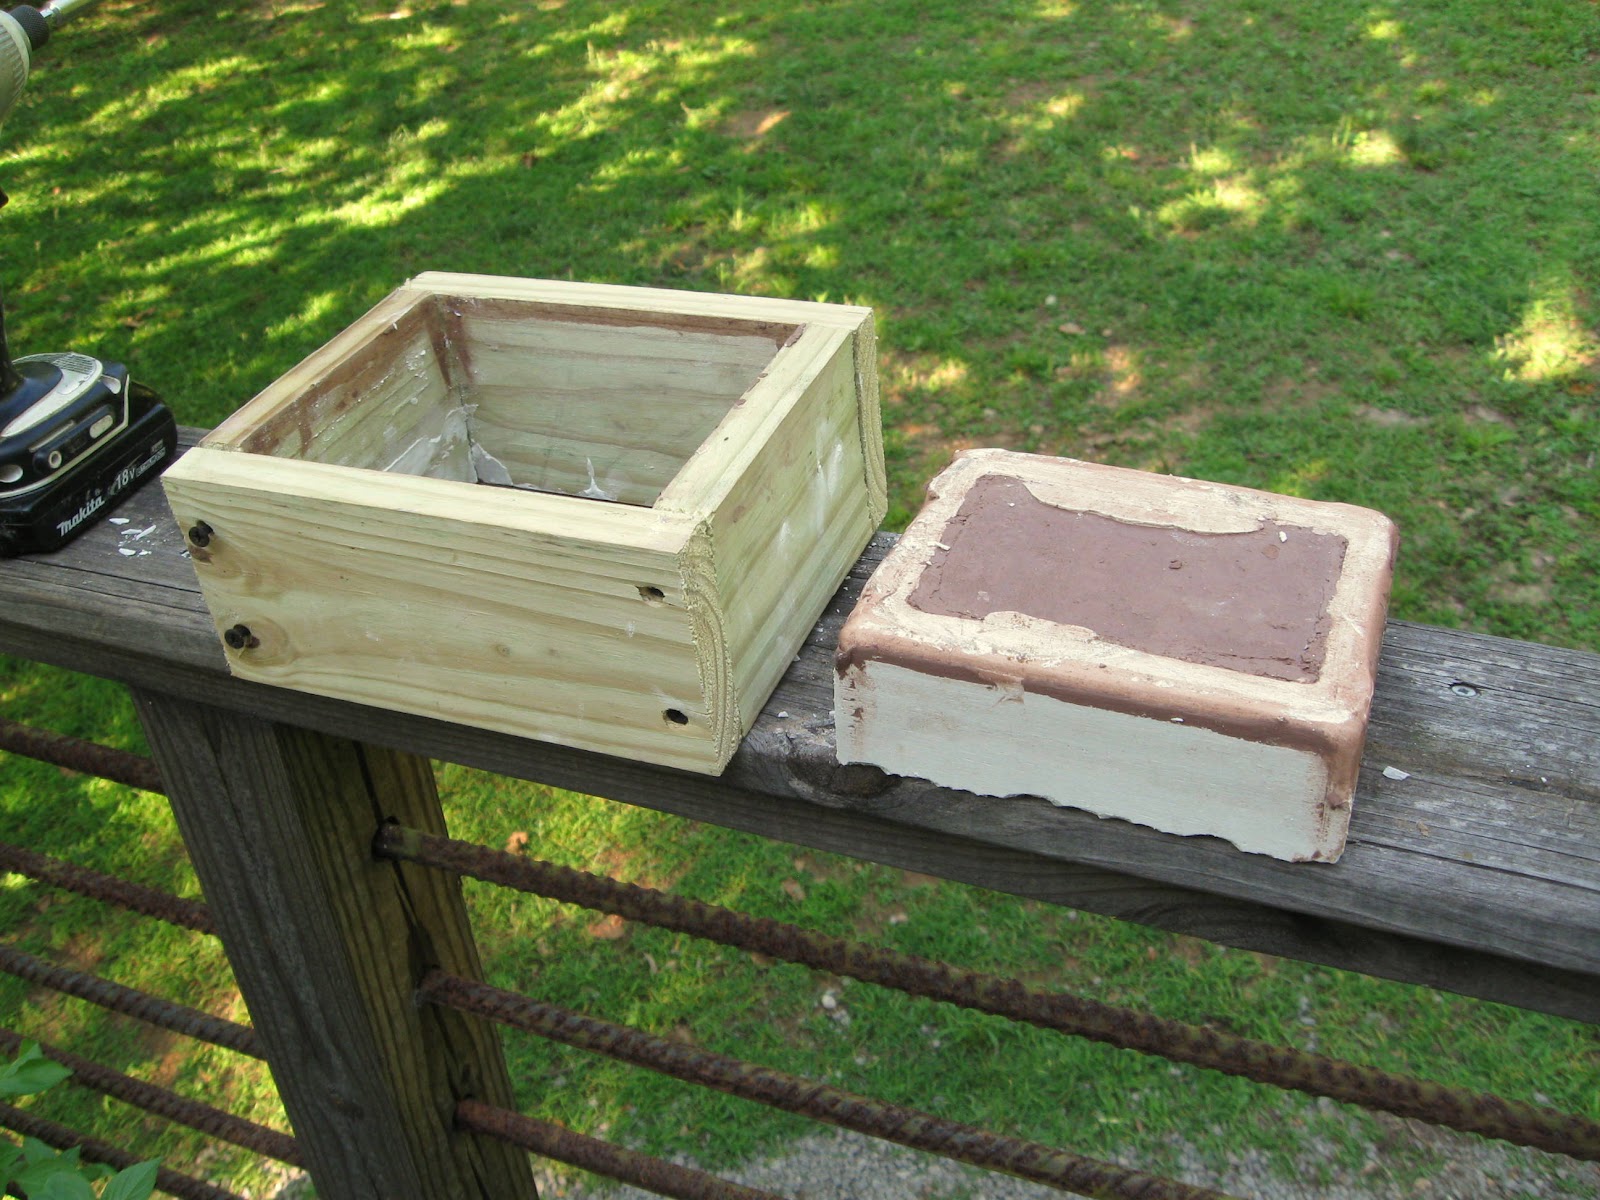
I threw together this simple box; it's held together with screws because you are going to have to take it apart later. I sat it on a good flat board and sealed the inside cracks, where it sits on the board, with clay. I then placed the tile in the box, centering it best I could. You can kinda wet the back of the tile also, to kinda make it stick to the board.
I then mixed the plaster that will make the mold. Plaster hardens through a chemical reaction so when it starts to get warm you know it's about time to pour it. You must mix plaster with your hand pretty much, so it's easy to tell it's getting warm and getting thicker. As it starts to thicken slightly just pour over the tile. You want the plaster to cover the tile by about one inch. Now, just let it set. This can take a couple of hours or so.
Now, unscrew the corners on opposite sides and pop the mold out! You can spray the wood mold with cooking spray or such to facilitate it letting go of the plaster but I didn't have a problem with that.
Then, just pick the clay out of the mold making sure not to jab or break the plaster. If you can get one edge coming up the tile should just pull on out but you may have to pick parts here and there. Again, you can spray the tile and everything with cooking spray to make removal easier.
Of course, the original tile is destroyed but now you have a easy way to make bunches of them!! So, just clean the mold up, straightening the edges etc. You obviously can't have any undercuts or the tile won't come out! Plaster holds a lot of water, even after it has set, so you must dry the mold in the oven for a couple of hours or so. I put mine in my little toaster oven on about 150-200 degrees for a couple or 3 hours. When it has dried sufficiently it will fell much lighter and well...dry. Now you can cram clay back in the mold and, in about an hour or so, the dry plaster will suck enough moisture out of the tile to cause it to release on it's own. Just tap the mold on a table and the tile will pop out! Repeat as often as you like! After a good many tiles the mold will begin to loose it's fine details, so if you wanted to make hundreds of tiles it would be best to make several molds.
I dry the tiles on a wire shelf, turning them often to help keep them from warping. Then just fire like any other pottery.
Sunday, May 20, 2012
Brushing Up
I imagine more than a few of you will be happy to see that I'm doing house project posts again, instead of relentless chicken and garden stuff! Just joking, I know ya'll enjoy those too. I, however, am VERY happy to be doing house project posts again. I'm ecstatic to have something to post in that area. I took just a bit of a break from the pottery, as I had a little inventory built up, and used the time to start anew on the house. Now to just keep up that momentum but still take 3-4 days a week to do pottery. As I have some money saved up I can devote a little more time to the house and not be having to scrap every minute to make money. Of course, not really having any bills helps too. And having the garden in full swing for food production. Our grocery bills should be minimal for some time.
So, my first priority is to finish the outside. Every last bit! This shouldn't take too long actually. It's mostly just painting, which I actually enjoy. I know most people detest painting a house but I like it. I like how fresh everything looks. In fact, I have to resist the urge to paint stuff that really doesn't need going over again. I know; I'm whacked in the head. I have been alternating between finishing this south wall and the clerestory wall that you can see just a tad of. The upper part was really done but it needed a little touch up on the caulk and trim. I was very happy at how well the caulking etc. is holding up in that area because it receives the brunt of the weather and sun in the winter. I always use a siliconized latex caulk with at least a 35 year warranty. (I've actually seen some with a 50 year but it's harder to find). The siliconized caulk is flexible enough to move with the building without cracking, and the structure is going to expand and contract with the weather. I will say though that it works better if you apply at least a 1/4" bead to cracks, joints etc. Smaller, thinner beads do tend to split with excessive heat/ cold. The silicone paired with the latex base makes it paintable. 100% silicone will resist paint, so keep that in mind. You can get 100% silicone in a variety of colors though, although you may have to go to a specialty company. This has been one item that I have tried to be very conscientious of simply because passive solar houses are designed to be exposed to so much sun.
I've been painting off a ladder a lot so it's handy to use a hook like this to hang your paint can and it leaves your hands free to caulk or hold onto the ladder! I just had a thick piece of copper wire that I bent into an "S" shape.
I also love these little mini roller screens designed to fit a gallon can of paint. I hate using a pan and avoid it whenever I can and many times if you are painting the exterior of the house you don't really have a flat place to sit those pans. You can get these for 5 gallon buckets or these gallon sizes and they are much easier to use and faster to clean up than the pans and all that crap.
So, I'm going as quickly as I can on the outside because that means I can then start on the kitchen!! Actually, I can start doing a few prep things on the kitchen in the evenings after supper and I'll show ya'll a few of the things I'm working on there.
Wednesday, January 25, 2012
All Good Books
Over the few years that I have lived on my little homestead here, I have collected a few books that have really come in handy and I thought some of ya'll might find them interesting if you don't already know about them. Especially if you are geared towards the gardening, homesteading kinda movement. I think a couple of them are pretty standard to most people who garden seriously but there was one or two that might not be that popular. I can't really say that I use anyone more than the others; they all get referenced regularly. And I have several more good ones on the same subjects. I just thought these 4 were kinda the best overall.
I think everybody is familiar with Rodale's organic gardening books and for good reason. I use this book a lot! Great info on all kinds of stuff, even if you've been gardening for a while. It has good illustrations and diagrams too.
I think there are several variations of John Seymour's book on self-sufficiency but I like this one a lot. My only complaint would be that it contains so much information on so many subjects that it sometimes leaves a bit to be desired in depth of information. For instance, the section on making pottery just kinda glosses over the process. Not really enough info for someone new to the craft. I do really like his gardening strategies for each season and that is outlined well and how to best use the land you have, whether it's 1 or 20 acres. I consult the gardening sections a lot. It also gives you a lot of ideas for truly being self-sufficient; producing energy, reducing wastes, raising food etc.
Story's Guide to Raising Chickens is great too. It gives really good overall info on everything from hatching chicks to cooking the chickens. Good diagrams and illustrations too. I also supplement this book with The Chicken Health Handbook, which is a bit more technical but full of good info. I've never had any problem with my chooks that I couldn't figure out using one of these books. Not that we have much problems with them but anyway..
Last, but not least by any means, is the Reader's Digest book, Homemade. This is not a book I've seen espoused much but I love it. There are recipes for everything in this book! food, cosmetics, animal treats, cleaning supplies, art supplies and on and on and all of them designed to save you money and go easy on the planet. It also has a huge section on home health remedies and gardening tips and products. I have used and/ or made much of the stuff in the book and it's always worked, been luscious, effective or what have you. I highly recommend this one whether you live on 200 acres or in a ultra urban apartment. Even if you are not into "green" that much, the recipes etc. are not so out there that you don't want to fool with making them. They might require having some dried herbs etc. on hand but everything is really easy to make and usually pretty quick. And relatively cheap! It has a to-die-for rice pudding recipe in it that I am going to post soon. I really, really like this book. And no, they didn't pay me to say that!
Do any of you have a similar book that you would recommend?
Wednesday, December 07, 2011
Two Hands
During the past few years many of us have seen a huge surge in interest and production of handmade items. Some of it due to disgust and revolt of the rampant, mass-produced hysteria of consumerism and some of it is simply due to unemployed people trying to make a living the best way they can. As someone who has made a living with their hands for most of my life, there are several false notions out there that I would like to address so that if there are others out there considering crafts or such as an income source, that they would not be discouraged by people who have no idea what they're talking about spouting a bunch of crappola.
1. You can't make a living with art/ crafts in a bad economy. Well, I tell you, going by the number of orders I'm getting for my work right now, I'd never know things were not good in this country if I didn't read the news. Yes, I understand that it is the holiday season and people are buying more and it will drop off after the first of the year but.....people are buying. If you make a good quality product and market it in the correct area, people will buy it. You might have to make smaller items, as I have had to do, but you will sell lots of these. My big, expensive casseroles are not moving, at all, but I am overrun with orders for small dessert bowls, soup bowls, mugs etc. and am bringing in a substantial amount of money from that. People are fed up, for the most part, with cheap crap from China and are looking for an alternative. These are the people you want to focus on and find. Forget about the rest. They wouldn't appreciate your work if they had a million dollars because some people just do not get handmade.
2. I'd never be able to make enough money off it to pay for my time. Now, if somebody is using this excuse simply because they don't really want to try to market their stuff, then fine. However, if anybody really believes this, then I'd have to call bulls**t on ya. It all comes down to where and to whom you market your work. Yeah, if you go to flea markets and crap trying to sell handmade sweaters for what they are actually worth then people are going to laugh you out of the place. BUT, if you market your work through high-end consignment shops, galleries or other alternative markets you are likely to find many customers. There are still lots of people out there with money and who usually appreciate hand made. Now, it must be of very good quality. Lots of people nag me about how picky I am on my work. I cull my work and a defect means I have more stuff to make mosaics out of, if you get my drift. Bring out the ol' hammer! You must be ruthless in judging your work. You may also have to go cities 100 miles (or more) away but if you can find a place or places who will accept a large enough inventory then it can be worth the drive. If you choose to do craft shows, only do the ones that insist on jurying the work and I personally never do one if the entry fee is below $75. This insures most all the entries are going to be from serious artists and craftspeople and you are not going to have to deal with somebody next door selling foam lizards on a stick. (been there, done that.)
I know a number of successful craftspeople who make their living solely from their art, so it is possible. One fellow, who lives not far from me, makes furniture and has for most of his life. Now, one chair or small table can go for $2,000- 8,000, so it is art, not just any ol' stick chair. But he makes his living with it. Yes, he has to travel and be very selective about where he shows but once you make a bit of a name people will begin to seek you out.
The thing is, even if you just make quilted potholders or clay jewelry; if your craftsmanship is good and it is a quality product, there are places and people who would love to carry your work. Think big, forget the flea markets. The environment in which works are shown determines their value. That doesn't seem right but it is so, I guarantee you. Don't sell yourself short. Don't be shy. Most shop owners are happy to look at stuff because they are always looking for that great new product or artist. I will say one thing though; don't lug a giant box into their store or gallery without asking first. Many galleries ask that you submit your work electronically these days but you can walk in and ask about their submission policies.
And of course, online is okay too but I find that most people still want to hold the object in their hand before purchasing when it comes to craft. I do sell some work online but for the most part, in person is the way to go.
Labels:
art,
finances,
getting off your a$$,
how-to,
insufferable self-promotion,
seeing,
work
Friday, June 24, 2011
Tell Me 'Bout It
Now, on the main subject of this post: I thought it was funny that yesterday's post title got way more hits than even the "Great Big Knockers"! But, Ron, you shouldn't have deleted your original comment on that last post! I was not put off by it and you have a right to express your opinion. I hope my reply comment did not come off as brusque or snippy. I was in a little bit of a hurry yesterday to get going and kinda rushed through a few comments that morning. I needed to go into Birmingham for a multitude of errands and meetings and it was about 10:00 last night before I got home. I intended to continue answering comments but during the last hour of my trip I developed one of my tri-annual migraines and made it home limping and dragging. I had trouble reading, much less typing something legible, so thought I'd just respond to comments here. I feel somewhat better today but am a bit fuzzy still from the meds. At any rate, I don't want my readers to feel they cannot dispute me or argue their point. Ed has disagreed with me a few times and I still let him come around! LOL!! Sometimes it's hard to remember to make absolutely every point you want to within one post. I certainly did not want to make it sound like regular Joe's (non-construction people) can't do a good job. Certainly they can. And I have seen, in person, some horrible examples of "professional" work. I actually meant to include such in my original post but my memory leaves me sometimes. I'll never forget once, Allen and I watched a crew of home builders pouring a footing for one of your typical McMansion type houses in a suburb. This was probably a 2,500 sq.ft. home or more, so a sizable footprint. Now, they were pouring directly out of the truck and we noticed that they only moved that truck once. You see, the concrete was SO wet, it RAN all the way around the footings. We call that pea soup at work. And that is one reason I would never want a licenced home builder, other than Allen, to build anything for me. Sure, the mud set up. But what it's going to do 10 years from now when the ground has heaved a little here and there.....
And what Jenn said in comments about a commercial block building that they didn't even grout or throw their rebar in...Dang! I wonder how that got past inspection? but stuff like that does occasionally happen. That was one reason I was so reluctant to ever work for another construction company than the one I did. We did our work right! We never cut corners on our concrete or reinforcing. We were proud of our work and rightly so.
But yall, please, if you don't agree with me on something, feel free to say so if you're inclined. I would love to get more comments than I do because I like discussion and I am not up here just to spout out what I think is so. I show what has worked, or not worked, for me and I show some building techniques I know to be correct because I know a lot of people want that information but I am not an authority and somebody can always come up with a better or easier way. We always said at work; a good carpenter is NOT one that never makes a mistake. A good carpenter is one that knows how to fix his mistakes. You can always learn from others too. I know I may have a terse manner sometimes and some of my comments may seem snippy but it's just years of construction work and that environment. I know that sounds like a lame excuse but, well, you work on those sites for 20 years and tell me what you think. lol! Either way, I welcome all comments. Unless, you tell me I'm a bitch; then I'll kick your ass!
Wednesday, June 22, 2011
Distant Early Warning
Over the years of blogging I have come across a number of other blogs on building, as you would expect. Mostly it's regular people building their own home or barns or such. And that is great. Ya'll know that I try to encourage everyone to try their hand at building, especially women, for a variety on reasons. And in the course of reading some of these blogs I have noticed some of them have quite a few readers. Unfortunately, it seems that the blogs of people who are least qualified to be showing other people how to build something are sometimes the most heavily read. Let me just say, just because someone is being adventuresome in their construction; say, building in some exotic location, does NOT mean they know what they are doing. Now, some of these are fun to read regardless and I am not promoting myself as some all-time expert; I make mistakes too, which I will also show you. That said, I do have almost 20 years of construction and safety training and with that I say please, PLEASE, be very careful who you take construction advise from and what their qualifications are. I don't care how much experience they say they have in concrete, if they don't know what a snap-tie or a johnny clamp is, you run from them, quickly. They are an idiot and have never worked in the industry. In fact, we used to have a game we played when I worked construction. We often had fellows drop by our jobs looking for work and they often claimed to be form carpenters or whatever. This is common in commercial construction. Now, they wouldn't have a resume or anything but would just tell the super what their experience etc. Now, if they promoted themselves as super-carpenter, one who had done all and been all, and even if he uttered the famous words of one guy, "when it gets too rough for everybody else, it's just right for me", we, the crew, would immediately start taking bets on how fast this guy was going to drag up. Not, IF he was going to drag up but just how fast, because when people start talking like that they are full of shit. We never were wrong about a one. Keep that in mind when reading these blogs.
I have also noticed that many of the self-sufficiency types and all really like to get out of the city limits where there are fewer, if any, restrictions on building. Now, I don't have a problem with this. I'm only in the county and didn't have inspections on my house BUT, it is still built to code. Now, I agree that many times the building codes are stupid about some things and the city just wants the revenue. However, for the most part these building codes are for your protection. They are there so that JimBob doesn't put your rafters on 3 foot centers and have the ceiling or roof collapse on you. It's there so your neighbor isn't shitting in a 55-gallon drum and having it overflow onto your property. It's there so your well-meaning cousin doesn't burn your house down because he really didn't know how to wire that junction box anyway.
I have seen some of the stupidest things done, by way of building, on some of these blogs. I have seen people frame a two story house and not put the first header over a door or window. That's fine until about 2 years down the road when things have sagged so bad they can't open any of the doors or windows. I have seen a lot of unsupported spans on outer floor bands and rafters; no piers but in the corners. Code will tell you how far you can span according to the size lumber. I actually saw a couple install rafters with the wide side down. Now, I don't know how anyone can look at that, no matter their experience or lack thereof, and think,' yeah, that's the way those go'.
Granted it was just a chicken coop (a big one) but, holy hell! how do you do something like that.?? I have seen people install roofing in about every bad way imaginable. Granted now, roofing can be difficult and you really need to have help if you don't know what you are doing.
And Lord O' mercy, don't get me started about people pouring concrete. Concrete is a wonderful and versatile medium. It is astounding in it's strength and beauty. Under the right circumstances, it will kill you deader'n a hammer in seconds if you make one mistake. Concrete is not something to screw with and you especially need to watch who you get your advice from. Now, it's hard to make a deadly mistake pouring a slab for a patio or such but you can mess up and waste an enormous amount of money if nothing else. The photo above is of some formwork from one of my old jobs. We were pouring foundation piers and footings that were 2-3 feet deep. You can see some of the massive amount of rebar that went in those footings and the steel sticking up was just part of what was stubbed up for the walls that would pour on top. And, in all honesty, these were kinda wimpy footings for commercial work. I've seen one guy, on a blog, pour walls where he only put a stick of rebar every 4 or 5 feet and then claimed that was overdoing it. And NO, fiber in the mix does not help on walls. Fiber is to help keep slabs and walkways from cracking. It is NOT structural. Nothing over his doorways, windows etc. Please, please, please, consult with an actual concrete professional if you are going to pour walls, even some retaining walls. Walls must be tied into the footings correctly and with sufficient steel and the footings themselves must be sufficient to hold the wall up. Now, I know footings for a house are nowhere near what commercial construction calls for but, as I have actually seen, a 2-inch thick little spread footing is NOT going to hold up a two story house, especially when it was poured right on top of the topsoil! They didn't even dig down past the frost line or to substantial enough earth to meet resistance from a probe. You can get into a lot of trouble with concrete in a hurry if it is done incorrectly. The form itself can fail, which I have seen, and that can hurt or kill someone. Concrete (reinforced) weighs around 140 lbs. per cubic FOOT. That means one yard is way over 3,000 pounds. Concrete is expensive nowadays and hard to get back out once it has set! If you screw it up it can be costly to repair.
It just pains me to no end to watch people install such piss-poor foundations for their houses and such and you know, come a year or two or 5, everything is going to be so damn outta whack the walls are going to be cracking and all kinds of hell. The foundations, however they are done, must be done correctly or the rest of the house will suffer for it. And you too, I might add.
So, this is my rant. Just please, take most of what you see online with a grain of salt. Even me. For one thing, I have come to realize that something that is code down here might not be advisable in another climate and some stuff I've seen done up north (because it was code) I would never do here. MUCH depends on your climate, the geology of your region and the building materials you are using. Please, please be aware of these things, research your ideas for your region and know and go by the building codes, even if you don't have to.
Labels:
concrete,
creative building,
formwork,
foundation,
how-to,
rants,
warnings,
work
Sunday, June 12, 2011
Imagine
For a building, I will then generally do a footprint drawing or cut, to work out my foundation etc. and also to do a materials list from. It helps me count up how many 2 x 4's etc. I will need. I was also calculating my roof pitch and such and, as you can see from the many scratched out places, I had trouble remembering the formula to figure rafter lengths! It had been so long since I have done that I messed up several times. So, see, even those of us who build can forget if we don't keep in practice. I finally saw what I was doing wrong in the formula (I could remember that part) and figured everything out. Still, even with the drawings, I ended up changing things as I built to save on material and such. For instance, the front wall is not a full 8 feet tall and the roof pitch is not a full 3/12. So, I don't know if this helps anybody! When I built the house we pretty much went by the drawings but we might occasionally move some framing just slightly. On something like a shed or so however, we might move stuff quite a lot.
So, I guess to answer the question; I do make drawings but they are just a suggestion! and to help me make up a material list. Also, since I often built with salvaged material, I have to go with what I have sometimes and that affects framing, looks etc. I guess my artistic side allows me to "go with the flow" on building.
Friday, May 20, 2011
Eight Easy Steps Part 2
So, anyway, back to the remaining program! Once I finished the framing for the walls I installed the sheathing/ siding. It's better if you go ahead and run your sheathing because it adds a huge amount of stability to the structure that you really need before you start trying to frame and deck the roof.
Because we had the material in old stuff, we also ran bridging where each piece of plywood was going to break. The joints I mean. Now, this isn't necessary, you can just use those clips, but since we had plenty of old lumber than needed using up and this is only 1/2" plywood, what the heck! Now, some of you with a sharp eye might notice that one sheet of plywood is running opposite the others. I'm not going to say who did this while I was gone to the store but it was a dumbass that I let help me one day. See, the grain of the plywood (roof decking) should always run perpendicular to the rafters. Do not run the grain with the rafters because it's weak when you stand on it. Now, if you run that crap OSB it doesn't matter, because that stuff has no grain but I only talk about real construction on this blog so, there you go.
Now, I mentioned in the last post how that I realize this is a lot of trouble and stout construction to go through for some chickens but here is my other reason: Where I live we have a surplus of predators that would love to eat my chickens before I could. We have coyotes, hawks, owls, crows, gopher rats, possum, raccoons, snakes, weasels, wild dogs, neighborhood dogs, bobcats and probably something else I've forgotten. I will not go to the expense of getting livestock, feeding it and caring for it only to let some other animal destroy it. I let the wild things be, but they ain't going to take food out of my mouth. I do not at all get into this pseudo hippie bucolic attitude of 'oh, we are going to be one with nature and just let the chickies roam and peck and if they happen to get eaten, well, that's nature. Bullshit. I paid $3 apiece for those f****ing birds, I'll be damned if some coyote, that isn't even native here, gets even a taste. I read the reviews for this book some dipshit wrote about this foray into urban homesteading. He built some little crap coop and it wasn't long before his chickens got ate by the neighbors dog or something and he was like, 'well, that was a learning experience for me and it's okay', blah, blah (I bet the chickens didn't think it was okay) and went on to quote some statistic that showed humans learned best by thinking about their mistakes. Well, no shit Brainiac. I guess we would have all died off by now if nobody could learn from their mistakes. I'll do you one better; I'll learn from that goober's mistake and build something no dog can get into.
It's basically like this; I feel that if I am going to confine an animal and take away it's ability to flee, and that's basically all a chicken has by way of defense, then I damn well better provide it a secure environment where it doesn't have to worry about protecting itself. If you don't you are basically providing the predator a sure fire way to catch and eat his meal and damning the chicken to a horrible death. I lost a few chicks once to a raccoon. It will not happen again.
So, the next post I'll show ya'll the run and a little more of what's been going on. If anybody has any questions about any of this construction framing etc. just let me know.
Thursday, March 17, 2011
Forming
I wanted it connected to the garden for a variety of reasons. At certain times, when there are no tomatoes, the chickens can be let right into the garden to patrol for bugs etc. Scraps from the garden are easily thrown to the chickens and chicken poop is easily gathered and taken over to the garden. Plus, I already have electricity and water at the garden and it won't take much to trench the power down to the coop, although I would like to maybe install some solar lights. And, last but not least, I already have shock wire run around the garden and it won't take much to incorporate the coop with this. The coop will also be known as ChickenTraz.
So, I'll be back later to show how I finished my preps for pouring this slab. Oh, and I meant to say I did not buy any lumber to do the formwork. It was all constructed of scrap material I had laying around. Basically just old 2x4's and stuff. Unless it is going to be pretty architectural concrete that is really going to show, I almost never buy form material.
Thursday, March 10, 2011
Finishing Touches
Alright. I don't have as many detail shots of the cork installation but I think there is enough to see what I did. It's not that complicated. I checked my room for square and I was within 1/4" overall so I didn't worry any more about that; I just started laying the stuff. First off, you must maintain a 1/2" gap all around between the flooring and the walls. I stuck 1/2" shim packs against the wall and cabinet base to hold the planks at the right distance. These are pulled out later. I works easier to snap the planks together long way and then snap that length into the preceding length, as I have pictured. Remember to stagger your joints. I simply used the drop from one end to start the next run. This is fine as long as your drops are at least 10 inches long.The first plank lays flat on the floor and then you insert the next plank at and angle and press down, wiggling it a little. When it snaps in place it is very hard to see the joint.
I am quite happy with this cork. You can read more about it here. It is a 'green' material; very renewable, healthy for your home and looks great. Supposedly, the resin in natural cork also makes it fire and insect resistant.
This is a 6' x 8' area and it took 2 boxes plus 1 plank from the 3rd box. Each box costs about $63 and covers just under 22 square feet, if I remember correctly. This brand and type comes with a 25 year surface warranty and a limited lifetime structural warranty.
I have since moved my little upright freezer back into the pantry and installed a few other little hooks and hangers. I just need to seal the counter top and install the backsplashes and I'll be completely finished there. Seems like an awful lot of work for one little dang room.
Tuesday, March 08, 2011
Down Under
So, I'm goig to show ya'll the steps I went through before installing the cork flooring and explain why I did things this way. Basically, the cork is only about 1/2" thick and I intend to run it through the kitchen and out to where it will meet the hardwood flooring in the dining area. Although the cork seems to be rather resilient, I believe that traditional hardwood will be more durable, for me and my work boots, in the living room and dining area. Anyway, hardwood is 3/4" thick and I didn't want to have this 1/4" discrepancy between floor heights. Also, adding a layer of cement board would just help provide a very smooth and clean surface on which to run the cork. My plywood floors, having been down so long with no other flooring over them, are a little rough in some areas.
Using a 1/8" notched trowel I spread a layer of water based glue that is used to adhere vinyl tile, wood and/ or base trim. This stuff has a relatively short working time so I only spread enough for one piece of cement board at a time. I picked this glue up off a job a while back, not knowing if I would ever use it but seems it came in handy after all! They were going to throw it out even though it had never been opened. So, making sure I was staggering the cement board joints over the plywood subfloor joints, I just started laying in one corner, working my way out. These sheets come in 3' x 5' sizes, btw.
Make sure to stagger the joints of the cement board also. I then screwed the cement board down using 1" coarse threaded drywall screws, 12" on center both ways. Make sure that the screws sink beneath the surface well. You don't want to feel those screw heads because they can cause problems in your finish flooring later.
As you can see, the cement board makes a lot of dust, so I try not to even cut it in the basement, although I have on occasion. I continued to run the cement board up to the threshold of the pantry door. You could use 1/4" luan plywood I guess but the cement board will never delaminate on you and is very resistant to moisture.
After getting everything glued and screwed real good, I installed the plastic underlayment that the cork manufacturer recommends for a moisture barrier. It is basically 6 mil black poly. I shouldn't ever have a moisture issue, considering this floor is elevated and not on grade, but you do what they call for, for warranty sake. The red, moisture resistant tape they recommended was basically crap however. It wouldn't even stick to anything. The plastic has one sticky edge though, so it sticks itself together anyway. I lapped the pieces about 3 or 4 inches.It wasn't too terribly bad to put all this down and after stopping to eat lunch, I then proceeded to install the flooring. Which I will show in the next post.
Subscribe to:
Posts (Atom)