Showing posts with label windows. Show all posts

Friday, February 21, 2014

Underneath It All

 Erin had asked about seeing a tour of my clay studio, and just so happens I have recently cleaned and purged the whole thing, so I thought it would be the best time to show it, before I mess it all up again.  My studio is in the basement, and while this was not really my first intention, it has worked out fine for now.  If I continue to work in clay I would like to have a separate, free-standing studio away from the house, but that's a dream for another time.


If you enlarge these photos you can probably see things much better; there is a lot crammed in there.  Of course, you can see my wheel in the foreground.  It is positioned so that I can see out the door when I have it open in warm weather.  I like to look out over the front yard and I can watch out over the chickens too.  Almost in front of the wheel is 2 kilns and storage shelves for finished ware or bisque.

 As you might expect, firing the kiln does heat up the house.  This is nice in the winter but not so nice in the summer.  I can open windows in the summer though, and have fans, so this helps dissipate the heat some.  The big metal cabinet to the left of my wheel is where I store dry glaze ingredients that come in smaller quantities, glaze making equipment and small stuff like that.  Of course, the floor is concrete so that helps keep things clean; easy to mop.


Just past the kilns is the sectioned shelving I built.  This holds most all my stained glass stuff; tools, glass etc.  I also keep just miscellaneous craft supplies, furniture and firing supplies for the kilns and all that.  Over to the far left is the wood burning stove that heats the house.  It is not exactly the type designed to be used in this fashion (with the ductwork and all) but hey, it works.  For now anyway.  When I build the rest of the house I imagine I'll have to break down and buy an actual furnace type heater.  My bedroom is directly above the stove too, so it stays nice and toasty warm in there.  No cold tootsies going to the bathroom!

Chigger's bed is right there beside the stove too, so she and the cat, have a nice warm sleepy spot if they want it. Chigger likes to sleep outside if at all possible (better to bark at anything that might come by) but she will come in here when it's real cold or rainy.  There is a dog door on the other end so they can come and go as they please.  And in case anybody wants to accuse me of abuse, as so many are want to do these days, I keep the floor swept and mopped so Chigger is not exposed to glaze chemicals or spills on the floor etc.


Behind the big metal cabinet is my work table and wedging table.  This is where I measure out my clay and get it ready for throwing.  Or work on hand built stuff.  All those buckets and stuff underneath are glazes or glaze material.  I have some large metal shelves on the other end of the basement where I store the pottery in progress.  I keep it down there, away from the wood stove, so I can better control it's drying etc.  If clay dries too fast in will crack or warp so there is some technique to it.  There is also a big utility sink on that end for the obvious reasons.  That sink is wonderful, even if I didn't have a studio down here. 


The basement is partially underground but the north side is above grade and we put in lots of windows for light.  Some on the west end too.  That helps make it a nice enjoyable space to work as I can see outside and enjoy the woods and flowers and all.  These are all casement windows too, so I can open them in nice weather for ventilation.
So, that's about it.  There is not much to it really.  I do have some more stuff crammed here and there in the back section of the basement but it's hard to photograph anything there.  I have a nice slab roller back there and that's where I store all my clay (usually around 800 lbs) and a few other things.  Like I said, in the best of worlds I would have a separate building for my studio with rooms and very organized storage and work areas but you have to work with what you've got.


 I added this photo after another artist asked me about venting the kilns.  I should have thought to include that to begin with.  All kilns should be vented, especially if they are anywhere around living quarters.  Venting not only removes the harmful fumes (like sulfur) released by the clay as it fires, but it also helps the kiln fire more evenly, acting as a downdraft.  Most fumes are not really released until the temps get pretty high, and it often gets too warm in here for me to work before that time anyway, but everything is still vented to the outside.  Fumes could pass up into the living areas of the house and plus, Chigger and Callie do go into the studio when the kiln is running and this makes sure they are not exposed to the fumes.

Sunday, March 14, 2010

Nothing I Can Do About It Now

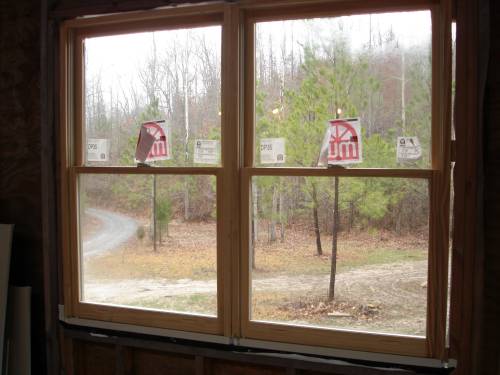
Well, I got as much done as I could but, due to persistent rain, it didn't amount to as much as I would have liked. I did manage to get this window trimmed out. I thought they might want to take a photo of one of the few finished areas of the house! It looks so much better with trim on it. Nothing like a little publicity to throw yer butt in gear. I also got a few things cleaned up in different places and finally put a switch cover over the porch light switch.
We kept waiting for the rain to stop to attempt to get the brackets and pick board up on the roof but it just would not quit completely so we just went for it. Allen made the brackets (you can see one on the far right under the board) and we got them all ready and secured and hauled that heavy ass board up there. This is the 24' board and it weighs about 150 pounds. If the roof had been bone dry it would not have been as daunting but we got it anyway. As Allen said, things are better now because before, if we fell off the roof, we would hit the ground and roll off into the ditch at the foundation. But now, we'll just hit the ground!
In this photo you can (maybe) see that I had painted the plywood and I managed to get the rafter tails finished too. The wood looked so aged and bad I hated for them to take any photos of it like that. It looks much better now.
So, I'm going to try to get home tomorrow a hour or so before they get here and maybe tidy up some more. I just hope to don't say something too stupid in the interview part.

*Willie Nelson

Monday, January 11, 2010

Looking For Changes

Now, I hope you all understand that much of that last post was written with my tongue firmly planted in my cheek!
Anyway, we got bigger problems to solve now! I need you all to speak up and give me your honest opinion on this dilemma. Look at the trim pieces on the top of the windows there; you see how the trim on the window on the left is more narrow than the one on the right? (the top edge of the trim is not at the same height as the other window) Now, because of the size of the window and spacing etc., I can't change the size of the trim on the sides but Mouse says I should make the header piece the same height as all the other windows, so that the top elevation of the trimmed out windows is all the same. This is as I have it now and.....

this is with a piece put on the header to make it the same as the other windows. So, this way I would have 2 1/2" wide trim on the sides and a 5" tall piece of trim on the top. I know there is a little notch missing there but just ignore that. What do you think? Do you think this makes the header look top heavy or unbalanced? I know some of you work in design, architectural and otherwise so let's have it....If it makes any difference, the bottom trim piece is the same as all the other windows.
I finished installing the siding all the way up on the wall to the right, so I just lack this side around the bathroom window and I can't go any further until I install the permanent header. I await your opinions.


*Paul McCartney

Wednesday, January 06, 2010

Soak Up The Sun

I know this has taken forever and I have been teasing ya'll with bits of photos here and there but the time has come. I finally installed the stained glass window. I was going to wait until it was completely trimmed out and everything to show it but I'm having some issues with a little moisture between it and the exterior piece of glass, so I may end up having to take the window back out and seal things a little better, then reinstall the stained glass.
However, if I have to do that I believe I will wait until we have a warmer spell come along because there is such a discrepancy between the inside/outside temps right now I think it would just make things more difficult. As it is, a tiny bit of moisture between them is much better than the one piece of glass that was sweating profusely by itself.
So, here it is. I am quite pleased.


It does add a beautiful feel to the bath. A lot of people have questioned me as to why I insist on adding such touches to the house, because it takes so much time. Hell, I've questioned myself as to why I insist on such stuff! But once it's there it adds so much. It's just a nice touch.


*Sheryl Crow

Sunday, December 20, 2009

Ring Of Fire

I've been burning the candle at both ends lately, I tell ya. Getting back into the clay again gets me all fired up to do more stuff. Ha! all 'fired' up! I kill me. Anyway, I'm trying really hard to get the items to the people that would like to give them as Christmas gifts and I should make it. I recently bought new elements for my kiln and Mouse was sweet enough to put them in for me while I worked on other stuff. The kiln is firing much faster now. So, the top photo was taken when I opened the kiln after the bisque fire.
This is all the stuff that came out of the kiln, awaiting cleaning and waxing. The initial firing of pottery is referred to as the 'bisque'. It is done basically to drive all the water and certain chemicals out of the clay by firing the ware to around 1800 degrees F. The ware is put in dry, and while dry, can still be slaked in water and brought back to a workable state. After bisque, it is no longer able to be broken down by water because the clay has gone through a chemical transformation. Flower pots are similar to bisque ware.
Now, I prepare my ware a little differently than a lot of potters do. I trim a distinct foot on each piece and this allows me to wax a very neat circle which will resist the glaze and leave a bare, clean bottom which will not stick to the kiln shelf. And hopefully not scratch anybody's countertops or such. You don't have to wax your feet but it's pain in the butt to try to clean that glaze off if you don't. You can also use the wax for some decorative effects.
Oh, and in between all this I have reworked my window just a little bit. I wasn't happy with the way it was coming out, so I basically simplified the design. I replaced the clear, textured glass with all the same type instead of several different kinds I had before and took out that second curve and a few of the squigglies. I like it much better and am very close to finishing it. I know, ya'll are probably thinking, 'this woman is crazy; she can't make up her mind about anything!' Well, you'd be right, nutty as a fruitcake!

Well, I've got a very busy week ahead of me. I'll show ya'll the monster tree I ended up getting! It's huge! Thankfully, Mouse also helped me get it in the house and set up. It was almost to heavy for me to move around. Going to have to have a ladder to decorate it.


*Johnny Cash

Thursday, October 22, 2009

Closer

During the recent bouts of rain, and in between face bashings and finger loss, I have managed to work on the window a little more. I have completed the hardest parts I believe, so it should start going a little faster.
You can see the textures in the clear glass a little better in this pic than in the one above. Here you can see where I've had to shim up the copper foil pieces to be level when one end is in the lead came and the other edges are not.
Of course, it helps when you have a good studio buddy to talk to while you are working. He's kinda quiet but is real easy-going. It was cold enough last weekend that I actually had a fire going in the heater for a couple of days. That makes the basement very comfy but Lika actually doesn't like it so I had to move his bed all the way to the other side of the basement in order to entice him to come back in. I don't know if he doesn't like the smell or something or if it just gets too warm for him.

*Nine Inch Nails

Thursday, October 01, 2009

Cut To The Chase

I made good strides in almost completing the siding on the north side today. I have just a couple more pieces to put up and then it's just painting. I thought I would show some of the technicalities of siding work. I guess that is what you would call it. In this pic you can see why they refer to this type as 'lap siding', 'cause it laps over piece below it. I am using Hardiboard which is a cement-based composite. You can also see in this pic, the drip cap I installed over the window trim. This is just a thin, L-shaped piece of metal that goes up under the siding and keeps water from standing on and soaking into the wood trim. A small bead of caulk over crack after the siding is installed seals the whole deal up.
This type of siding comes in several widths and surface textures. I am using the 8 1/4" wide with a 7 " reveal. You can lap it as much as you like, I suppose, but I think normally, to get the most coverage out of the material, you lap it over about an inch or so. They make it up to 12" wide I think and down to 4 or 5". It is about 5/16" thick and comes in 12 foot long boards. This type is nailed up with 4 penny galvanized commons. I think the manufacturer also says you can screw it up. I mean, use screws to put it up. I assure you, you can screw it up 'cause I did one or two pieces! Ha!
This is a shot of a finished window so you can see how it ends into window trim. The exterior trim is cypress milled to a full inch thickness. This is also referred to as five-quarter boards.
Ya'll may remember my rafter tails are exposed (ooh, I'm so embarrassed!), so I am having to cut the siding up around all of those too. One reason this is taking so long! The next to top piece of siding just has these little notches cut out to accept the underside of the rafters. Maybe you can see that in this pic. I just have them marked but not cut out yet. Now, with something like this, I go up and make my measurements and do a little drawing too, labeling each section with the measurements. One hint here, when you have to cut out several little sections in anything; take all your measurements from one end. What I mean is, don't measure between each rafter individually say, because you'll get off that way. Clip your tape on the end and pull each measurement from that one end. So, my measurements came out 2', 4', 6' (approx) etc. from one end to the right side of each rafter. Then, pull from each of those marks, over and measure for each notch. Did I explain that right?
Also, when I go to measure for each notch, I 'cut an inch' on the tape. This is good when doing any kind of fairly precise measuring like trim or whatever. That little clip on the end of the tape can throw you off sometimes (and yes, it is supposed to wiggle back and forth) so if you just scoot down to the inch mark you can line up well. But remember, you must add that inch you cut, back to the measurement! So, here I wanted 4 3/4" but marked 5 3/4". Got it? And yes, I have screwed that up too.
So, there is your little carpentry lesson for the day! Ha! I'm sure you all knew that stuff anyway but I got to write about something.
Hopefully, I will finish this side tomorrow. I have a couple of errands I must run in town so won't be able to get on it right away. Heehee, also might have a visitor this weekend of the male persuasion! He seems a very nice fellow and one that is man enough to handle yours truly.


*Rush

Sunday, August 30, 2009

Wire And Glass

Okay, so I really got started good on the window for the bath. I'm going to try to explain this but I don't know how good I'll be at it. If I say something that doesn't make any sense, which wouldn't be unusual, just ask me to clarify.
You have to have a good, sturdy table that is at a good working height so you don't have to bend over. Old, solid core doors make wonderful work tables. Anyway, screw two boards to one corner, making sure with a framing square, that the inside corner is square. You will start the window in this corner and work outward. The boards should also project about an inch or more above the top of the table surface in order to accommodate the layer of ceiling tile and glass. Leave the other two sides open. Then you take your full size cartoon of your window and tape it down, making sure it is up against the boards and square.
The zinc U-channel is cut for the two sides first and put in place and then you start cutting the glass in that corner, working out. Most people make two copies of the pattern in order to cut one up for tracing on opaque glass. I just lay the glass in position, making sure it is fully in the appropriate channel, and trace the shape on the glass. If I use some opaque, I just use some tracing paper to get that one shape. You also have to decide if you are building the window face up or down, as the glass is heavily patterned on one side. Keep this in mind as you build so you don't cut a piece wrong side up! Yes, I've done that. I use a grinder to smooth up the edges and perfect the fit, then slide the glass in place and secure it with horseshoe nails, keeping it tight in that corner. These nails have a broad head and are easy to push into the ceiling tile. Also, they are flat on one side and will not roll around against the channel. You can use small pieces of channel (came) as this is temporary, like in the photo below.
So, you just keep cutting the glass and lead came a piece at a time, working your way diagonally across the pattern. I am using a few pieces of zinc came on the long, straight runs to help keep the window from eventually sagging. I am also using copper foil on some of the really wiggly edges because it would be about impossible to get lead came to bend like that. This will add a real organic feel to it. I also write the type of glass I'm going to use in each space to help me get it laid out and to plan ahead.
Hope this makes sense. If not feel free to ask more. I am going to try to get a lot done on it tomorrow; didn't get much done this weekend.


*The Who

Saturday, August 15, 2009

Hundred And Ten In The Shade

Actually, our summer has been quite mild this year, so far, and we are really enjoying the break from the normal sweltering heat box that is Alabama. Now, when I say mild, I mean highs just in the 90's, not over 100 degrees F. Last summer was extremely hot and the year before, when I was at the railroad, we had like 11 days in a row that it was over 100. Combine that with being surrounded by nothing but gravel and running trains, swinging a sledgehammer for most of the day and it makes for some rough times. So this summer has been a piece of cake, let me tell you!

But I digress, my topic for this post is how happy I am with the coolness that my house sustains. I am still amazed at how much difference it makes to just position your house a certain way when building and put just a little thought into the eaves. For those that haven't read back far enough, my house is a passive solar design; a basic rectangle laid out east to west, lengthwise. The majority of the windows face south, to pick up the winter sun when it drops lower in the sky. I do have a couple of small windows on the east and west ends but they stay shaded most of the time. The eaves or overhangs of the roof project outward 2 feet. This shades all of the southern and northern windows from the summer sun, as the sun is higher in the sky, almost directly overhead. I believe about the first of September the sun will just start peaking back into the house.
I have not installed a permanent HVAC system in the house yet, as I hoped to wait until the other half is completed and then size the unit for the whole house. And also, I hoped that they may make some advances in geothermal units by then and possibly the price for such might go down a little. But who knows? Anyway, for now I just run two small window units for cooling. Now to me, they do a fine job. The house is fairly open in the design so air circulates well and I have 2 ceiling fans in the main part of the house. I have one unit in the living area that is programmable and I run it during the day. It turns it's self on and off as needed to maintain the set temperature. Now that I'm here all the time I usually don't even turn it on until about 11:00 or noon and the house stays very comfortable. To me at least. I am comfortable with the house staying about 78 degrees, which it seems to do easily. I know a lot of other people want it colder and if I have company coming I will cool the house more, but for me this is fine. I turn that unit off about 6:00 or so and turn the unit in the bedroom low so it will be cool in there for sleeping. Sometimes I have to turn it off completely at night because I get too cold. There again, I know if I had someone with me it would need to run all the time. Now, get your mind out of the gutter! I don't mean because of that (actually I probably do, hehe) but just because two bodies make more heat. Oh, you know what I mean!
So, there was a couple of days I went to work and forgot to turn the air on before I left and I thought, oh hell, it's going to be unbearable when I get home but it was actually not that bad. It was in the 90's outside and the house stayed in the low 80's with no air. It didn't take it long to cool down either, once I got home. We've had several days where it rained or stayed cloudy all day and I didn't even bother to turn the air on.
Now, some hardcore greenies would say just don't run air at all, and I wish I didn't have to but when you work in the heat like I do, you've got to have a little relief when you get home or you will damage your body.
I hear a lot of people complaining that their power bills run over $300/month and that just astounds me. If I run my air a good bit, mine will be slightly over $100 and I know a fair amount of that is that damn water heater. I hope to get a solar system soon for water. What kills me is the people that I know who purposefully built these big houses, knowing that the power bill was going to be ginormous! Excuse me? And half the time only a couple of people live there. I'll never understand. So, if you are planning a house, please consider the size and positioning; it makes a world of difference.

I had a great visit and dinner with a fellow artist last evening. We intended on watching a movie also but we talked and laughed so much it was too late when we realized the time. I have been able to be around more women lately and it's nice to not talk about hunting or trucks!
However, this evening I go to visit Cat Daddy so I'll be back tomorrow sometimes. You know the old saying, all work and no play makes Jill a dull girl! Hope ya'll have a great weekend.

*John Fogerty

Tuesday, February 17, 2009

Workin' On It

This post is the first of several to answer all the great questions ya'll posed last week. I promise to get to them all but ya'll bear with me. So, the question was:
what do you have for a food pantry? Do you have cold storage, root cellar?? Are you a prepper?This photo shows what will soon be my pantry. Due to the fact that I'm still building on the house, I do not, at the moment, have all these items mentioned but do plan on all those things. So, I'll just have to show what I have and discuss my plans. My pantry is an 8'x8' room right off the kitchen. There will be a cased opening leading into it (no door) and it has one small window. I am trying to finish the side to the left so that I can at least set the base cabinets on that side and pour the concrete counter top. Above the base cabinet I plan on having open, wood shelving that extends up to the ceiling. The shelving will probably be five-quarter pine or cypress, 12" deep, with a natural wax finish. Both base cabinet and shelves will be wall to wall. That side will be used for storage of food and other items that I do not want to receive direct sunlight. On the other side of the room I plan on having a chest freezer and it also has a small broom closet behind the electrical panel. The kitchen and pantry will both receive cork flooring.

At the moment I do not have cold storage or a root cellar but would like that. I plan on installing a sand-set brick floor in my pump house (which is partially earth sheltered) and with the addition of shelving, can use it for some cold storage. The pump house stays about 35-45 degrees F. in the winter and I think it would be okay for storing canned food.

As far as the root cellar, that's a little trickier. On the front of the house, which is the north side, I plan on pouring 4' high concrete walls to form planter boxes. This will cover the concrete block that shows now also and help the house appear to 'sit' lower to the ground. Of course, once finished, the planter boxes could possibly be used to grow some food or herbs and medicinal plants without fear that the deer would chow on them. I would like to form a vault of sorts within those planters that would serve as a root cellar. The roof of the vault would also be concrete and it would be covered by the earth and plantings above. Also, since they are on the north side, it always stays cool there. A small, insulated access door would allow you to get to the food from either the outside or inside of the basement. I hope my description is clear and I explained all that well enough. This is one frustrating part of the house because I know what I want to build but it is just taking so long. I'm plugging along though and getting some stuff done. I'm hoping warmer weather will give me a boost of energy too!

As far a s being a prepper, not in the way most people define that I guess. Due to just the lifestyle I like to lead (rural living) and what I do for a living, I do have or employ many of the tools and supplies that preppers do but that's just circumstance more than a conscientious effort for prepping or belief that a great disaster is imminent. Now, don't get me wrong, everyone should keep a decent tool supply, certain supplies for emergencies etc. and I certainly believe that a disaster, whether natural or man made, is possible these days. I am short of the food supply just due to the fact I have not finished constructing my storage areas. I do have some dry goods stored and a good selection of heirloom seeds for growing more food. I have several fruit trees planted already and am adding to that selection and hope to acquire chickens this year. So, I hope that answers that question somewhat.

Oh, btw, this is the enlarged 'cartoon' of the finished design for my bathroom window. I have actually started the window! but haven't gotten real far. I have discovered I need to order glass pretty soon also. I'll try to show what I have of the window soon.


Sunday, February 08, 2009

Hello Again

Allen found this old picture of Grendal and a terrifying snake in some of his old papers so he scanned it and emailed it to me, thus the kinda crappy quality. I thought it was funny though. This was taken several years ago.
Well, I've been working on the house some, specifically the window for the bathroom, but don't have much to show for it. I should say I have been working on the full size pattern for the window. I'm almost done with it, I believe, so should be able to actually start the glass today. I just need to pick some general idea of colors and make sure the proportions of the window look OK. Sure enough, last week the BFA was browsing the blog and spied my design. He hated it, of course, and promptly sent me his design that he had been sitting on for months now. His is quiet complicated though and does not lend itself to clear glass and light colors, in my opinion. It would be very nice in bold, rich colors but I'm trying to avoid that in order to take full advantage of the sunlight. So, I'm going to go with my design. I think it will look nice. It's very difficult to make an ugly stained glass window. Now, I have seen it done once or twice, but for the most part colored glass is just magical somehow.

I took my truck to a detailer yesterday also and had it cleaned inside and out. Man, it looks so much better! Anyway, another buddy of mine had dropped by to chat and tell me about the sorry state of our work right now, (we lost at least 2 big jobs just this week) and he said he would take me to pick up my truck. This buddy worked with me over at the RR (and knows that whole story) and as we were walking out of the place, he picked up a price list and started laughing. What's so funny? He showed me the paper and pointed to the address of the business. Such and such Railroad Street. I had not noticed that before. And btw, my company has recently given that RR prices for some additional work at that same location. Apparently, they want to put in another, larger sand silo and extend a concrete slab and so on. So, we may go back over there to work before long.

Well, hopefully I will have real window pictures to show you soon. Hope everyone is having a good weekend. The weather here is absolutely beautiful.


*The Cars

Saturday, January 31, 2009

Echos Round The Sun

This is the design I'm thinking about using for the window in the bath. I came up with this myself, sort of. I combined elements from several windows I have seen to make this. The BFA has been telling me that he would come up with something but he is just too busy to fool with it and I can't wait any longer. I am going to use a lot of clear, textured glass to maximize the amount of white light that comes in for solar gain but am going to put some lightly colored glass in it too. Some light blues and yellows, stuff like that. The window is about 32"x 38" I think. Something like that. I am also going to try to use glass and materials that I already have to make the window. I am going to have to buy a little bit but not much.
So, what do ya'll think? Of course, the house is quiet contemporary in design so I wanted to go with a modern looking window. The top most arched area will be a light blue, to symbolize the sky and the wavy streak running down through the area will be pale yellow to symbolize the sunlight coming in. The other lines and blocks stand for the structure of the house etc.
I might can even get started on this today. I have the table and materials all ready. I need to cut some firewood today and finish that freaking patch in the bathroom wall (I'm almost done) and paint that. Of course, there is always 27 million things to do here so I just pick the most relevant and try to finish that. I am very close to having the bath absolutely, completely done. I think that will help my feelings immensely. After the bath I need to go back out and start working on exterior projects. If I could just clone myself about 3 times.... Eeeew, on second thought, I wouldn't wish that on the world!
Hope everybody is having a good weekend and I'll try to be back soon. Not a lot going on here; kinda boring. Maybe I need to go out tonight.
*Paul Weller / don't care for his music but liked the title

Monday, October 22, 2007

Hey, Crow Doesn't Taste Too Bad!

You know when you rant and rant about something it's going to come back and bite you in the butt. If it's a free bite in the butt though it's easier to take though! Most of ya'll know that I dislike Pella windows because they have a tendency to rot, in my opinion. I even inadvertently attracted the attention of Pella Corp. with my rants here on their product. Well, anyway, I was offered 10 free Pella windows by a dear friend who didn't need them so...... beggars can't be choosers, I guess. They look great and I really, really appreciate the gift. I don't want it to sound like I just took them and didn't really want them, I just need to take some extra steps to assure that they stay dry in their setting. So, this weekend, we set the windows which helps in closing in the underside of the house. This is very important now as winter is approaching and I have bare water pipes under there and an uninsulated floor. We used 3/4" plywood to create a backing for the windows (spaces where cut out in the plywood so that you can see through the windows) and this works to suspend the window in the space above the concrete block so that I can lay the stone around the windows without hindrance. And I can lay the stone at my leisure and the space is still closed in. That stone work is going to take some time and I would have never been able to get it all done before winter with all the other work on me.
Here is a little better view of what we have done. You can see the stone work approaching from the far side. The stone lays out flush with the front of the block work so the windows will be recessed into the stone about 3 inches. I will wrap the outside of the windows where you see the bare wood, with a rubber membrane to keep the moisture out. It's the same stuff we used in the window sills before we set the windows upstairs. This is some cool new plywood too. Well, I don't know how new a product it is but this is the first time Allen and I had seen it. It's called Dryply. It's apparently just CDX with one side embedded with a water repellent. Looks like good stuff. Could have really used that when we put the sub floor down. It's tongue and groove stuff too.
So, this is the "basement" now. My pottery studio will go down here and some storage. This area you see here is where the washer and dryer will go for now. We need to continue that wood frame wall on the right a little more and put up a door and it will be dried in then.
I was finally able to order the tile for the shower and it is on it's way! YEA!!! I have a feeling I will be down there installing that stuff at night to get a little further along. We are working so much that I now only have Sunday to work on the house. I'm making lots of money to buy stuff for the house but no time to put it up. I'm not complaining though. It is funny though that not too long ago when I was laid off, I had lots of time for the house but no money. Ain't that just the way things go?

Tuesday, July 31, 2007

I have finally finished the clerestory wall! Wooohooo! I ran all the trim and installed the base of the light fixtures yesterday. Did some touch up on the trim; filling nail holes etc. Oh, I do need to touch up a little paint on the wall where I smeared it putting up one light fixture but other than that, it's done. Now, I just need to insulate the wall on the right (against the attic) and sheath it once and install the ceiling fans (which I don't have and can't afford right now) and I can get rid of the scaffold.
This is just a close up of the windows. I built the picture frame trim down on the ground and then just carried it up in one piece and installed it on the windows. This was easier, given the circumstances of the windows, than taking it up there and nailing it up a piece at a time. The inside trim has the linseed oil/beeswax finish on it. This is all a select pine that has been stained with Olympics new, custom-color premium stains. I really like them. You don't have to use a wood conditioner on soft woods with these stains. You can see in this photo the beginnings of my light fixtures. More about those later. I'm still working on the globes.
On the exterior of the windows I wanted a finish that would hold up to more strenuous conditions so I used a Spar varnish. This is the best type of clear exterior wood finish that looks really great too. This type was rated as an interior version also, so it had very little odor. I expect these windows to be open a lot so I extended the Spar inside on the sashes too. The large overhangs on these windows don't allow much rain to get on the windows but it can happen and during the winter, these windows will receive a lot of harsh sunlight as they are south facing and work to absorb heat for the house.
Allen installed a temporary kitchen sink that he had salvaged out of an old house he has been working on. He loves these old cast sinks but I hate them. It will do for now though. So, the water is working in all the house now; kitchen sink, toilet. No shower yet though. I imagine that the kitchen will be the very last thing to go in so it will be pretty rough for a while.
I think I need to add to my water filtration system too. I have one separate sediment filter now but I think I may need a finer one to help cut down on what goes into the last filter. The filter cartridges in the main one are $100.00 each so I must help extend it's life as much as possible. They said the cartridges should last 3 years but with these heavy rains lately we were getting a lot of sediment out of the spring. We raised the foot valve below the pump to about 4 feet off of the bottom of the spring and I think this helped also. I also need to shock the water system once before we really start drinking it to make sure and flush out any bacteria. At times, the water has sat in the system for a few days without new water being pulled in and it got a little smelly at one point. We try to run the water a good bit every day just to keep things fresh.

I will try to post again soon; it seems like I have been very unorganized lately but I think I am getting back on track. I am kind of running out of things to do that don't require a lot of money so I have been trying to assess things and see what can come next.

Edit: Allen says I have to correct myself about the sink. It is not a cast iron sink but enameled steel. So there.

Saturday, July 07, 2007

Under Pressure

Here is a different view of the clerestory wall and windows that I don't believe I have shown before. I took these while up on the scaffold I am using to sand and paint this wall and the ceiling. Lots of things are happening since I have so much time now to work on the house. I have primed almost all of the walls that got Sheetrock. I completely finished painting the bathroom and it's ready for flooring. More about that later. This wall is primed and ready for the final color. The title of this post refers to the extreme difficulty I have in picking colors. The BFA is of no help lately. He is very busy on real projects so I am mostly on my own with this now. I have only my concept of what he verbally described as wanting this room to look like, which is probably nothing like what he imagined. So, we'll all get over it. It's going to look good I think, at any rate.
I also cleaned the steel beam here and it's waiting it's final coat of wax. Lots of people ask me if this beam has been painted or if I'm going to paint it and I'm not. I left the mill scale, which is a natural, blackish coating that forms on the steel as it is rolled. I love the way it looks and a good coat of wax will keep the edges from rusting. I have installed the screens in these windows so that I can keep them open all the time now. Normally, you would not put the screens in until a house is completely done (they don't usually come with the window anyway) but these windows are not likely to have anyone messing around them. I think having them open helps a lot to vent the hot air in the house. I have a thermometer in the house and with no air conditioning, the house usually stays about 10-12 degrees cooler than the outside on a sunny day. Now, that's not too bad but on days when it reaches 95, that can get warm. I think with the addition of ceiling fans, it will be a little cooler or feel like it anyway. I plan on having air conditioning but it will probably have to be a window unit for a while.

This is just a close up of the rafter tails. I am using a natural polymerized linseed oil/beeswax finish on the rafters and plywood decking. It is a beautiful golden color, completely natural, biodegradable finish, VOC-free and smells wonderful. The beeswax gives it anti-static properties also so they claim surfaces finished with it won't attract dust. I had to order this stuff from New York and it was kind of expensive but I think its worth it for the health factor. By getting so much salvaged material for free etc. I feel I can splurge some on a few things like this. These rafters don't have anything on them in this photo. The tail part (spruce) of the rafter ( #2 yellow pine) is going to be stained a slightly darker color (which I started today) to accent them a little from the rafter. It took a long time to finish around each of these tails and make the Sheetrock look good.


This is not a very good shot but I was trying to show something of the bathroom. I am having to mix my own colors due to the fact that I was given various paint. You get it free but have to take what is available. Hey, but I'm not complaining! It's worked out really well. I was able to mix up just the right color in a kitchen and bath semi-gloss. The colors are not showing up well in these photos though. This is a light sand color that goes great with the slate floor and I will have white trim. I wanted to show the shower to show that you can finish Durock just like Sheetrock. It would be pretty pricey to tile the shower all the way to the ceiling so I am going to stop it about 18" from the top. You have to skim the Durock maybe a couple more times than Sheetrock but you can't tell where one leaves off. Here, I have cut in my corners and am about to roll the walls.
I did a little investigating on the VOC levels in paint as far as what is considered unhealthy and all. Anything above 150 grams per liter is generally considered not good. All paint, stain etc. now has this information on the label so I checked out the stuff I got and it was all around 60-85 grams/liter except the semi-gloss in the bathroom. It was 163 g/l but I figure I will just leave the windows open slightly until I'm sure the paint has dried to let everything air out good.
Tomorrow I plan to continue finishing the ceiling and rafters so maybe I will have photos of that soon. I think it looks great so far. I am very excited!!!


Tuesday, January 09, 2007

She Came In Through The Bathroom Window

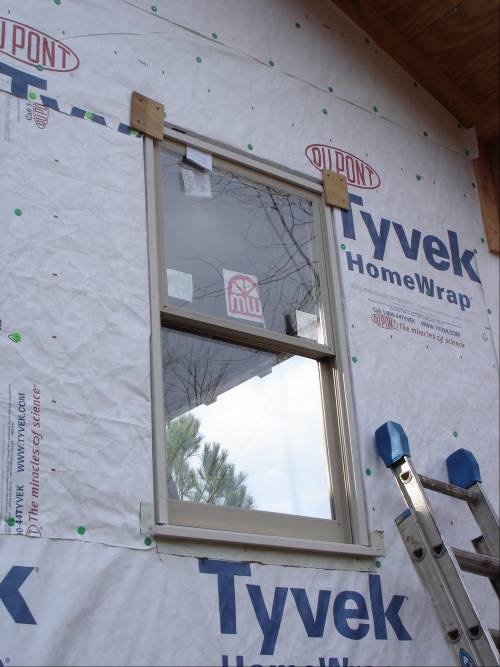
Well, the title has nothing to do with this post but it was the only song I could think of that mentioned a window and it's one of my favorites. Anyway, these are MW windows, made in Virginia I think. I liked them because they are just plain wood windows, no frills or grilles or cladding. You can get that with this brand but they have good solid wood too. I don't care for vinyl or aluminum windows. They are fine if that is what you like and want but I just like the feel and look of wood. Now, these do have composite sills but everything is paintable and the wood is treated with a sealer. As I mentioned before, I'm not much impressed with Pella and some of those either and here's why. Lots of the expensive window makers use white or sugar pine for the frames because its pretty wood (it really is), fine grain etc. But it rots like crazy. There is no sap in it. But they charge alot because it looks so nice and it does look pretty on the inside where you might stain it. Now, these windows use good, ol' hard yellow pine. Lots of sap means harder wood and less rotting. Now if installed properly, they should not be getting water under them anyway but things happen. But the interiors are still nice and would look just fine stained. Also, last year I replaced about 6 sills in some big Pella windows. They had only been there about 7 or 8 years and were completely rotted out, so the owner calls the Pella rep and complains. So the rep says, "I'll come out on Friday to look at them 'cause that's my day to check out complaints". He has one whole day devoted to complaints?? Anyway, the guy comes out and looks at the windows and says, " Yeah, they're rotted. Too bad." So I don't care much for them. We put down this rubber flashing under each window. It's a peel and stick deal and you have to make sure and not let it touch its self. Some peope say you only need this if you are going to have brick or stone on your house but we use it regardless. Let it roll up the sides about 2 inches and stick it down good. Then set the window.
After the window is securely set, I stuff a little insulation under it and then you kind of roll this flashing up on itself to make like a little dam at the back or inside of the window. This photo is a little misleading 'cause I rolled it a little different that what I show here. It will secure itself if you roll the sticky side in.
So it looks like this. This is in case any water gets under your window somehow, it will not fall back into the wall. It will either flow out and behind the siding, where it will evaporate, or just evaporate on the sill. Now, if you get lots of water, that's another story! So that's my window lesson for the day. The metal roofing is suppossed to be here Friday morning!!! I'm excited again! It cost way more that I thought! I'm running out of money! Need to work more side jobs. We added alot of trim to it so that's what ran the price up because that stuff has to be custom made.

Sunday, January 07, 2007

Nick Of Time

Hey, what are those funny pieces of glass that keep the rain and wind out and raise up and down?? They're my windows!!!! We worked most of the weekend installing these and got all of them on the main level in. We still lack the 4 clerestory windows. Those are going to be a little bit of a challenge since they are up so high. We did get the pick board up and everything prepped for it so we can just go right to sticking the windows in. About 30 minutes after we got the last of these windows in a huge storm hit. But no rain came in! It's starting to look more like a house now. I'm excited!
I'll have more about the windows on the next post probably with some better pictures. I was just trying to put up a little something for now. These are all wood with composite sills. I've have to replace too many rotted sills for other people. And no, I did not go with a big name like Pella and I'll tell you why later. It wasn't the cost. Well, not entirely!
We also installed the bathroom and shower lights and bathroom exhaust fan and did a little more wiring in the living room. It seems like that is going on forever. Crazy architect and his crazy lighting plan. I'll try to post more soon; maybe tomorrow.

Wednesday, December 13, 2006

Finally!

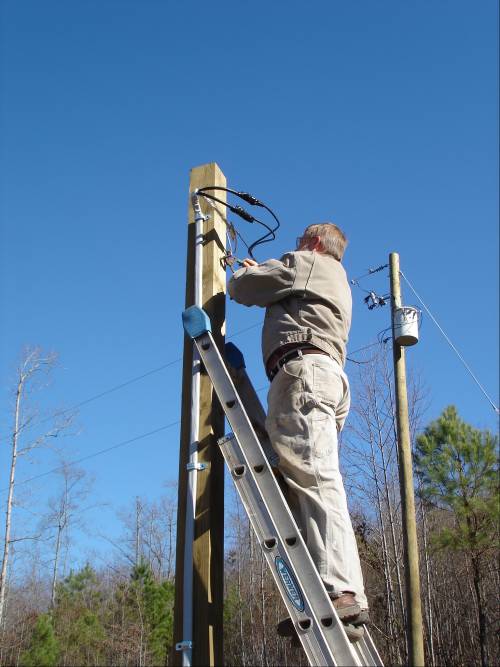
I have been so bad about posting lately or not posting I should say. What's been going on lately just has not seemed that interesting so I haven't been excited about putting much up. I mean, it's very exciting to me but I think would not be that thrilling to other people. Anyway, we got the power actually ran to the house!! After all this riggamaroll (?) about finding an 18' pole for our temporary, Allen came to me the other day and said he thought that the pole he had all this time was 18'. He thought previously it was 16' but didn't check it. I know everyone out there has felt that desire (that I felt then) to choke the crap out of someone at some time in their life. But, it was okay. We now have plenty of 18' pressure treated timbers. Should we ever need one again.
And when you put all those wires together, you get this!! Yea!! I couldn't help but have my feelings of joy dampened just a little by what we had to pay for 200 amp service wire though. All wiring has gone up tremendously lately. They tell me it's China's fault. Concrete has skyrocketed too. I finally got quotes from 2 different places on my windows too. Another sobering reality. I really wish I could have salvaged some windows from somewhere but that just didn't happen so they are going to be one of my bigger expenses. But I really can't complain because of all of the stuff I have gotten for free. And once again, Lowe's and Home Depot have been beaten out by the little local building supply. Do not ever assume, as alot of people do, that those big stores are the best deal. A building supply in a nearby town beat Lowe's quote by a considerable amount and I just can't see how that is possible IF Lowe's was really trying to give me the best price. Anyway, I'll try to post more soon.