Showing posts with label kitchen. Show all posts

Wednesday, October 26, 2016

Pick Up The Pieces

 So I promised to show ya'll a few photos of some actual work I have done around here.  I was never really enthused about the idea of painting this bar wall, so when it hit me to sheath it in pallet wood I jumped on that. Allen had been scrounging pallets for me for months and I had stripped a lot of them down to usable wood where they were just waiting for finishing.  So, I finally bit the bullet and sanded, stained, painted, sanded again, and patched for two days to get enough planks to do these 2 walls.  I didn't make a lot of effort to hide any patches, dents, or bangs in the wood.  I mean, it's obviously pallet wood and obviously reclaimed, so there's the "charm".  Ha! Anyway, I thought it came out rather well.  The corners are done in 1 1/2" angle iron and these make helluva good corner guards..  The iron is just stuck on for now because I'll have to take it back off and cut to fit when I run the finish floor and baseboard.  In person it looks better.  The color is a bit washed out in this photo because, due to low light in the warm months in my house, I have a devil of a time getting decent photos.  I often have to use a flash and it just doesn't look right.

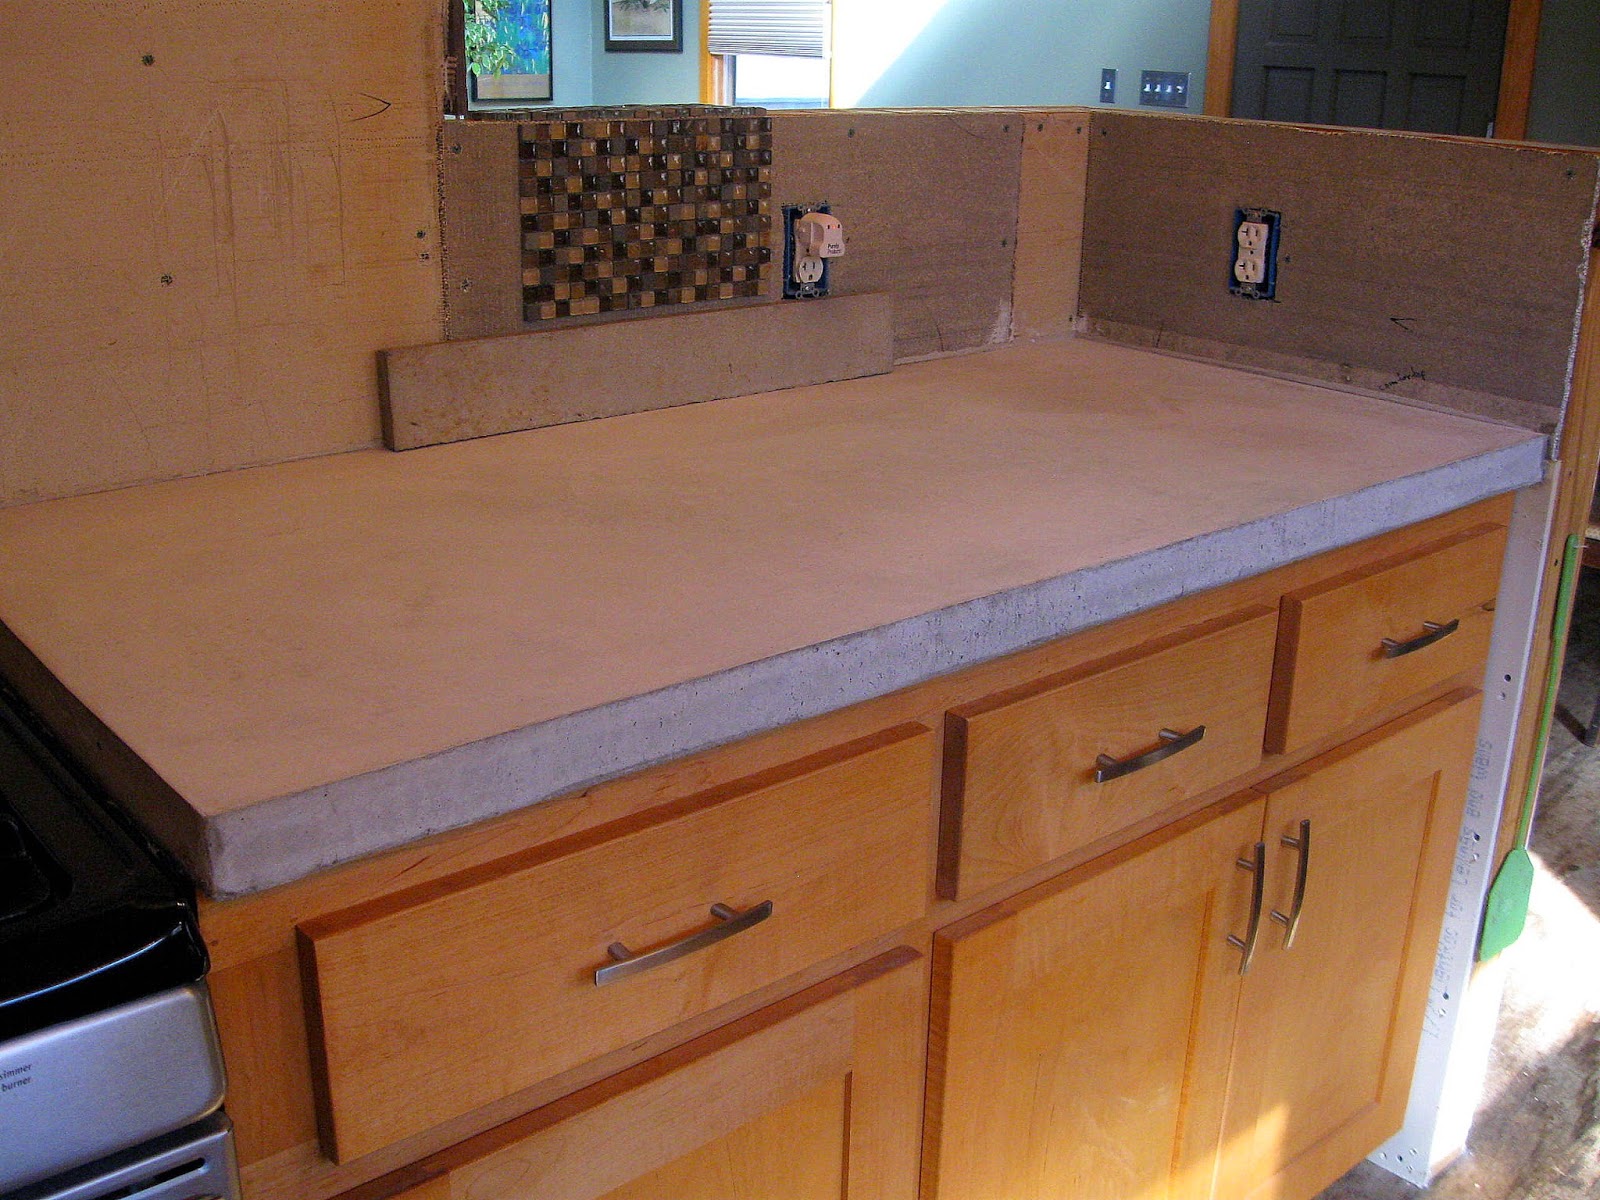
 This photo is a little better but it's a little washed out too.  Anyways....I finished this counter top and back splash and wanted to run a little of the glass tile just to see how that was going to look.  I'm very pleased with this but please note; the tile has not been grouted yet, so it will look a little different when finished.  This gives me a lot of motivation to keep going.  I'm very anxious to get the kitchen finished because I think it's really going to be awesome.

 However, I had to take a break from all that and take advantage of the fact we are in an extended drought.  I have needed to fix this basement wall for years after I discovered just how much rain floods down the mountainside during the winter rains.  If the rest of the house were built this area would remain dry but.....we all know that has not happened yet so....I have to treat this as if it is forever an exterior wall.  Which meant chopping the bottom 2 feet off of the wood framing, forming a 4 inch thick wall and pouring it in concrete.  Here you can see the girls inspecting my forms.  It came out real well.  I even played around and did a faux board formed look on the outside.  This 11 foot section is a little less than half of what I need to pour but it's the worst part of the problem.  I admit I should have done this to begin with..but I did not realize the amount of water etc. around here.  And I was under the supreme delusion that the rest of the house would come along soon enough. Ha!!
Anyways, this form has been dropped, the wall sheathed back, and also insulated and covered on the inside.  Snug as a bug!  I'm now running multiple shelves on the inside in an effort to better organize the basement and my studio there.  I'll rub the exterior of the concrete here, below grade, to produce a smoother finish, then waterproof heavily and backfill.  There is still no sign of any rain anywhere in our near future so I shouldn't have any issues finishing this in the dry.

I also thought I'd take advantage of the drought in other ways!  We have ample dried foliage, leaves, flowers, grass and any things else you can think of here, so I gathered up a armful of stuff, a couple handfuls of feathers via some molting chickens and threw together this autumnal wreath.  Not too shabby I guess.  Certainly was cost effective.  haha!

Friday, January 30, 2015

Float On


So, I pulled the forms from the counter top and was pretty pleased with the way it came out.  As you can see, the concrete has cured to a fairly light color but once I polish it a bit and seal it, it will be a much darker gray.
I set a piece of concrete backsplash up there too and some of the glass tile I will use for the back also, just to kinda see how it will look.  Once the concrete is sealed it will be very close to a grayish slate color and match the glass tile well.


I was fairly pleased also, with the finish I got on this pour, although I think I actually got a smoother finish on the hearth slab.  It's fine though.  I will run over this a bit with 100-200 grit diamond pads and it'll be slicker'n owl shit.  I have no idea where that saying comes from or what it means but I used to hear it all the time on construction sites.  Ha!
It's also quite hard (to me anyway) to get a good slick finish right up to the edge because you can't follow through with your stroke but that is easily smoothed with the diamond pads and I'll round that top corner off just a tad.  The front face of the edge had a few little bug holes in it but I don't really mind that.  It makes it look more like concrete, to me, and I want that to be obvious.  I just really like the look of unstained, natural concrete.


 It's really hard to explain to somebody else how to finish concrete and I looked around for some YouTube videos that might do a good job but didn't really come up with much.  Most of them show how to float concrete, which is good, but none I could find show how to trowel it to a hard finish and that's what takes such finesse.
In the photo above I have the tools most commonly used for concrete finishing and they are not interchangeable.  The one on the left is the float and the one on the right is the trowel.  Since my pour was so small I did not need a screed or straightedge but you need those on a large pour.


The float has a much thicker blade and is longer; some of them are up to 2 feet long or so and this is what you use immediately after placing the concrete.  On really small pours like mine you can use the float sorta as the screed to knock the mud down to the correct elevation.  Then you pass over the concrete in sweeping motions to smooth it down nice.  Now, at first, it's not going to look that smooth and that's okay.  Once you float it off good, with one pass, you just then let the mud sit.  Water will begin to rise to the top and you will see a pool form.  Let this water evaporate!  Do not keep working it back into the mud.  Once the water evaporates you can see the surface begin to "tighten up" as we say.  Make one more pass over the concrete with the float.  Water will rise again.  Let it evaporate.  At this point the mud may have tightened so that you can move to the trowel.  When you go over the mud with the trowel you will begin to get a much smoother finish.  As you can see, the blade on the trowel is much thinner.  And, it's pretty much the same rhythm; trowel it off, let the water rise and evaporate and etc.  Now, at this point, hardly any water will be noticeable on top but you can tell it's happening.  This is the part that is really hard to describe as it's something that a person has to see and do to really "get", but it's much like burnishing clay or similar.  Also, the tighter the concrete gets the harder you have to press down to get a smoother finish.

If you really want to try pouring something like this and have never worked with concrete before I would strongly suggest pouring some little practice slabs first.  Maybe pour some steps or a small patio just to get the hang of floating the mud and those things don't require a really hard finish.  In fact, you don't want to get them too slick or they will be very slippery in wet weather.  Then maybe pour some little stepping stones or maybe a bench seat to practice troweling a smoother finish.  Good concrete work is much harder to do than most people realize but it's not rocket science.  It just takes a little finesse, as I said.  If all else fails, hire a finisher.  And you can polish counter tops once the concrete is cured, to hide a multitude of sins.  I've done all my own concrete work here at my house but I'll say this:  the work I did as a carpenter and welder was pretty hard sometimes, but I always got through it.  I don't think they could have paid me enough money to place and finish concrete however. 

Okay!  I'll be putting this finish on this top before long but we had to order some new diamond pads so it may be a bit before I have another post on this.  And, I have to find a suitable sealer to use on these since they are in the kitchen and would come in contact with food.  But I'll have a complete post on all that when I'm done.  Any questions?

Monday, January 26, 2015

Something's Cooking In The Kitchen


I suppose a more accurate title would be Something's Curing In The Kitchen, but this'll do!  Unbelievably enough I finally got up the gumption to start pouring the first of the kitchen counter tops.  We had a whole week of spring-like weather and I just couldn't let that pass without doing some kind of house work.  A lot of times the hardest part of a project is simply starting, so I just took one step at a time and pretty soon it was going!  The nice weather made getting and hauling the sand and gravel enjoyable and easy and that was one of the biggest steps.
Now, in this first photo you can see that I have everything pretty much ready and in the next photos I'll give you some detail shots and more explanations.  As you can probably guess, the plastic sheeting is to protect my cabinets and also the stove that I left in place for the pour.


I ran my forms on grade, which is to say, I set the top of the form at the height I wanted my finished counter top.  To me, it's just so much easier to finish to the top edge of the form rather than try to make a grade line and keep it visible while you are pouring.  Of course, that's not that hard and what I had to do anyway on the sides that butted the backsplash area.  When I get my forms set to the right elevation I always mark it with a crow's foot and that allows you to see if something happens to knock your form up or down.


I then leveled my grade line across the back and around the sides and was pleased to see that when I measured up 2" inches in random spots it actually hit the grade line! ha!  I also partially ran a few long screws into a few studs to help "lock in" the counter top slab.  It would probably never move on it's on but expansion and contraction and all that jazz, you know.


There are several ways to do the edge form and I choose again, just to clamp mine to my cabinets with a 1" spacer between the cabinet and the vertical form, which is the standard counter top overhang.  Clamping does sometimes cause the form to roll out a little at the top but I'll show you how I remedied that in a minute.


The ends of the form were screwed off to available surfaces.  I always use screws also because they are much easier to remove than nails and will not pull out like a nail will.  Of course, there was very little pressure against this form but 2 inches of mud will exert a little.


This is looking at the inside of the edge form and you can see I caulked everything really good.  The concrete mixture will weep way more than you might think so I always caulk any crack really well.  A nice, smooth bead of CLEAR caulk in the bottom inside edge will give the bottom front edge of the concrete a really smooth finish too.  I know everything looks white but this is that caulk that goes on white but dries to clear.  The edge form and spacer are white though.  To the left you can see the 3/4" plywood that tops my cabinets and is the bottom form for the counter tops.


The very last step is to put in your reinforcing and in this case I used dog wire.  It's a 4"x2" grid wire.  You could use chicken wire, hardware cloth or even #3 rebar.  You also want your wire to end up about halfway up in the concrete rather than mashed down against the plywood.  An easy way to do this is to initially pour a blob of mud about every 12 or 16" and then pull the wire back up so that it's about an inch off the bottom.  I'm pouring 2" counter tops, btw.  The mud will hold the wire in place then as you pour the rest.


We mixed the concrete outside and then just brought it in with buckets.  I float the mud down as I go, pushing the concrete on grade towards the back first and working your way towards the front form.  With floating you are kinda pushing and patting and smoothing.  Not trying to get a smooth finish yet, just trying to get everything on grade.  I also vibrate the edges with a palm sander and tap the underside of the form with a hammer to compact the mud.  When bubbles stop coming to the surface you know you are done.  Don't vibrate any more or you can actually separate your mix too much.
In this photo you can also see two other tricks.  The side form against the stove is not nailed off as this was not possible without moving the stove and all that crap.  I pushed the stove over to the left as much as I could and slid in the edge form.  I then placed the wooden wedges every few inches and tapped them down until I got a good snug fit.  Once it's screwed to the front edge form and caulked good it's not going anywhere.  Always use wood wedges too because they won't scratch or dent anything. 
You also see 2 wires running over the slab.  I anchored 2 tapcons into the studs of that wall and then wired 2 little turnbuckles in the wiring, which ran over to the front edge form.  As you tighten (or loosen) the turnbuckles you can move the form in or out, however you want.  Works great.  I simply used a straight edge on the front edge to determine when it was good.  These are a tiny version of the large turnbuckles we use on big wall forms and such.  After you pour and get it floated down, you want to check your lining again and make sure nothing moved.

Okay!!  So, any questions??  I hope I explained all that correctly.  If I didn't, please let me know and I can address it in the next posts.  I'll do another on troweling the concrete for a good finish, removing the forms and all that.

Friday, January 09, 2015

Easier Said Than Done


So, one of my goals for 2015 is to finish this kitchen!!  Really, I hope to finish the kitchen and maybe even the other side of this wall before the winter is up, or at least spring.  I don't really lack all that much, although there is a lot of unfinished square footage, it covers fast with what I plan to do.  First, is to pour these counter tops and the concrete bar tops that go on the low walls.  I'll probably form and pour the bar tops outside on a decent day and then place them once they are cured but the counter tops will be poured in place, obviously.


Then to do the tile backsplashes and wall tile.  This is the glass/ slate tile that will go between the concrete countertops and the bar tops.  And yes, that's about how much tile will be the too.  I have 2 inches of countertop (as marked by the crow's foot on the lower left on the wall) and then a 3" or 3 1/2" concrete backsplash which should fit right up under that electrical box.  Then the glass tile from there up.


On this other side of the wall I need to finish the sheetrock, paint those low walls and then make, or have made, the built-in bookshelves that go there on either side of the fireplace.  You can see where I have a temporary bookshelf on the other side.  And of course, I need to finish running the slate tile here and grout it, along with the mosaic work that goes in the off-centered strips.  That part may drag out a little longer as that mosaic takes a long time!  Ugh!  the little bit you can see I have done, down by the hearth, took 4 hours!  But, it's just something I've got to psych myself up to do.  I do enjoy the work but I tend to get a little antsy to be finished.  Doing a little bit every day or so is usually my best strategy.


Now, this will have to wait until warm weather but I also must finish this wall this year.  I have to etch and paint those metal sheets so that is why I need warm weather; can't do that in the house.  And then after the metal is up I'll install some sort of shelving to display sculptures and ceramics.  Or whatever.  Skulls of old boyfriends, I don't know.  And yes, that sheet hanging over the door will be replaced with an actual door!!  I have a really, super cool idea for the interior doors but again, I need warm weather to do those. 

So, if I can get all this finished before springtime I can then move on to all the crap that needs to be finished on the outside!!  Yay!!  I guess I should look at it like this...it all keeps me from sitting down at least!  I also have not forgotten that I need finished flooring but that is a very last of the list item and I'm trying not to overwhelm myself.  haha!

So, do ya'll have any interior house projects going on for winter? 

Sunday, May 19, 2013

Lights Please


We actually completed another item on the house recently and I am very excited about it!!  Now, I know already that the BFA (big, fancy architect) is going to hate the fact I defiled his steel beam by hanging pendent lights from it but the basic fact is, I could not see worth a crap on that side of the kitchen with no overhead lighting.  In the winter, when the sun comes in, it's no big deal, except at night.  But in the summer when there is no direct sunlight, I was having trouble.  Yes, my eyes are not what they used to be and I need a little more light.  So, we picked out a nice light fixture with very unobtrusive wiring and Allen did the rest.  The wiring runs along the upper side of the bottom flange of the beam, so it is completely concealed.


I know you can't tell crap from the first photo about what the globes look like, so here is a close up.  Personally, I think it looks really cool.  I had thought about repurposing wine bottles again to make the globes but just wanted something a little nicer and these were not that expensive.  The entire fixture was about $45 maybe.


This is just a view from the other direction and from here the wires the globes hang from basically disappear  because of the dark wall behind them.  Anyway, they add a wonderful light and clarity to the kitchen area. 


Which is better to highlight the glass and slate tile I picked out for the backsplashes and stuff!!  Yay!!  The small sheet tile will be the backsplash area along all the counter tops and behind the stove, up about 2 feet.  The large slate tiles will be from the range hood and up and completely cover the other side of that wall, around the gas fireplace.  Well, with a bit of mosaic thrown in.  I am very anxious to get started on this part but there are a number of things that must come first, such as pouring the actual countertops!


Just a little close-up of the glass and slate.  I really like these and the tan/ brown/ goldish colors will blend well with my kitchen cabinets. 
Now, you all know I always advice people to go to a specialty supplier when buying stuff like this and not assume Lowe's or some other big box place is going to be cheaper.  However, in this case Lowe's was actually the best deal by a long shot.  Still, it doesn't hurt to check the supply houses first.  I had seen these tiles at Lowe's a while back but went to look at a tile supplier in Birmingham just to see.  In fact, they were the same supplier I bought my shower tile from and, at the time, they beat Lowe's price quite well and had a better selection.  Well, sometimes things change I guess.  I really couldn't find anything at the supplier that I liked better than these and they wanted 3 times what Lowe's was asking per square foot.  Literally, 3 times.  Plus, I had a gift card from a while back that was a safety award from my construction days and that got me another $50 off, so....

Unfortunately, I am still working in Birmingham and then have to get back to my pottery for a big special order and some other stuff, so it may be a while before I actually get to start installing this stuff.  Well, and get over a terrible head cold that has left me not feeling like doing anything.  Hopefully it won't be much longer and I can really start getting this kitchen finished.  I think it's gonna look fabulous!

Friday, February 15, 2013

Looking Back...And Ahead


The purple crocus down by the creek have finally awoken to signal the earliest signs of a much anticipated spring.  We still flip-flop between cold, dreary and thunderously rainy days to warm, agonizingly bright sunny days.  Currently, it's one of those bright, sunny ones but with a forecast of snow flurries tonight.  Such is Alabama and all this does wonders for my sinuses and bronchitis, which is still clinging for dear life.
So, in an effort to cheer myself by looking at what all we've accomplished this past year and what I want to get done this coming year, I offer you the standard Blog Year in Review!

In the Garden:
1.  We established a sizable asparagus bed with 1 year old plants.  I'm really looking forward to being able to cut a few stalks this spring.  If it comes up, that is.
2.  I redid my existing strawberry bed with plants more acclimated and bred for our southern climate.  It shows some promise already.
3.  Established a small grove of tea plants.  They are still alive anyway and hopefully will show quite a bit of growth this year.
4.  Planted yet another apple tree to replace the one decimated by moles (or whatever) this past year.


In The House:
1.  As you may see in the photo above, all of the incoming power and cable/ Internet is now underground. Just so happened that the phone company came out the next week to upgrade things for us (no charge) and happily ran new Internet/ phone cable through that dedicated underground conduit.  Now there are NO overhead wires anywhere around the house.
2.  Installed new kitchen cabinets!  Yay!
3.  Installed duct work and electrical for range hood vent and completely closed up the dividing wall in the kitchen.
4.  Painted main kitchen wall and trimmed out all windows.
5.  Started wall covering on west end of kitchen.
6.  We finished the clerestory area of the house completely!!  Way, way overdue.
7.  Also finished all the painting/ siding and miscellaneous on exterior of the house.  Even installed the porch light fixtures.


Chickens/ Land/ Misc.:

1.  Added a bitty coop to the Big Run so batches of young chicks can be more easily separated from grown hens and have more room.
2.  Built a large wood drying and storage shed. 
3.  Established my pottery business to a greater degree by securing 3 more outlets for sales and enlarging my product line/ new glazes etc.
4.  Added to the landscaping by enlarging my daffodil and iris collections.

There may be a few other things that have slipped my mind at the moment but I think that is the majority of it.  Seeing how long this post already is (more stuff done than I thought!) I think I'll do a separate post on what we want to do this year.  Now, if I could just get well enough to work before any more of this year slips away!

Wednesday, October 03, 2012

Closer


This is just a quick update to let ya'll know I'm still alive and here!  The kitchen has progressed a bit more; probably all it's going to until after the honeymoon.  But I got the range hood installed and it works!!  Yay!  However, having been so long without one I keep forgetting to turn it on.  Ha!  It is only temporarily up because I'll have to have it out of the way to install the tile on that wall, but it shouldn't be any problem to disconnect and take down.  It's a very simple installation.


I was very pleased with this wall cabinet that Mr. Adams made for me.  I think it looks so good against the dark metal.  I know these pictures are crap and please bear with me.  I'll try to get some during the day when the lighting is better.  Nowadays I do good to remember to take them at all and it's always at night.


I finally got all the countertop bases installed today, which is just basically 3/4 plywood on top of the cabinet.  Makes a fine temporary counter though.  The space here is for the dishwasher.  I don't have it yet because it can't be there when we pour.  The form must drop out after the counter cures so the dishwasher would just get in the way right now.
I also finally trimmed out the front door on the inside and another window.  These windows are next.  I hope to do those tomorrow.


I also got most of the fall garden planted and we sold all 6 of the mutt chicks and mean ol' Blondie.  So, that's seven fewer chickens crammed in that coop while we are gone.  Well, they will get to go out into 2 different runs during the day but this helps a lot.

Thursday, September 27, 2012

Lullaby Of Birdland


I just love to sit and watch my sweeties.  I'm not sure what is so mesmerizing about chickens but they are just endless entertainment.  We have been letting the pullets out now for about 3 weeks and they are finally starting to integrate a little with the big hens.  Not much, but some.  Good ol' Ramona (my big New Hampshire hen) has taken it upon herself to act as ambassador and enjoys hanging out with the pullets more than the older hens.  Maybe she knows a few of these are her people.  I often come out to find her lounging with them or showing them good bug hunting spots.  In the photo above you can see the Speckled Sussex, they're kinda obvious, and the large one in front is a Partridge Rock.  They are very cool and easy going chickens.
We lost Sylvia early last week to a fox, so I have been vigilantly watching when they decide to stray too far near the woods.  I know it was a fox because about 2 days later he tried his luck again and actually was bold enough to run out in the daylight.  I saw him come out of the woods.  We all gave chase and have set a trap every night since but no luck.  EDIT:  It's a Havahart live trap for relocation.  I don't want to kill him but don't want him making a habit of this either.


I thought this was funny of Rocky peeking in from the side.  "what'er you doin' with that little box?"  The chicken on the left is one of the Brown Leghorns.  These things seriously need to take a Zanax.  High-strung is an understatement.  They are certain that everything is going to kill them.  The dog, the cat, rocks, the wind, whatever.  I hope they lay well.  I don't know, I may try to sell 2 or 3 of them.


Rocky here is one of the 2 New Hampshire roosters.  I only ordered one but got two and a Partridge Rock roo!  The PR that always looked like it was wearing bloomers?  That turned out to be a roo!  We call him Gaucho because it looked like he was wearing those short pants.  His feathers have filled out now and he looks fine; very handsome actually.  All of these roos seem pretty laid back so it might have been a serendipitous fortune to have had the mix up.


This is my sweetest little baby, Zuzu.  The Sussex are mostly very friendly and love to sit in your lap for you to pet them.  If you are not going to rub them though they'll leave!  They sing and make this funny groaning sound.  It sounds like they are complaining but I guess it's just how they talk. I had talked about selling a few of these but I love them so much I don't want to now.


And the kitchen keeps inching along, little by little.  All the cabinets, and drawers, are in now.  Just need to finish installing the plywood tops on part of them.  I'll get that done and the range hood temporarily hung and then will probably stop this project to prepare for the wedding.  I can't wait to have the tile installed on the wall behind the range; that is going to look SO good.
So, off to do a little more work before bed.  I have been terribly sick this week but have finally beaten it, I think.  What a horrible time to come down with a sinus infection!

Sunday, September 23, 2012

Kitchen Sink Drama


Okay, so there was no actual drama but it makes for a good title anyway.  It did take all day to install this cabinet unit and the sink and faucet, which kinda surprised me, but it went pretty smooth.  Mainly because I got Allen to do it!  Now, the sink is actually only temporarily installed because, if you notice, I have only a plywood countertop there.  When the concrete counters are poured the sink will have to be lifted back out and reset.  Hopefully, it will just be a simple matter of undoing a few connections and then putting them back.  We will have to replace one piece of cheap drain pipe, I think, as the sink will raise 2 inches, but that's nominal to me.


My new sink and faucet!!  Yea!!!  It is so lovely.  I bought a Franke sink and the faucet is a Kohler.  Both of these items were not cheap, let's say, but I believe in buying the best you can to avoid problems later.  I thought it was kinda funny because the instructions on the sink actually say, "congratulations on buying the last sink you'll ever need."  It better be.  So far I am very happy with them both.  We actually put the sprayer and the soap dispenser in the wrong place but the interesting thing about this design is you can move them around in whatever configuration you want.  We may swap a few positions of the things when we take it back out, depending on how I feel actually using it.  I think the control lever might be better on the left, for example.


We are slowly taking each cabinet unit out to stain and finish and then put back in permanently.  Well, they will all get the beeswax finish inside once permanently installed.  I ran out of my original stain because Cabot decided to quit offering a custom mix.  I was very unhappy, and still am, with them for doing this.  And, they made no premixed stain that even came close to the ones they used to offer.  It took many days of searching but I finally found a Rustoleum stain, of all brands, that matched pretty well and that I liked.  In fact, I have switched several items to Rustoleum stains where I used to use Minwax or Cabot.  Rustoleum's colors are beautiful, they dry very fast and don't have near the odor that Minwax does. 


This gap between cabinets is where the dishwasher will go.  Eventually.  After the guys delivered the cabinets and left I realized I was 2 feet short on cabinets for this side.  I was freaking completely out and then after about 15 minutes of pure panic I realized why I was 2 feet "short".  Duh.  I'm still working on getting all the drawers and doors stained so that is why some are missing.


We were planning on buying a new toaster oven and microwave to match all the new stainless appliances but the toaster oven came a little quicker than I intended when the door of the old one fell off the other night.  I was going to wait until all the heavy work was done, so as not to risk dropping something large on them or whatever.  Oh well.

Monday, September 17, 2012

Something's Cooking In The Kitchen


I have been going about non-stop these past 4 days and am wore "slap out" as they say around here, so this is going to be a short post but I wanted to put up something since so much is going on in the kitchen right now.  I think I found out on Thursday or Friday that my cabinets would be delivered bright and early Monday morning and I wanted to get as much done in there as I could, so as not to be working over finish cabinetry.  So, I bit the bullet and chose my color, had it mixed and been painting and cleaning and tearing out old temporary cabinets like mad.  I'm really happy with this color; it just looks so good in person.  It has a slight brown undertone so it is very warm and inviting to me.  I think the stainless and concrete are going to really go well with it.  Oh, and it took me forever to stain all those rafter tails that show on the inside of the house but it looks good. 


And, here are the cabinets!!  They are not finished!  I asked the cabinet guy to leave them bare so I could put the natural finish on them I want.  I tell you, I can't recommend this guy enough if you live anywhere around Alabama.  He can make anything you would want I believe.  I am so pleased with his craftsmanship and the look.  Of course, these match the one in the pantry and will be finished the same way, same hardware etc.
 As soon as these cabinets are set permanently I can start installing the tile on the wall behind the stove and all.


More cabinets, drawers and a small wall open wall cabinet.  Got to trim these windows out soon too. 
Now, off to bed before I drop.

Monday, September 10, 2012

What Goes Up Must Come Down


Look at this picture of my roof!!  See??  It's just my roof.....and nothing on it!  No scaffolding, no pickboard, no ladders!!  YEA!!!  Well, there is some dirt I need to wash off but other than that...  I'm very stoked about that.  Well, not washing dirt off but you know, nothing on the roof because I'm finished there!


I also made a concerted effort to finally close up the clerestory wall bottom and I got'er done! Did that today.  It looks 100% better.  I still have a little caulking and touch up to do but it's done basically.  WHOOP!


I also got this length of wall completely closed up and ready for cabinets to be set!  Yea me!  I will wait to start setting tile until after the cabinets are in and I know what kinda spaces I'm going to have.
Tomorrow I think I will start on the opposite kitchen wall and touching up drywall and caulking to get ready to paint.  And hang more metal wall covering.  I got one piece painted today but not hung.  That stuff is kinda tedious the way I have to do it.  So, things are finally rolling along here.  Have ya'll finished any projects lately?  Or started anything?

Wednesday, August 29, 2012

Busy Times


Yep, we all been busier than a one-eyed cat watching 9 mouse holes around here.  The garden has died down a good bit so I let the pullets in for the last 3 or 4 days to clean up for me and boy, they have been goin' to town!  They have scratched and dug and picked and had the time of their lives eating everything in sight, although they are pretty good to leave most of the larger plants alone like the peas and beans and such.  I'll go out there about twice a day and dig around for them where the dirt is real loose.  They get so excited they jump in and start digging too and pretty soon there are so many of them scratching in my spot I don't have room to dig anymore.  They are not able to dig quite as hard and deep as the big hens so they are not as destructive but they clean up the place good and clear out lots of the bugs and grubs.


The poor little things got in a fire ant bed though and I felt bad but couldn't help but laugh too.  They couldn't resist eating the ants and their eggs but were getting their feet bit from standing in the ants.  So, they would stand there and when the ants started biting, the chicks would start stomping their feet but were too greedy to leave.  If I had had some bluegrass music to play it would have looked like chicken buck dancing!  I laughed until I was cryin' just about and they would finally get enough and then run away and pick the ants off their feet.  Edit:  let me stress that I do NOT think it was funny that the chicks were getting bit, in fact I tried to run them out of the ants, but they insisted on running right back to eat the critters.  But seeing them all stomping their feet like that was funny.


They especially liked the coldframe once I turned some of the soil for them.  It was very loose so they could scratch through it easily and they got it all ready for me to plant now.


Hey, those are some funny looking chickens right there!  Well, somebody dumped these 2 little sweeties down at the end of my drive about a week ago.  Chigger actually found them hiding in the weeds when we walked down to check the mail, so I brought them up to the house and we have been trying to find homes for them.  No luck so far.  Grendal does not tolerate other cats well and I don't want any more in the house anyway, so they have been staying in the Goober Chicken Memorial Pen in the henhouse.  They actually seem to really enjoy it and the chickens don't really seem to mind them either.


And I have actually started on the kitchen in earnest since we about have the outside done!  My cabinet guy came Monday and got his measurements so those are being built now.  Things are slow for those trades right now so he said he should have them ready in 2-3 weeks!  Which means I have really got to get my butt in gear to be ready for them.  Yes, that is corrugated metal roofing going on the wall and it is a dark chocolate color.  I'll explain more about that later.  I know the whole kitchen looks kinda dark in this photo but it's not really.  My appliances are all stainless steel but they reflect the dark of the wall making them appear black too.  It will lighten up and be much more colorful when I am done.  I also got the wiring and ductwork for the range vent done and have closed up that wall and chase.  That is the big grey block on the right.  That is Durock covering that wall as it will get tile and stone over all of it.  You can see the ductwork poking out where the vent goes.  So, things are going but I have so much to do in this one area.  I am really excited about it and anxious to finish though.