Showing posts with label creative building. Show all posts

Thursday, April 28, 2016

Cinderblock Garden

 Our garden this year is off to a great start due to the early spring and my actually getting off my butt this year and starting quite a lot of things from seed, rather than waiting on the local stores to get stuff out.  Seems they are always late.  Plus, they don't have the greatest variety of plants.  This is my first year growing radishes and I am stoked!  They came out so beautiful and SO tasty.  I've been making a radish/ cucumber salad that is to die for.  I mean seriously good.

 I wanted to experiment with more raised bed gardening so we are slowly transitioning over to large concrete block beds.  We get the blocks from a local concrete company as seconds (although I can't see much wrong with them) so it's much more affordable than buying new block.  Not the most attractive things in the world but you can make them look okay.  Beautiful plants like thins growing in them makes them much more attractive!

 This is the old strawberry bed that never produced a whole lot and was terrorized by moles and wild violets.  I dug the whole thing out, laid mole barrier in the bottom, refilled it with enriched soil and now it's got a bumper crop of broccoli and cauliflower in it.  We have a local farm that sells the best strawberries ever, so I'd just as soon buy from them.  They are reasonable and organic.

 Seems we'll also have a bumper crop of blueberries this year too.  This is especially great because blueberries are very anti-histamine and I've found a recipe for a coconut milk, blueberry, mango smoothie that is wonderful!  I have one several times a week now so I'll be freezing quarts and quarts of these these beauties this year.  Not so much jam but that's okay.

 I was attempting to till up the okra space but the girls commandeered it for bathing.  They thought it mighty kind to make that bath space just for them.  They have all been through their spring worming and are laying pretty good right now so they deserve a few treats!

 One view of the new raised bed area.  I've planted most everything that you see in those starter pots and it's all well on it's way at this point.  Still have not finished planting the main garden but we are getting close.

We are also experimenting in planting in double size concrete block.  Seems to be going okay at this point.  This is an old photo and these sugar peas are well over the top of the fence now and making little peas!  If we have enough stuff we are also going to try selling at the local farmer's market this spring.I'm all for it though, if we can produce enough stuff!  I think we'll have some different things, more heirloom veggies and stuff but whether that appeals to anyone in this area remains to be seen.  Anyway, we'll have lots of fresh veggies and fruits and it's very gratifying to grow so much tasty food!

Thursday, April 23, 2015

Diamonds Are A Girl's Best Friend


Well, they are IF they come attached to saw blades or grinding pads.....the rest are fairly worthless.  You all may remember me pouring the first bar top for the kitchen way back in this post, and I finally got around to doing a bit more work on it.  For one thing, I really needed to get that thing out of my studio where it was taking up quite a bit of room.  I truly hate trying to work around clutter or junk and since I am really trying to ramp up production here for impending shows, that thing had to leave!  Secondly, it finally stopped raining for a few days so that I could actually work outside.  Of course, it doesn't matter if the slab gets rained on, but I didn't want to get rained on.


As matter of fact, it has to be soaked down real good before I could grind on it anyway.  The diamonds in the pads last longer, as the water cools things slightly, and it doesn't stir up the dust when it's wet.  And you actually have to keep wetting it as you work.  A messy job for sure but these rubber aprons came in very handy! 
At first, it seemed like I was only managing to scrub the grout out of the slab, because it remained slightly rough, but after getting up to about 200 grit and staying on that for a while the concrete began to polish up quite nicely.  I will not be able to polish the cast in place counter tops quite this well, I don't think, so I didn't want a mirror finish on these bar tops and have them not match.  So I just kept it at 200 grit.  Actually, I did go up to 400 grit but the red pads started staining my grey concrete.  NOT good.  I believe I will have to email the maker of these pads and express my displeasure at that.  So, I went back down to 200 and polished until the stains came out, which didn't take too long.


I finished the sides off a little and called it good.  I was very pleased with the way this one came out.  Hopefully I made it the correct dimensions.  Ha!  Just kidding....sorta.  It's still outside now, drying out a bit and then we will bring it inside and set it in place.  It will not be permanently anchored yet.  I just want to get it inside where it can fully dry in a less humid and rainy environment and it not be in my way somewhere.  After a couple of weeks I'll anchor it in place (basically glued) and finish sealing it.


If you click on this photo you can get a good look up close at the finish.  Keep in mind it is wet so that accounts for the high gloss.  The finish I'll put on it will be more a semi-gloss or satin.  As I said, I am very pleased with the look of this mix and how the aggregate looks when polished.  Very cool.  It reminds me of some of the recycled glass counter tops I've seen.  This is considerably cheaper though!  Now I just need to find a good food-safe, water proof sealer.

Friday, February 13, 2015

Draggin'

Well, I haven't meant to be away from the blog so much lately but I haven't had a whole lot going on.  Or at least, not much that I thought would be of interest.  I scraped out another load of pottery for the stores and got that delivered.  And we've been piddling around the house with a few more things but not much. I've continued to work on the counter tops for the kitchen. 
Here you can see that I did get around to forming and pouring one of the bar counter tops.  I was not really going to be able to form this one in place so opted to pour it in the basement, so that I would not be constrained by the weather in any way.  After it has cured for a week or two I'll move it outside on a nice day and grind a nice finish on it.  I did hard trowel it but did not put near as much effort into slicking it off as I did the one in the kitchen, since I knew I could finish it better with the diamond pads.  I may even seal it outside and then just set it once it's completely finished.  I'll do a good post when it comes to all that so ya'll can see just how fantastic those wet-use, diamond finishing pads are.


So, I haven't been posting a lot lately because I've had a little bit of a set back on feeling better also, and have been really, really tired.  I've also been struggling every day with anxiety and that's not something I've talked much about.  I still believe that it all started with those damn steroids but I've been off those long enough that I think it's something else causing it now.  I've even had to kinda suspend my gym workouts because I was getting so tired and sore I just couldn't go.  And, oddly enough, the workouts seemed to be making the anxiety worse instead of better, as exercise is supposed to do.
I finally just sat down and started doing a lot of research and reading any information I could find on fatigue, anxiety, exercise and anything related.  I know a lot of you would be saying, just go back to the doctor but I've kinda got to the point I can't really afford to go any more unless it's really needed and I thought I might could figure this one out myself.  My insurance has stopped covering a number of blood tests and I just now paid off a bunch from last year that took me by surprise when they didn't cover them.  Not doing that again.

Anyway, it seemed to me that I was building up a lot of lactic acid in my system and muscles from the workouts (which is normal) but it was not dispersing like normal.  (Excessive lactic acid can cause anxiety even in people not prone to such).  I tried all kinds of stuff like upping my water intake etc. but it still didn't help.  Then I finally came on some information that indicated my iron might be low.  Had many, many of the symptoms; irregular heartbeat, fatigue, dizziness, anxiety, leg pain and cramps etc.  I also noticed after taking a few days off from working out that I felt better but that didn't cut it.  I'm not that old and out of shape!  Some yes, but not that bad.  I should be able to do a reasonable workout for an hour.  Got so bad I was getting sore and out of breath just walking up from the chicken house!  Since you need iron to carry oxygen through your blood to all your muscles and tissues, thus relieving the lactic acid and fatigue, it seemed logical that I might be a tad short.  And I found out you can be low in iron but still not be considered anemic.  Also, people who have RA or other types of arthritis-like conditions (like me), who use nsaids for pain and who also use Tums or similar products because the nsaids tear your stomach up! (like me) are more likely to be low of iron or not able to absorb iron as readily through your food.

So!  I've been carefully trying a low dose iron supplement to see if there is any improvement.  I know if the BFD is reading this he is probably cursing me for trying to diagnose myself, and I guess you really shouldn't, but I figure, 'what the hell?' and all of the above mentioned reasons.  I'm trying it anyways.  I felt a fair bit better today and had no pain in my legs after doing some moderate walking around here but we'll see.  If the anxiety goes away then I think I'll know for sure.


Friday, January 30, 2015

Float On


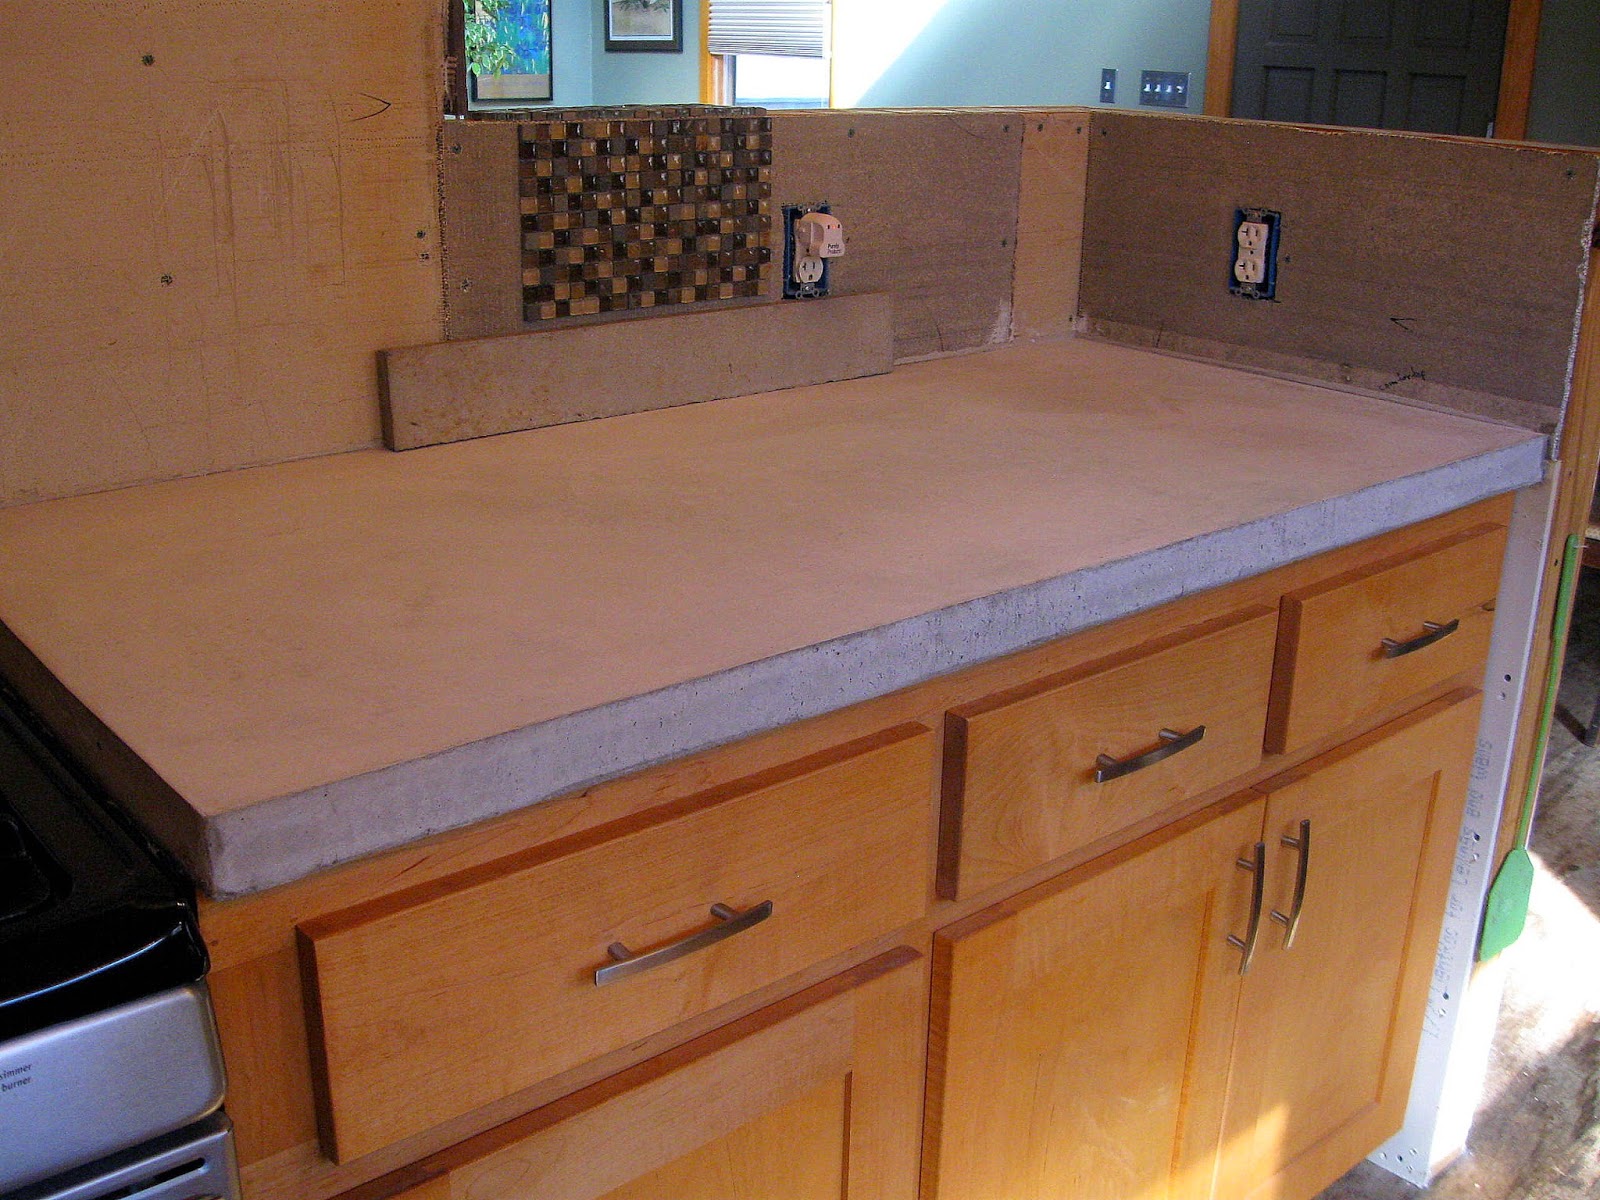
So, I pulled the forms from the counter top and was pretty pleased with the way it came out.  As you can see, the concrete has cured to a fairly light color but once I polish it a bit and seal it, it will be a much darker gray.
I set a piece of concrete backsplash up there too and some of the glass tile I will use for the back also, just to kinda see how it will look.  Once the concrete is sealed it will be very close to a grayish slate color and match the glass tile well.


I was fairly pleased also, with the finish I got on this pour, although I think I actually got a smoother finish on the hearth slab.  It's fine though.  I will run over this a bit with 100-200 grit diamond pads and it'll be slicker'n owl shit.  I have no idea where that saying comes from or what it means but I used to hear it all the time on construction sites.  Ha!
It's also quite hard (to me anyway) to get a good slick finish right up to the edge because you can't follow through with your stroke but that is easily smoothed with the diamond pads and I'll round that top corner off just a tad.  The front face of the edge had a few little bug holes in it but I don't really mind that.  It makes it look more like concrete, to me, and I want that to be obvious.  I just really like the look of unstained, natural concrete.


 It's really hard to explain to somebody else how to finish concrete and I looked around for some YouTube videos that might do a good job but didn't really come up with much.  Most of them show how to float concrete, which is good, but none I could find show how to trowel it to a hard finish and that's what takes such finesse.
In the photo above I have the tools most commonly used for concrete finishing and they are not interchangeable.  The one on the left is the float and the one on the right is the trowel.  Since my pour was so small I did not need a screed or straightedge but you need those on a large pour.


The float has a much thicker blade and is longer; some of them are up to 2 feet long or so and this is what you use immediately after placing the concrete.  On really small pours like mine you can use the float sorta as the screed to knock the mud down to the correct elevation.  Then you pass over the concrete in sweeping motions to smooth it down nice.  Now, at first, it's not going to look that smooth and that's okay.  Once you float it off good, with one pass, you just then let the mud sit.  Water will begin to rise to the top and you will see a pool form.  Let this water evaporate!  Do not keep working it back into the mud.  Once the water evaporates you can see the surface begin to "tighten up" as we say.  Make one more pass over the concrete with the float.  Water will rise again.  Let it evaporate.  At this point the mud may have tightened so that you can move to the trowel.  When you go over the mud with the trowel you will begin to get a much smoother finish.  As you can see, the blade on the trowel is much thinner.  And, it's pretty much the same rhythm; trowel it off, let the water rise and evaporate and etc.  Now, at this point, hardly any water will be noticeable on top but you can tell it's happening.  This is the part that is really hard to describe as it's something that a person has to see and do to really "get", but it's much like burnishing clay or similar.  Also, the tighter the concrete gets the harder you have to press down to get a smoother finish.

If you really want to try pouring something like this and have never worked with concrete before I would strongly suggest pouring some little practice slabs first.  Maybe pour some steps or a small patio just to get the hang of floating the mud and those things don't require a really hard finish.  In fact, you don't want to get them too slick or they will be very slippery in wet weather.  Then maybe pour some little stepping stones or maybe a bench seat to practice troweling a smoother finish.  Good concrete work is much harder to do than most people realize but it's not rocket science.  It just takes a little finesse, as I said.  If all else fails, hire a finisher.  And you can polish counter tops once the concrete is cured, to hide a multitude of sins.  I've done all my own concrete work here at my house but I'll say this:  the work I did as a carpenter and welder was pretty hard sometimes, but I always got through it.  I don't think they could have paid me enough money to place and finish concrete however. 

Okay!  I'll be putting this finish on this top before long but we had to order some new diamond pads so it may be a bit before I have another post on this.  And, I have to find a suitable sealer to use on these since they are in the kitchen and would come in contact with food.  But I'll have a complete post on all that when I'm done.  Any questions?

Thursday, October 30, 2014

The Garden Rules


Many people have asked me how I manage to have fairly decent flower gardens and still let the chickens free range around the yard.  Most people would expect the chickens to scratch up and trample on everything, and to some extent they are correct, but you can have both if you follow a few rules..


One of the main strategies is that I don't mulch anywhere I wouldn't want the chickens to scratch.  Of course, they are still going to scratch even bare dirt some, but putting down mulch of any kind is the exact same thing as putting a person in a room full of bubblewrap.  They go wild.  Can't help themselves.  Chickens are absolutely sure that that next few inches of mulch is harboring a motherload of tasty bugs and by God they are going to fling that stuff everywhere until they find it.  You simply don't go there.  You will never win.


You can mulch with stone, but it better be heavier than pea gravel and hard pine cones work pretty good but are not absolute.  My strategy is to just plant things close enough that the foliage serves as mulch, or use a non-invasive ground cover in between plantings.  I also mainly use sturdy plants, such as iris, lilies, echinacea, mums, peonies and so on.  The girls will make little trails through the beds but the flowing foliage of such plants usually hide them.


 I have also included a number of flowering shrubs with arching habits as these serve as hide-aways for the girls when the hawks are out.  And they are sturdy enough that the hens can't hurt them.


When I plant something new I always lay some small stones around the plant for a couple of weeks because the newly turned soil is an open invitation to scratching!  They can no more resist that than they can the mulch. 


If you insist on growing something that tends towards the delicate I would recommend putting it in a pot and then mulching the pot with stone.  My girls have shown no inclination to eat my flowers; but for some bizarre reason they love to eat the perlite and fertilizer pellets that come with potted plants, so be aware of that.  If I'm planting something that has arrived with commercial soil I always throw a couple of inches of my plain dirt over that stuff so the chickens can't see the "goodies" in the potting mix.


The vegetable garden is another matter entirely because they will happily eat most anything you have planted there in addition to scratching everything up.  Now, you all know I have my garden fenced, which is mandatory, and a couple of runs available for the girls depending on the season and age of groups.  This did take a bit of work to build, and is much more than what most people would be willing to do, but it works great for us and we didn't mind doing it.  The runs come off the coop at a right angle and run alongside the main garden.  Their main run is solely for the chickens but the other one, which includes the Goober Chicken Memorial Pen, is divided in two and can serve as a bittie pen or a larger run for adult chickens, mainly if we separate pullets or roosters.  The larger section of this run can also be garden and this is where I have planted my winter crops this year.  I sold George last weekend so I knew this run would be empty and just the right size since we don't plant near as much in the colder months.


This allows me to let the girls use the main garden now that the warm weather crops are gone.  It's very handy to keep them in here on days when we need to leave before sundown or if there is only one of us here and that person needs to run into town for a minute.  You can see the black gate in the back that goes into their main run and coop.  Chickens are very much creatures of habit and if you disturb one of their beloved daily rituals, like getting out into the yard, they will get their cranky pants on in a hurry, so this is sort of a happy medium with them.  Big enough that they feel they are "outside" but still safe from most predators and at the end of the day they go straight back to the coop without us having to worry if they all got in before dark.


By the time winter is over they have picked the garden pretty clean of bugs and larvae and fertilized it all over, even working in into the soil with their scratching.  The only thing I don't like is that they have decided that underneath the blueberry bushes is the best spot to dust bathe and have dug huge holes there.  I may have to fence off the fruit bushes for that reason but that would not be terribly hard to do just for the winter. 

Sunday, September 07, 2014

What's (S)he Building?

  Unbelievably enough, I'm actually still keeping up with the "word" posts that I started so very long ago and am down to only 2 words left on the list!  One word after this post because we are going to explore the word "architecture" for Rich, who wanted to know how I designed and built my house.  And as you may have guessed, yes, I saved the harder words for last!  Or I guess I should say, words that involved the most time and effort to elaborate on in a blog post and I really wanted to do this one as well as I could.  It's not going to involve all that I originally wanted to but I think it will be fairly complete.
  Now, as far as how I built my house, well, that's the majority of the blog and you can just pick what part you want to see over in the 'labels' column, i.e. foundation, framing, electrical and so on.  And for any newcomers, yes, I am a woman and yes, I built my house.  Of course I had help! or you could say I was the help in some cases as Allen was in charge of framing and such but I did the formwork, the steelwork and all the interior after it was dried in.  I even did a long post on how I saved for and financed the house, which is somewhere in finances.
  Now, as far as how I designed the house, well, I didn't.  Okay, I kinda started out doing it and knew sort of the footprint I wanted but you all know by now that the BFA (big, fancy architect) had a big part in the design of the house.  I did use The New Natural House Book by David Pearson and The Solar House by Daniel Chiras for technical information on passive solar heating and cooling, correct placement of windows and all that and just general inspiration for a naturally built house and I highly recommend both books if you are interested in doing something similar.  I would also recommend any of Sarah Susanka's Not So Big House series for the sensible, actually livable designs and beautifully crafted houses she spotlights.
  So, I admit flat out I used, and still do use, an architect... and I've been really taken back by the amount of crap I've received over that.  I think I can kind of guess why in the blogging world.  From my reading of the popular homesteading/ DIY/ prepper/ doomer blogs I have gotten the distinct impression that if you don't do absolutely everything yourself and/ or you dare to use any conventional element from normal society (like a contractor or architect) you are not authentic and are pandering to "the Man".  Because you know, I didn't manually shred and chew 1,000 pairs of old blue jeans into natural cellulose insulation and I let a real cabinet maker make my cabinets so I'm just faking it all!  So to employ a honest-to-goodness architect!!  Holy shit! I might as well turn in my anarchist card immediately and cancel my subscription to Mother Earth News.  What the hell was I thinking!
I think what it boils down to is the idea that if you actually use an architect, you must have money and no real homesteader/ doomer/ prepper has that kind of money, so you are not one of us.  This theory is backed up by the fact that I've had a number of people ask me, to my face, "what, you think you're better'n everybody else?"  "Why can't you just do like everybody else?"  and let's not forget.."why d'ya even want to use some ol' architect?"  Well, let's ponder those questions for a minute...Some people could accuse me of an ego trip but I can't really see how because I can't say who the architect is and to me, that's where the bragging would be.  And no, it's not Frank Gehry.  Hah!  I'm not a big fan of his designs anyway.  I mention using an architect because it is something more people should consider, it's more possible than many believe and I don't want to give people the false idea that these cool designs are mine!  As far as why?  Hhhm, let's see...I found a notable, very experienced design professional who was willing, and even considered it fun, to design a unique little house in exchange for carpentry/ manual labor on my part...but nah, no thanks, I'll just use some layout I found in a magazine.  Yeah right.  I mean seriously, if I'm going to go to the extreme physical effort to build my own house, wouldn't you want it to be something awesome and reflective of your personality and life, rather than just stick something together that looks like some damn Jim Walter home some half-ass contractor could throw up in 3 months?  Of course, I know there are those out there now saying, well yeah, but the Jim Walter crap would be done by now!!! and you're still slaving away on only half of your fancy-smancy house.  Well, you got a point there I'll admit.  I'll also admit I've had some unusual physical problems and such that have seriously impeded my progress and it has caused me to question what I'm doing more than once, I assure you.  In the end, it's up to the individual and what matters most to them.  Some people want 4 walls and a roof and be done with it and there's nothing wrong with that.


This is an example of why I enjoy the route I have taken.  I could have never come up with this design myself.  Or the large steel beam that holds up my roof, or the rafter tails inside and out and how it kind of, in the back of your mind way, makes you think of a church when you see them.  The column in the drawing above is a recent thing that the BFA came up with and these will support the covered walkway that I've started and will extend further down the house as the next half is built.  The bottom half or less is stone around a concrete base with filigreed steel extending up to the roof.  The cool thing is that the steel design is cut from three flat plates and joined at ninety degrees so that a cross-section would look like a + sign.  It's still very strong structurally but does not employ the normal hollow tube used for steel columns so that you can have this really cool, open design but not have to worry about wasps and other horrible critters making nests up in it!  If the design looks a bit, erhm, intricate to you...then I would agree and we figured this will probably be simplified a bit to keep me from losing the rest of my mind trying to assemble these things.  There will probably be 5 or 6 of them when the house is totally finished.


Now, here is an old, original drawing of the entire house footprint.  You may notice that it's been marked on quite a bit, changed, and that there are no dimensions!  Well, there are some concessions you must make when working with a BFA in a barter situation.  If he had to work hard enough to put actual dimension on there I'd still be a slave to this guy! Ha!  Well, I laugh but those fancy columns just bought me another round of labor and sweat.  One good thing about taking a while to build a house is that you really, really figure out what is essential to what you want in a house and where to put it.  This drawing shows a 3 bedroom house but it will probably wind up being only 2 bedrooms and a really honkin' great craft/ sewing room.  And a much bigger master bath...I don't know what the hell he was thinking on that.  When I'm old and decrepit there's no way I'm gonna try stepping into a tub to bathe.  Hell, I'm half decrepit now.  I want something I can just cruise into and sit down.

This is the elevation drawing from the south side and it is somewhat different from reality in that not that many windows actually went in the existing part.  But that's okay.  Since we were experienced builders we really didn't have a problem building with drawings that were....not quite finished, let's say.  I would not recommend that if you are not experienced in construction.  Most people also have a hard time seeing in their mind what the finished house will look like from some drawings, so I found this actual photo of a contemporary dogtrot house.  Of course, this house does not look like mine is going to but you get the idea.  Their trot area is wider than mine is drawn now, and I'm thinking about maybe making mine a little wider, but overall it gives a very similar feeling.  Long, rectangular footprint, high windows, metal roof and a deck that bumps out on one side.


When you are building your own house, and it ends up taking a while, I think you also begin to think about other scenarios.  "What if I go to all this trouble and then don't end up staying here?"  "What if some giant storm comes and destroys my house just about the time I get it finished?"  Due to circumstances beyond my control in the years I have lived here, I have seriously considered the idea that I may not always live here.  What if I found some beautiful, secluded property with a gorgeous mountain view?  Well, no one knows what the future holds and how things are ultimately going to work out.  Often times it's quite a surprise.  I know it would break my heart to leave this house due to the sentimental value and I'm not kidding when I say I would rip out certain parts to take with me!  But, it is one thing to consider when building.  At least if I finished the house and needed or wanted to sell, I could be pretty certain of getting a good price in order to start over somewhere else.  Because the house was designed by someone who does that for a living, most everyone* that comes here raves over the flow and comfort of the place.  And it's not even all here yet.  People find it very homey and comforting.  It's personable, not some sterile, catalog ordered floor plan. So, it's an investment one way or another.

This post may not have answered your question Rich, if you even remember your question, so if it didn't just let me know and I can hopefully address what you really wanted to know.

*Everyone except my stick-in-the-mud family who hates everything.  Ha!

Thursday, May 08, 2014

Mix It Up


Since Erin had asked about the birdbath thingy a couple posts ago, and someone else gave me the word "eclectic" in the word post (I'm on a roll, huh?), I thought I'd combine the two ideas for a post.
Some of my favorite schools of thought in design or art would be Japanese and Craftsman but when it comes to decor, indoor or out, it winds up a very eclectic mix.  You can see traces of those influences though, in what I end up dragging home.
The birdbath above is actually a large platter made during my college years.  One of the few surviving pieces from then.  If you look closely you can see it's warped pretty fair but the birds and bees don't seem to mind.
I like to keep some of the stumps from trees we cut because I think they make the perfect pedestals for display.


The object here on top of the post is an old handmade anchor, from the days when some of my land was a lake.  We plowed it up at some point; I can't remember if it was when we were putting in the drive or the garden or what.  I've found a number of peculiar objects like that.  Old leg traps, fishing lures, horse ties and shoes.


Many of the objects are cast-offs from jobs I worked on.  I especially like old stonework.


I don't normally buy mass produced, slicky yard art but I though this was kinda cute.  Allen has always accused me of being an old crow too, because I like shiny things.  Plus, it moves, so I like that.


I have a few remains from the little farm I grew up on.  I actually remember using this old grinding stone to sharpen an axe once when I was young.  The barn burned down years ago and I tried to salvage what I could of the old plows and such.  Maybe turn them into sculpture one day.


Another job cast off.  Suns are a recurring motif around here. 


Job cast-off turned art.  This is one of my very favorites.  I like the simplicity of it.


More sun.  I need to add more colored glass beads.


This is a new antique/ junk store acquisition.  I must remove the hideous paint some ding-dong decided it needed.  Then it will be good.  I would really like to make a mold of this one so I could produce more but the undercuts in it are troublesome.  I do have some rubber mold making compound but not sure it's enough to do this, as it's about a foot square.  Hhhmm, I have to think on that.


I have a number of these of various species.  I need to group them all somewhere as a collection.


Various things picked up on travels.


One of the best thrift store finds I ever made.  She's a favorite.


Fat little bunny.  I like any kind of animal statuary.  Unless it's real cutesy crap.  And oddly enough I don't have any chickens.  I do have an idea for a chicken sculpture though, so maybe I'll do that.


Homage to the dragonflies.  I try to make them feel welcome you know.

There are actually a few more pieces and I'm always on the look out for new finds at garage sales and thrift stores.  People get rid of some of the coolest things.  I love to decorate in the gardens as much as in the house and it's always a fun game to me to try to find new and unusual treasures from odd places.

Tuesday, November 19, 2013

Pick Up The Pieces


A good while back one of you dear readers had inquired about the "creek glass" I happened to mention in a post.  So, I finally got around to getting a decent picture of said subject.  I had actually misplaced my collection briefly and had to find them again.  I've gotten quite forgetful lately and usually am only reminded of things when I inadvertently stumble upon something.  At any rate though, this is some of the creek glass I was telling you about.  Now, much of it is not actually glass at all but rather ceramic pieces or natural rocks or formations I find interesting, such as the two objects in the top right area.  See, every time it comes a pretty fair rain, enough to get the creek up a bit, new objects always wash down the creek and settle in various places as the water drops.  If I go down and wade around in time I can usually find a few things of interest.  Of course, it's usually just broken dishes, beer or Coke bottles and various liquor bottles but I have found some cool old pottery shards and a few really cool pieces of unidentifiable glass.  They are normally quite worn and smooth from tumbling down the rocky creek bed, just like it's more famous cousin, sea glass.

I don't really know what I'll ever do with the stuff.  Some of it may be of a size and shape enough to fit into a mosaic here and there.  If I can ever get back to working on those things that is.  Or maybe I'll just mix some of it into some stone mulch for a little color.  As you can see, green, brown and clear are the most common colors.  Blue or white is quite rare, although I have found one piece of each of those.

Sunday, November 10, 2013

Simple


  I had seen this PVC pipe chicken feeder on the web and I thought he'd give it a try because the girls just seemed to throw so much out of the standard feeders you buy at the store. I had tried a couple different sizes and stuff but they still threw food everywhere.  They would often clean it up off the concrete but still, I'd rather they not eat dirty food.  So far, these are working great.  The parts are pretty cheap, you might even have most of the stuff laying around, and it's easy to put together.  HERE is directions if you want to try one and because I am too lazy right now to take ours apart and take pictures etc. etc.  It's pretty straight forward. 


Here's another view in use.  The girls took right to it and you can see there is no mess on the floor.  Now, that's not to say they don't occasionally throw a little out but it's nothing like what they used to do.  Only problem is only one chicken at a time can eat, so you might want to make more than one but they take turns or just peck the one when they feel they've waited long enough.


This was the other non-conventional thing I wanted to show ya'll.   This was all my doing, or thinking and me and Allen did the toting.  I have had this object for some time but only now had to make room for it in the house somewhere.  After a little head scratching I decided it made the perfect table, bench combo.  Three guesses as to what the object originally was.  Well, it still is the object but no longer functions in that capacity.  It is made of full 1 3/8" totally clear white pine planks, about 12x14 inches wide.  I don't know that you can even get wood like this anymore so that is one reason I insisted on saving this.  It fits in perfectly and makes a great conversation piece.  And yes, don't look at the ugly floors!!  One day I will have finish hardwood floors down.

On another note: some people have been asking so I wanted to post a little update on the health stuff.  Basically, I'm still waiting on test results.  I went in last Monday to have a bunch more blood drawn and the tech said some of those tests that had been ordered for me can take up to a full week to return.  I hope I know something soon!  I guess whatever makes blood in your body is the one thing working great in me because they've sucked so much out lately I'd be in rough shape otherwise!  Once again the trip to Kirklin was pleasant (well, you know what I mean) and those people are SO nice.  I mean, even the parking lot attendants.  I bet they make all those people take classes on being nice or something and it's all amazingly efficient.  I've never waited very long for anything. 
I was feeling a little better but then seem to have maybe had a bit of a relapse on the fatigue lately.  Everything just tires me out.  I had been trying to get back to my pottery but have finally decided just to take it easy.  The stress of being so behind for the holiday season seemed to even be making me worse so I just said the heck with it.  I wanted to have a studio open house and such but it's just too much at this point.  I just try to putter around and do a little each day but nothing too strenuous.  I absolutely HATE being like this but sometimes you just gotta let go I guess.

Monday, July 01, 2013

Stuck


 Well, I finally have a house post for ya'll!!  I finally got up the gumption to start the fireplace tile and have been steadily working on it for the past week or so, in between pottery, gardening and such.  I am actually a little further along than what you see in this photo.  About 2 more runs of tile and I have started the mosaic that will be in that blank space over to the left.  Yes, all that smashed pottery will be put to good use.  There were a number of reasons that I chose to break this up with a mosaic.  First, I think they are pretty and I wanted to do something different and creative.  Secondly, in placing these tiles out so that they wrapped the corners the way I wanted them to, it was going to make the spacing between them just a fuzz larger than I really wanted.  3/8" was really the max that I could justify with looking right.  By laying the ends the way I wanted and working inward, I could leave a strip in which dimensions didn't matter.  Oh, and I didn't want to cut tiles if I could get away with it.  There is nothing wrong with cutting them but with the area etc. I would have come out with pretty small cuts and just wanted to avoid that.  I wanted to stick with whole pieces for the looks.


 As it is, the spacing didn't quite come out as I imagined, although it's close.  See, natural tiles are...well..natural.  Even cut they may not be exactly the same size or totally square.  I have found differences of up to 1/8" and I really didn't expect that.  Maybe a better quality tile would have been more accurate, I don't know.  I will use a dark grey grout on this so that will also minimize how much you notice the irregular spaces.  For the most part I have been able to use these cool little spacers to keep it all in line but I have had to fudge some here or there.  I made sure to establish at least 2 control lines (1 vertical, 1 horizontal) before I ever started to help keep the tiles laid level and plumb.  Actually, I have 4 lines at this point but it never hurts to keep a check on that.  These spacers, by the way, just pull out when the adhesive is set up and you reuse them indefinitely.  They are also 2-sided; one side is a space just for a slot and the other is a spacer for intersections of 4 corners.  The adhesive also sets fairly quick so I only spread enough to set 4 or 5 tiles (6x6) at a time.  You have about 10 minutes working time, maybe.  That may seem like a lot but when you are adjusting and tweaking it goes pretty fast.  Or it does for me anyway!
You can also see from this photo what I meant about the corners.  I did not want the edge of the tile that turns back to show.  The edge of the face tile shows from the side but that is more attractive, to me, than the other.  Basically, when you are standing in front of the fireplace wall, you will not see any of the edges of the tiles.  There are many ways to do corners though.  You can run some type of edge cap of another material such as wood or steel corner molding, another type of tile etc. etc.


 In this photo you can see a bit more of the unevenness of the spacing but it will be covered up by the fireplace unit.  See, I don't have any problem showing my stuff that doesn't come out exactly right.  Everybody makes mistakes or has things that don't do exactly what they thought they would.  I honestly thought the tiles would be more accurate in size so that was a learning lesson for me.  At any rate, I have been able to control the spacing better in areas that will show more, now that I understand the material more.  Plus, it's a natural stone.  It is just going to have variations.  Don't want variations??  Use a manufactured tile.  I had to cut a few tiles to fit around the gas lines and anchors that hold the unit in place.  This was very simple just using a 4" side grinder with a diamond wheel.  You can use it dry too for such small cuts.  I just had to nip out a notch here and there.  For whole cuts I will use a wet saw for tile.
So, there is the beginnings of that.  I'll have some more on it soon.  Hopefully.  If you would like to see a more in depth or closer look at how I did something please let me know.  I'm not sure how well I explain things so please ask questions if needed or tell me to clarify.