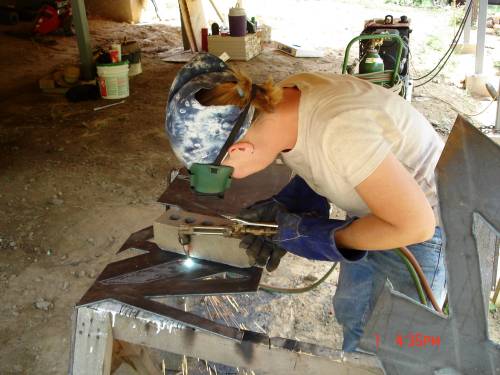
Showing posts with label steel work. Show all posts

Friday, January 17, 2014

Big Iron


     Aha!!  I bet by now, you all had even forgotten about the "word" posts that I was supposed to be doing!  Uh-huh.  Well, that's okay.  I'll let it slide this time.  I can't blame you because I have been a terrible slacker.  But, I keep the list on my desk so I will get to them all at some point.  Well, anyway....the next word on the list is podger!!  And I would imagine that most of you, like myself, are like, Huh??  What the hell is that?  Leave it up to some smarty pants construction people to come up with something like that...heehee.  The tool of course, I knew, just not by that name.  Down here, we call this a spud wrench.  Podgers, or spud wrenches, are generally carried by ironworkers and used to help erect "red iron".  This is the term we use for the structural steel framework of a building that is usually coated with a red primer, although many times they will use grey.  Red iron just sounds better.  Red iron is welded in places but initially they bolt it together as the crane lifts each piece into place.  As you might can imagine, a 30 foot I-beam swinging from a crane is not incredibly easy to control by a person standing only on an 8 inch wide beam 60 feet in the air.  Suspended in such a manner, the beam actually swings quite easily, but getting the bolt holes to line up just right is time consuming and a good way to mash your fingers off (literally), thus the pointed end on this tool.  It's easy to ram that end through the misaligned holes, as long as they are somewhat together, and as the pointed end is pushed through, it draws the holes in line.  The bolts can then be placed in the other, now aligned holes, the podger removed and that hole bolted.  It's also a great pry bar.  A coordinated ironworker can move pretty fast with one of these.  This particular spud wrench is fairly large (for me) at about 20 inches and it has, as you can see, a fixed open end.  Many spud wrenches are adjustable just like a large Cresent wrench.  I honestly have no idea where I got this one and have rarely used it.  Tools like this were usually supplied to us on the job and as I was not a full-fledged, regular ironworker I did not keep my own.  Allen has an adjustable one that we use more often, as you might imagine.  So, there is your lesson for the day.  Haha!


     I haven't told ya'll a funny work story in some time so I thought this one kinda went with the post.  I don't think I've told this one but if I have just pretend you've never heard it.  In my construction career, I actually worked more as a carpenter probably but did do a fair amount of steel work on our jobs and the last job I did was solely as a welder.  I did hang a little "red iron" but mostly I was there to weld up the structural steel that held pre-cast concrete and stone panels.  As you might also imagine, this is some pretty hefty steel to be able to hold that much
weight.  The steel is also not bolted up but welded directly to steel plates embedded in the underside and edges of the concrete floor slabs.  The vertical pieces were only about 3-4 feet long, and I could handle those myself but the horizontals were very heavy and they would set those for me with a machine.  Well, this was a crap job.  I was supposed to have another welder helping me but that boy never could get his act together and ending up leaving because of an off the job injury.  Even with another welder there was no way I could hang all that steel by myself (also the elevators, handrails and much other misc.) in the time frame they wanted.  I was somewhat flattered in their confidence, or whatever, but no way, no how.  So, they ended up hiring a steel subcontractor to come in and help.  I had the pre-cast on the back of the building and this group of 5 men had the steel on the front.  To be fair, they did have more to hang than me. ha!  Now, for near 20 years, through chance or design, I had worked a great deal by myself.  When I truly needed help I could get it; I never moved a piece a steel that was too much, but if I could handle it myself I preferred it that way.  And, when you work by yourself (whether you're a man or woman), you learn how to move things and hold stuff the smart way because it's not physically possible to manhandle it.  The high art of wedging, cantilevering, prying and clamping come in handy.  So.  I was chugging along the back, hanging my steel like all get out.  I would put a heavy board across the handrails of my lift bucket and then wedge the vertical piece of steel between that board and the embed it welded to.  I had my layout marked on the embeds already so I just tapped the steel with a hammer to get it on spot and to plumb it up.  Magnetic levels are very handy too!  I'd tack that off and then move back, clamp the diagonal brace off to my first piece and just hold the other end until I tacked it.  Easy Peasy.  Double check my plumb and then hard weld everything.  I only needed help after I got all my vertical/ diagonals hung and one of the guys would hold the 30 foot or so horizontal angle up to them with a Lull.  I'd tack weld it on grade, he leave and then I'd finish.  Piece of cake.  So, the new steel crew came out and started on the front.  And this was no rookie crew.  You could tell by looking at them they were seasoned ironworkers.  Well, their first day I came through the building for lunch and I noticed that 3 of those men were crammed into the basket of one man-lift.  Now, that is highly illegal in OSHA's book and our foreman over the steel had a fit when he saw them.  "What in the world are ya'll doing??  Why do you need 3 men in that one spot??"  They stomped and fussed.  "Well, what do you expect??  Got to have one to hold, one to plumb it and one to weld!!!"  Now, Nick, one of our younger foreman at the time, usually goes into a battle of wits unarmed, but the construction gods were kind to him on that day.  An evil, joyous smile quickly spread over his face.   "Well, I'll tell ya'll what..." Nick drawled, barely able to control his glee but trying to feign a serious air. "I got a woman welder around back that's hanging all her steel by herself....I'll go get her to show ya'll how to do it."  Nick said a look of sheer horror came over that steel foreman.  "Hell no! No, no, no!!  Naw, we can figure it out!!  Nick insisted it would be no trouble, that I was a very nice lady and don'tcha know she won't mind a bit but they would have none of it.  Haha!  Imagine that.  I was in the trailer eating lunch with the other guys when Nick came running in to relay the story.  He was laughing so hard we almost couldn't understand him but eventually we all got a huge kick out of that.  He told me later that day he saw two of the welders peeking around the corner of the building to see just how I was doing it on my own.  Of course, every time I passed them after that I made sure to smile big and wave.

Monday, April 02, 2012

Those Old Backroads Again


I suppose I shall always get some perverse pleasure from loading my tools up in Ol' Blue and heading out for the open road. Why, I don't know that I could really say. Joyful associations of my freer and younger days? The simple curiosity to see what is over that next hill? Probably a combination of many things really.


But don't worry dear reader; I haven't reneged on my vow to retire from that life. I just took the weekend to go help a dear friend expand their little vacation house on the river. Being in a flood plain, the house sits up on steel columns and more steel was needed for the expansion, thus the need for a welder. I was happy to help.


It was about 3 hours south of my place and took me to some areas of Alabama I had never seen before. Funny thing, you still see lots of old pecan groves, lots of cattle farms. Just on much flatter land than is around my home.


Nice view when it wasn't covered by my welding hood. Saw lots of ducks and other water fowl. Didn't get a chance to go fishing though. We had to work fairly steadily to be able to get it done over the weekend. Had lots of good food and good company to make up for it however.


Now, this is only about 10 miles south of my place; note the hills in the background. I arrived back at my place about 5:00 p.m. and have been playing catchup ever since, so I may be a little late returning emails or such and now it's way past bedtime. I'll be back soon with more news and photos.

Monday, September 12, 2011

Cracker Box Palace


Well, today has just been a real Monday all around; very frustrating.  I was having so much trouble with Blogger I wasn't sure I was going to get anything posted or not.  But I persisted.  I trudged on for you, my dear readers!  Ha!  I know this blog has really had ya'll on the edge of your seats lately, ya know?
Anyway, these I-beams and tube steel are what I've been working on lately.  How did I get those heavy pieces of steel up there, you ask??  Well, us construction workers are not as dumb as people think!  We have levitation abilities!  No, not really; not anything that exciting.  There was simply decking over the openings when I was working there.  They wrecked the decking today to make the area ready for the elevator men.


 Just thought I'd give ya'll a few different views of the job site.  So far, they have made just over 200 concrete pours on this job.  I have no idea of the yardage.


This is (will be) the courtyard area.  Right now it's a staging area.  If you enlarge the area you should be able to see a lot of the sorted rebar and some finished column reinforcement waiting to be set.
I know sometimes I probably sound like a broken record talking about being safe with projects and stuff and maybe even kind of an alarmist type but this is what I know.  This you see is serious.  We are not playing around and this, in this photo, is one reason why it irks the hell out of me to see these jackleg bloggers giving people dishonest views of concrete and building.  Now, I know ya'll aren't building anything like this.  I know that pouring a patio slab or some other similar DIY project is rarely ever going to end in any serious injury but you have to be careful.  Accidents do happen.  And any structural concrete needs steel reinforcement.
 

I was trying to get both cranes in the shot but it's kinda hard when you are up close.  My stamina is improving and I've been working in the shade the past few days with this welding, so that has helped.  It's not near as hot as it was but even a cool day gets warm if you are welding in the open.  That comes later!  Ugh!
I tell ya, I sure didn't want to come back last night.  I hated to leave home but I keep telling myself it will be good.  I will be able to finish the house and it will look so good and be even more enjoyable to live there.  Well, bedtime comes early these days!  See ya'll!

Tuesday, March 01, 2011

Gates To The Garden

I just love the fact that title is actually a song by Nick Cave and the Bad Seeds! Ha!! So, at long last, here is the garden gates and the incredible pain-in-the-arse to do brick paver entry. Actually, the pavers would not have been such a pain had I paid better attention to what I was doing and not let it get out of square. I guess I was so excited about finally hanging the gates that I tried to rush through the other. That is never a good idea. I backed up though and did it right and now everything is square and straight and looks pretty good. The pavers are not entirely finished on the other side however. I need to finish that soon. I desperately needed to be able to close the garden up, what with food growing in there, so getting the gates hanging took priority after the majority of the brick was down.
I am fairly pleased the the gates but I am going to add a few more touches to them. I have some copper plates that I am going to do some stamping on and add and maybe a few other things. Not a lot, but a little more whimsy.
I also have to clean and seal the gates. I will show ya'll shortly how I made the hinges and hung them and how I did the brick area.

So many green things are springing forth from the ground! The weather has been so nice these past few weeks and I am just ecstatic to have been home, working on these things that make me happy rather than slaving away on some construction site. Not that I didn't enjoy my job but I enjoy building for me so much more!
I feel a lot of creative energy stirred up from this project too. I have many ideas for other things and a lot of enthusiasm to finish what I already have started. God forbid I jinx anything but I feel this is going to be a good year.

Wednesday, February 16, 2011

Groove Is In The Heart

I tell ya what..! between getting to fall back into my clay work and the sculpture and workin' with hot metal and this gorgeous span of weather we've been havin', my mojo is workin' overtime!!! My juju is jumpin'!! I got it goin' on, I'm tellin' you. Ha!! Well, I think the gate project has been rather successful anyway. I can't wait to show ya'll but you're going to have to wait until they are installed to see the whole project. Just snippets 'til then! I am basically finished with them except for cleaning and spraying them with a sealer. Oh, and I have to weld the hinges on but that shouldn't take long.. This is a 2-piece gate and each section probably weighs 80 pounds each, so the posts to hold it need to be substantial.
I did have to go buy some more expanded steel, so that broke my plan to make them entirely out of scrap. I just didn't have as much of the grating that I thought I did and couldn't come up with anything else that would work. The gates need to be solid for the most part to keep rabbits and such from slipping through and making a feast of my garden. By having to buy more steel though, I discovered a local steel supply that I never knew existed and wow, what a great help this is. I had been driving to Birmingham up until now but these people are just down the road and are very nice. I talked to them for a while and they said they gladly sell their drop or whatever I would need. Score!!

I am very excited to have these things done and my garden on it's way to being a real decent project. To me, if the area looks neat and well-kept it is better incentive to get out there and weed and plant things. Of course, if I continue to work at home I think I will have plenty of incentive for the garden. At least I won't be so wore out at the end of the day I don't feel like dragging myself out there.


Monday, February 14, 2011

Easier Said Than Done

This countertop is being a butt, to say the least. Yes, I did screw it up with a bad initial finishing job, so I can't really say much! Unlike many bloggers that only show their successes, I will show you when I bomb something and I have no problem admitting mistakes or screw-ups. I believe I mentioned earlier that the surface did not come out well, but I don't believe I posted any pics of it. Basically, what happened is that the surface cement, after it had cured, was becoming powdery and flaking up, exposing the sand and aggregate below. I am a bit confused on this one though. I know the mix was a little wet when I first poured but I've seen mud poured almost like soup and still get a hard finish on it. Also, after this countertop, I poured the little slab in the basement, and just to be safe, I mixed that slab rather dry using the same mix. It is doing the same thing. Now, initially I thought the mix was too wet and this water sat on the surface too long, causing the surface to weaken. But this really doesn't make sense. I've seen concrete slabs totally submerged by sudden rain, with the water standing on the slabs for hours, and they still finish fine. Now, maybe I'm just that poor a finisher, but I have finished many yards of concrete with no problems. I don't know if the mix was old or what. It came from a place that stores theirs outside and they may not move much of it, meaning it will sit there for a while, but the bags appeared fine when I bought them. No holes, no water stains.
Now, the photo above was taken AFTER I had applied a topping coat to correct the problem. Tearing a slab out is a major pain and I really don't want to do that. Besides, the rest of the countertop, below, seems fine. I applied one coat of topping mix (which is basically portland and sand with bonding agents) very thinly, and it adhered well, but it made a very rough surface. So, I applied another, thicker coat, using additional bonding agent, and troweled a smoother finish on it. Now, it is nowhere near smooth enough but it is better than what was there. I have ordered a pack of diamond sanding/ polishing pads to put the final finish on with. I think most countertop contractors finish their product this way anyway, rather than rely totally on a troweled finish. So, we will see. It's an experiment anyway. Who knows? it might come out with a much more beautiful surface this way.

After I finished with the countertop and was letting that cure, I decided to start the gate for the garden. The weather has been beautiful the past couple of days and promises to stay that way for about a week. I couldn't resist getting out my welding gear. I've been meaning to build this gate for some time and my desire to have a truly fruitful (no pun intended) garden this year means I've got to to get the fence and gate up to par to keep the deer and 'coons and rabbits out. I am truly embarrassed to show you all what I use for a gate now. Plus, it's a pain to go in and out of. This new gate is going to be awesome, if I must say so myself! I am building two, 3 foot wide panels, so you can open one side or both to get larger things, like a lawn tractor, through. It's cool! I can't wait to be finished. Oh, and I am building it solely from scrap metal that I have laying around here. I am not going to purchase anything, except maybe the hinges, if I can't make those.

Tuesday, August 03, 2010

Joy

I got my pantry cabinet today!! Yea!!! I'm so happy. I had to enlist Allen to go pick it up because we are now on 10 hours a day at work so I have virtually no time for such. Anyway, this makes me feel so good. Now when I lose my job I'll have lots to work on here! ha! Speaking of such, they let 3 more of our superintendents go yesterday. I think we are in the final downward spiral.
But on to happy things. These cabinets are maple and yes, there is no finish on them. I'll do that myself so I can use as natural a finish as I can. Not sure exactly what I am going to use. I am very pleased with the quality of these and they were made by a local craftsman. Lowe's couldn't even get in the same ballpark on price or quality. I am also going to pour concrete countertops for all my kitchen cabinets.
The sides are meant to be open; I like open shelves and very minimal styling. And now I can put the flooring down!! Yea!!!

The only thing is I may have some trouble convincing you-know-who that these are not meant for a perfect little hidey-hole.
Well, work was hot today. I think it was 100 degrees actual temperature today with the heat index about 110 or so. It's been that way for several days here. I got to weld all day out in the sun too and when I weld I have to wear two shirts to protect myself from the radiation. One t-shirt and a long sleeve denim over that. Plus big leather gloves and a welding hood. Amazingly, it didn't bother me that much. That is how acclimated to heat I am I guess. I mean, I was hot but I didn't feel bad. However, since I welded galvanized steel I did drink some milk when I got home in an effort to not get the fever that you can get from inhaling the fumes off that stuff. I was tasting the telltale sweetness in the back of my throat by the end of the day. I did have a little wind that helped me out with ventilation also.
I'm tired though so I'm off to bed.


*Lucinda Williams

Tuesday, November 17, 2009

Where Is My Mind?

I guess it's just scattered all over the place lately and I haven't been able to get it together enough to write anything down. Been working at my company's new offices, building a conference table. That's what that monster of a thing is in the pics. My part mainly, was to weld together the steel frame and then the boys will pour a concrete top on it. The top will be ground and polished so the steel grid work will show in the concrete. I think it will look pretty cool.
I was having to weld in a finished room over carpet! We put plywood and welding blankets down over everything but it's virtually impossible to stop all the slag from getting to something.
The offices are a little over an hour from my house so driving to and from didn't leave me much time after I got home and certainly none in the mornings. I was having to get up at 3:45 a.m. to get to job on time.

So, in other news, I'm laid off again. I know the people at the unemployment office are getting tired of seeing me reapply so much. Hopefully, this time I will stay off for several weeks. I have to make some pottery to fire with a plaque I was commissioned to make because it is very inefficient to fire a nearly empty kiln. So, that's a good excuse to throw some. Anybody need Christmas gifts? Other than that it's back to the siding and on rainy days I'll work on my window for the bathroom.
I've been pretty busy the last week or so but I guess I've had a bit of a writer's block too and had many things on my mind. Just having trouble getting thoughts together. We had another very bad accident on one of our jobs; guy got caught between a concrete truck and a concrete wall and you can imagine the results. He is still alive but a good friend of mine was the supervisor for that section and I feel bad for him. Several of my buds from that job have called lately and they are really having a hard time. The work is incredibly hard and they are working them just too much. The guys have said they wish I was working with them but are glad I'm not there because they wouldn't want to have to see me go through what they are. I hope the job is over soon as planned.
We have a few jobs here and there and the company is bidding practically anything now to keep us working and for when all those guys come back from Georgia. Daddy Rabbit is remodeling a couple of bathrooms in a church, if that tells you anything. I mean, I wouldn't be surprised if we find ourselves building a shed in somebody's back yard! But work is work and that's fine.

If you have emailed or commented lately and I didn't reply or was late, please forgive me. And those who asked about saving some of the pics of the lake for screensavers or whatever, that's fine. Help yourself and glad everybody enjoyed them.

*Pixies

Saturday, July 04, 2009

Gates Of Tomorrow

Alright Rich, I finally came up with some stuff! Now, I have no idea what type of materials you have to work with, if you have collected materials or are you going to purchase stuff or what but I think any of these designs could utilize bought or found material. I know this top photo is probably not what you had in mind but I thought it was just a good example of something different, out of the norm. You just have to take the material you have and adapt it to designs you like.

If you look closely, these are all faces! Also, check out this lady's work! Her stuff is fantastic! and very unique. Just click on all of the thumbnails to see a wider gallery of that category.

I don't know if this is what you are looking for Rich but there are just countless things you can do with steel and found material. If your imagination can come up with it, you can build it. I always look through as many books and other stuff as I can and just try to absorb the images of the things I like. Then, when I go to work on my project, those designs seem to come out subconsciously. My pieces always are unique but it might use the idea of vertical repetition, or circular forms or whatever that I saw in other pieces. If say, you have a bunch of metal gears or pipe or even pre-bent rebar, you must completely disassociate the material from what it is and look at only it's shape. If the shape is repeated a certain way, does that look good? If I alternate the shape, is that good? You know, just mix it up. I don't usually go for trying to create things that look like something else (like the faces above) and think that is a mistake most people make. You get too caught up in that and it ends up looking too 'cutesy'. Just go for the sheer abstractness of the design, variation and repetition on shapes and sizes.
Hope this helps and gives you some ideas.

Saturday, July 07, 2007

Under Pressure

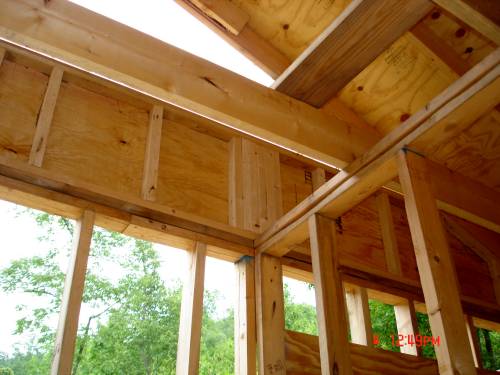
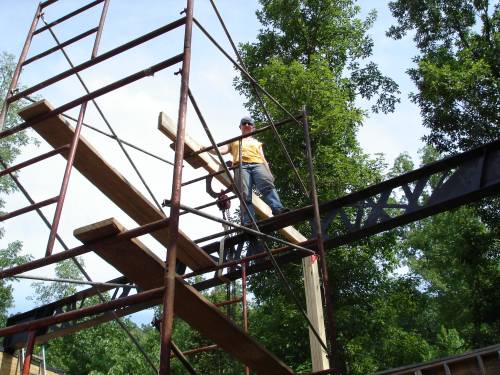
Here is a different view of the clerestory wall and windows that I don't believe I have shown before. I took these while up on the scaffold I am using to sand and paint this wall and the ceiling. Lots of things are happening since I have so much time now to work on the house. I have primed almost all of the walls that got Sheetrock. I completely finished painting the bathroom and it's ready for flooring. More about that later. This wall is primed and ready for the final color. The title of this post refers to the extreme difficulty I have in picking colors. The BFA is of no help lately. He is very busy on real projects so I am mostly on my own with this now. I have only my concept of what he verbally described as wanting this room to look like, which is probably nothing like what he imagined. So, we'll all get over it. It's going to look good I think, at any rate.
I also cleaned the steel beam here and it's waiting it's final coat of wax. Lots of people ask me if this beam has been painted or if I'm going to paint it and I'm not. I left the mill scale, which is a natural, blackish coating that forms on the steel as it is rolled. I love the way it looks and a good coat of wax will keep the edges from rusting. I have installed the screens in these windows so that I can keep them open all the time now. Normally, you would not put the screens in until a house is completely done (they don't usually come with the window anyway) but these windows are not likely to have anyone messing around them. I think having them open helps a lot to vent the hot air in the house. I have a thermometer in the house and with no air conditioning, the house usually stays about 10-12 degrees cooler than the outside on a sunny day. Now, that's not too bad but on days when it reaches 95, that can get warm. I think with the addition of ceiling fans, it will be a little cooler or feel like it anyway. I plan on having air conditioning but it will probably have to be a window unit for a while.

This is just a close up of the rafter tails. I am using a natural polymerized linseed oil/beeswax finish on the rafters and plywood decking. It is a beautiful golden color, completely natural, biodegradable finish, VOC-free and smells wonderful. The beeswax gives it anti-static properties also so they claim surfaces finished with it won't attract dust. I had to order this stuff from New York and it was kind of expensive but I think its worth it for the health factor. By getting so much salvaged material for free etc. I feel I can splurge some on a few things like this. These rafters don't have anything on them in this photo. The tail part (spruce) of the rafter ( #2 yellow pine) is going to be stained a slightly darker color (which I started today) to accent them a little from the rafter. It took a long time to finish around each of these tails and make the Sheetrock look good.


This is not a very good shot but I was trying to show something of the bathroom. I am having to mix my own colors due to the fact that I was given various paint. You get it free but have to take what is available. Hey, but I'm not complaining! It's worked out really well. I was able to mix up just the right color in a kitchen and bath semi-gloss. The colors are not showing up well in these photos though. This is a light sand color that goes great with the slate floor and I will have white trim. I wanted to show the shower to show that you can finish Durock just like Sheetrock. It would be pretty pricey to tile the shower all the way to the ceiling so I am going to stop it about 18" from the top. You have to skim the Durock maybe a couple more times than Sheetrock but you can't tell where one leaves off. Here, I have cut in my corners and am about to roll the walls.
I did a little investigating on the VOC levels in paint as far as what is considered unhealthy and all. Anything above 150 grams per liter is generally considered not good. All paint, stain etc. now has this information on the label so I checked out the stuff I got and it was all around 60-85 grams/liter except the semi-gloss in the bathroom. It was 163 g/l but I figure I will just leave the windows open slightly until I'm sure the paint has dried to let everything air out good.
Tomorrow I plan to continue finishing the ceiling and rafters so maybe I will have photos of that soon. I think it looks great so far. I am very excited!!!


Monday, June 25, 2007

Stacked

This weekend was very productive and some noticeable things are going on at the house. My mason buddy (Charles) came Friday and Saturday and started closing up the underside of the house. We ran out of block so it's not completed but I hope to be able to scrounge up some more soon. Now, when completed, this block will not show on the outside of the house. A stone planter will be built in front of the block and stone will top out the wall above the planter. I got the block for free and am trading for the labor to lay it, so I thought it would save me time and rock gathering labor to do it this way. If you notice the bright pink ball of string in the bottom right of the photo, Charles said he bought that just for me and this job. It takes a manly mason to use pink string. I wonder if he will carry to any other jobs though.

Due to lack of planning more than poor planning, lots of cuts had to be made and so that is why this little bit of block took 2 days to lay. I had originally thought the whole wall would be stone and so footing steps, column lines etc. didn't matter. They matter a lot if you lay block. But he was very kind about it and did a beautiful job. I told him it didn't have to be so neat but he wouldn't have it any other way because he said someone might see it before it got covered up. And I thought I was obsessive-compulsive.

I welded these ties on every 16" vertically (to hit in every other joint) and then painted my welds with primer. You can see that the ties have a slot that the little wire can move up and down in so you have about 3" in case the tie isn't in exactly the right spot. This block has been "buttered" and is waiting for the next block to be set on top.
I also had to serve as the laborer because a mason usually does not mix or carry any mud, block or tools. So, after proper instruction, I mixed the mortar, kept it on the boards, kept it wet, carried and placed block, made some cuts and generally tried to keep Charles from having to do anything but lay the block. I did not succeed on everything. I cooked lunch for him and welded a fender back on his trailer too so maybe I did my part for the weekend. He claims that he has not laid block in about 10 years (2 back surgeries) so I said this was sort of like a limited edition wall then. I'm proud to have it at any rate. At the end I also provided some comedy for him because he wanted me to try laying the last couple of block. Let me tell you, it's much harder than it looks. But I did see the tricks to it and, as I told him, I learned a lot. I learned I don't want to be a mason.
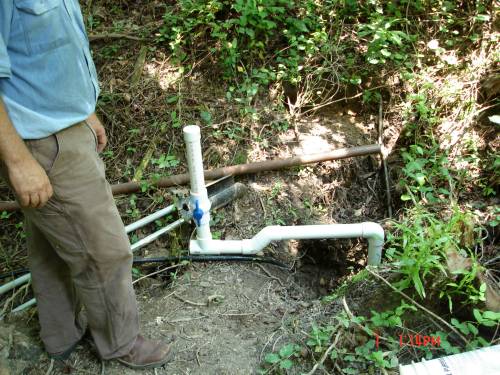
We had some friends visit who have been watching the blog for a while and that was fun although I didn't get to talk with them a whole lot due to work. Allen got most of the pump house framed and we both worked on wiring it on Sunday. After a pain in the butt ordeal we finally got the wire pulled and the connections made and he set the pump today. We may try to move the pressure tank tomorrow.
I'm still out of work. Maybe that won't last much longer because things are getting pretty slim as far as being able to buy materials for the house. But it will all work out fine.


Wednesday, February 28, 2007

Heavy Metal

I thought I would show this shot of the job I am on now since this is a more typical job for me instead of the Big House. Jobs like that house are few and far between. Anyway, I was brought over to this job to weld up that red steel you see towards the bottom of the photo. It is a support for a movable wall basically. This is in a huge multistory office building in Birmingham. Work like this can be a pain even though I love welding because you can get in some really tight places when you add to existing structure. You have to cram yourself up in all that pipe and concrete and over and under stuff and then strike this arc only a few inches away sometimes. You get burned a lot etc. It always cracks me up that the box of welding rods comes with these instructions that say "teach the welder to keep his head out of the fumes". I would like to send the manufacturers of the rods a letter saying " teach yourself to cram these rods up your #$%^%&". Well, I mean, we are not stupid; we know to try to avoid breathing that stuff but it's very hard not to breathe the fumes and now alot of older welders have Parkinson's. But I enjoy what I do and make a pretty good living. Oh, there are 2 other women construction workers on this job! I couldn't believe it. Also, this piddleling (sp.?) thing (the steel) had to be inspected and out of all the other big, structural stuff I've done in 13 years, this is only the second or third time I have had to be inspected and show my papers. That figures.
I'll try to have more about the house soon. More is happening. I am also trying to figure out how to list the blogs of other people that I read like everybody else does on their blogs. I'm a moron when it comes to stuff like that but I have noticed that I am listed on others blogrolls and want to do the same on mine.

Tuesday, August 15, 2006

5 Months, 2 Weeks, 2 Days

Well, I haven't been gone quite that long but it was longer than I thought. Time flies when you're having fun or just working way more than you should. Not alot was going on with the house itself for awhile as we were trying to get a road in the backway for the power company to bring the lines in. I don't want them to come in down the driveway but that's another post. Anyway, this past weekend we were back to framing and got the roof over the kitchen area framed, decked and mostly felted. Many thanks to our good friend Ted who came and helped us on Saturday. It takes quite a bit of time to cut out and sand all those rafter tails.
Allen didn't have a good pair of tennis shoes to wear on the roof so I got decking duty. That's okay though. That's one thing that you can look back at and really feel like you accomplished something cause you can cover so much square footage with just a few sheets of plywood.
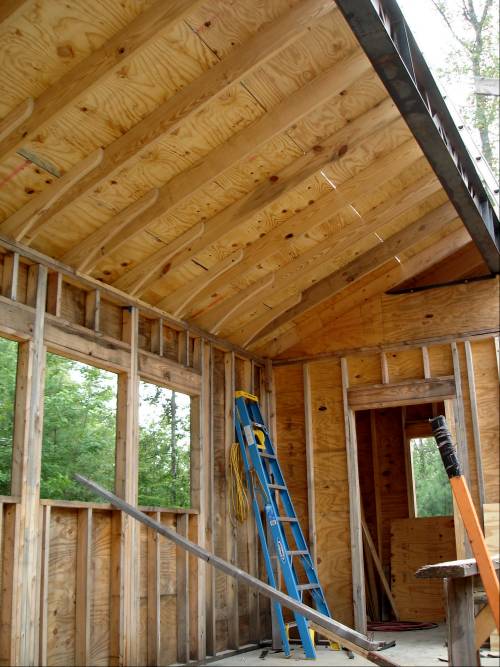
We are using 5/8" CDX plywood for the decking and since the rafters are going to show on the inside we will put the roof insulation (1 1/2" rigid foam board)on top of the decking between sleepers with the metal roofing on top of that. I will use some type of nice 1/4" plywood or other covering (bamboo?) to finish the interior ceiling between the rafters. The clerestory windows will frame up next over the metal beam here and then we will put up the rafters that span the living room area.
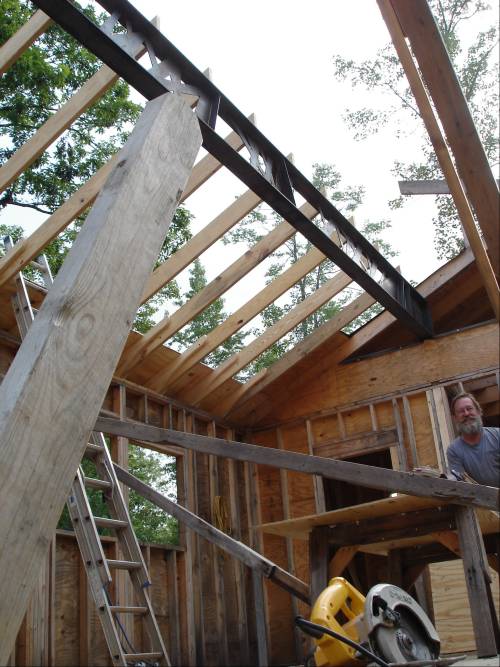
I just LOVE the way the rafter tails look on the inside when you get a whole wall of them. The bottom of the metal beam here is at about 10'- 8" so it's a nice, open feeling but not too high I don't think. It feels very comfortable to me. I'm very excited by this! It almost feels like a house!! I hope everyone now can see how this monstrous beam I built is going to work. I know it's hard to imagine some of this crazy stuff without seeing real drawings. We are still winging it a little but I am happy with how its coming. Well, looks-wise not time -wise. I am so ready to get moved in. When we get the whole roof on it might be camp out time!!

Monday, July 24, 2006

Oh, Happy Day

I think Allen and I were so happy to see this thing finally go up that he got a little trigger happy with the camera. Normally, I have to tell him, "make sure you get a photo" but he did all this on his own. Of course, then he said he wanted some topless but I told him that nobody would realize he didn't have his shirt on.
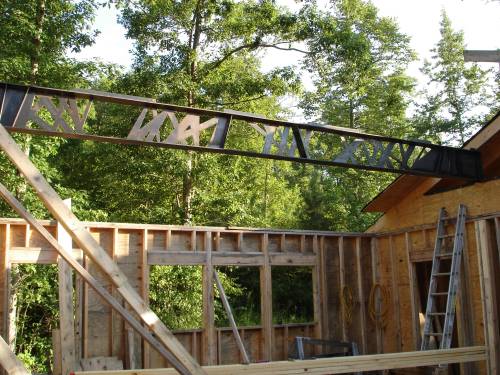
I am fastening the beam down here to the box beams with lag bolts and then later the framing for the roof etc. will fasten to the top of the steel beam and hold it more.

It's higher up than it looks! It took less than an hour I think to set this thing once we had rebuilt the rigging and stuff. I'm glad this part is over! Now, he says he is going to take me out for sushi to celebrate. We'll see. I still have alot of clean up on it to do also before it's completely done.

This photo should give you a better idea of how it sits in the house and how it will carry the rafters. I know up until now what I have shown didn't make alot of sense probably.
Here, all of the rigging is down and gone. Just have to start the framing again! YEA!!!! I am pleased with how it come out. I think it looks really cool! The architect will probably hate it even though it's his own design.

Monday, July 10, 2006

Come Together

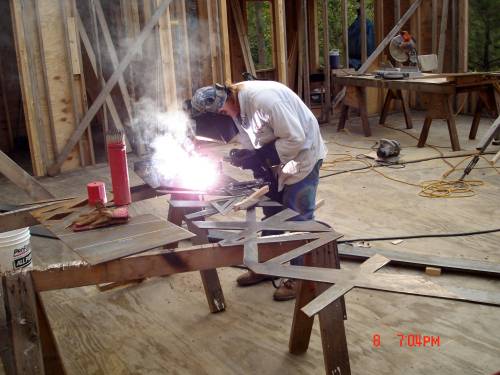
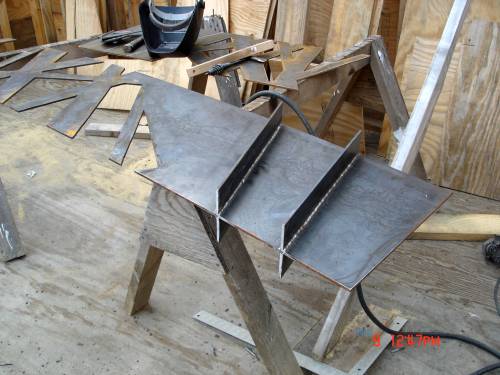
The actual welding of the truss has begun!! Here I am putting on some stiffeners that will hold the flanges from pivoting. Not that they would anyway once they're welded but these things are handy to hold the webbing upright as we are positioning them.
Finished product. The 2 end pieces of webbing each got 2 pair of stiffeners and the 2 middle pieces of webbing just got 1 pair each. This took longer than I expected but then, everything does I think.
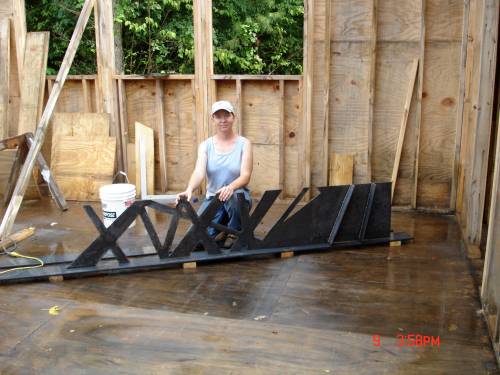
I'm just trying to show scale in this photo. We really don't have good room to get a shot of the whole truss at once. After it is in place we can though.
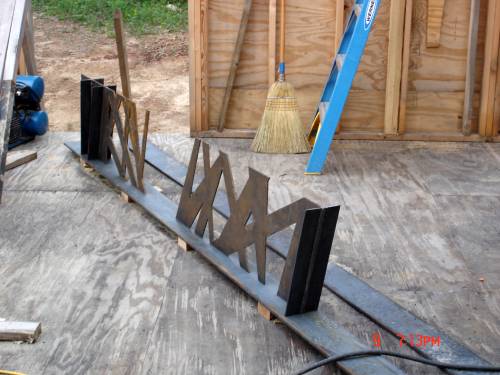
This is the other end. I was just placing the pieces on the flange about where they go as I finished them. We are going to have to do some measuring and see exactly how much space we can have in between each section of webbing. I'm afraid we are going to have to add either another small section of web or a solid piece to each end. I believe we have too much space within the truss and not enough webbing to cover it. We can't space the web out too much or it becomes a structural issue. That is the top flange laying on the floor behind this stuff. After all the web is in place and tacked we will place the top flange on and square it up etc. and then weld it.

Wednesday, July 05, 2006

Oh, What a Tangled Web.....

OK! So it's all cut out! The webbing for the truss that is. I finally got it all cut out and polished and ready to start welding together yesterday ..... and then it started raining. So, next weekend maybe. These pieces are 18" tall and 1/4" thick. I just grouped them all together so I could get a good shot, so this photo may not make any more sense than the drawings. But soon you will see that I'm not crazy and that these pieces do actually make something. The big one in the middle has been darkened and oiled and the others had not, that's why you see shiny, silver places on them but they will all be dark when finished.
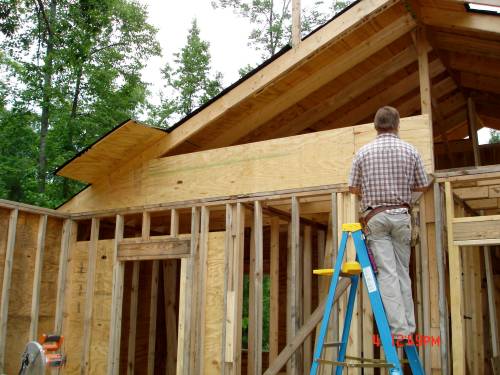
Here, Allen is building the box beam that will support the truss on top of the walls. A box beam is basically a stud wall with 2 layers of plywood on both sides, glued and nailed like crazy.
The plywood layers are staggered of course, to increase the strength. We are using a commercial construction adhesive for gluing.
This is the beam from the other side where the 2 layers have not yet been put on so you can see the framing. This one did get completely done and we have to build one more for the other side of the room.

Saturday, July 01, 2006

Red, Hot and Blue

I thought this title would be good with the 4th a couple of days away and also, I've been in a Cole Porter kinda mood lately! Well, I have gotten all of the webbing sections cut out for the big truss and will start welding them together tomorrow if all goes well. I had a little trouble at first with these things because we just had one old, ragged tip for the cutting torch and it was too big for the size steel so I was getting alot of slag adhesion. We got a new tip though and now it cuts like a dream! Happiness is a warm cutting torch!
Here you can see most of one of the sections leaning up against the horses. Three of the sections are about that same size and then one that's real big. Anyway, not very exciting I know but it actually was to me. It's like a big sculpture. Made me remember why I got that art degree. Despite the incredible heat today I had a blast. It has been in the upper 90's here for several weeks now and there's nothing like being bent over molten steel to just add a little more heat to it all.
Allen started on the siphon today that will draw water up out of the spring and take it down to a reservoir where it will then go to a hydralic ram and be pumped to the house. Or that's the theory anyway. The spring here in this photo is about 9 feet deep. It has gone down some lately because of lack of rainfall but it seems to be putting out quite a bit of water still. Allen added a long run of pipe from this siphon down to the stream and it was putting out about 5 gallons a minute the last time we checked. We are going to monitor the flow and see if the spring can keep up. Of course, we don't need that much water flow but we want to see what we've got to work with and can adjust it down later. More about this later when we know more about what we are doing. This is something that we are just having to experiment with. We don't even know that the hydralic ram will work but at worst we will just have to pump the water from the reservoir to the house with an electric pump. I don't think we can use a solar pump because it's much too shady in that area.